

Accounts Mapping for ServiceNow
This section describes how to configure an Account Mapping (environment) for the ServiceNow Custom Agent using the Multi-Org Mapping web application in NICE CXone UserHub.
An account mapping links a ServiceNow Organization (Org ID) to a dedicated NICE CXone connector under a single NICE business unit (tenant). This configuration represents the foundational prerequisite for multi-organization onboarding; you must create and register an environment before you can configure its associated Channel Mapping or Presence Sync Mapping.
Enable RBAC Permissions for ServiceNow Mapping Tabs
Before administrators or users can create and maintain mappings, verify that role-based access control (RBAC) permissions are assigned in CXone UserHub. These permissions determine tab visibility and permitted administrative actions.
-
Sign in to CXone UserHub as an Administrator.
-
Go to Admin → Roles & Permissions.
-
Select the role that should be allowed to use the mapping webapp, or create a new role for ServiceNow mapping administrators.
-
In the permissions list, find Connections Hub, then expand ServiceNow mapping.
-
Enable the required permissions for each tab:
-
Account Mapping — enable View to display existing account mappings, Create to add a new environment, Edit to update existing mappings, and Delete if the role should be allowed to remove mappings.
-
Channel Mapping-enable the same action permissions if the user needs to view, create, update, or delete channel mappings.
-
Presence Sync Mapping: enable the same action permissions if the user needs to view, create, update, or delete presence sync mappings.
-
-
Select Save.
-
Assign the updated role to the required users, or ask the users to sign out and sign back in so the new permissions are applied.
 View image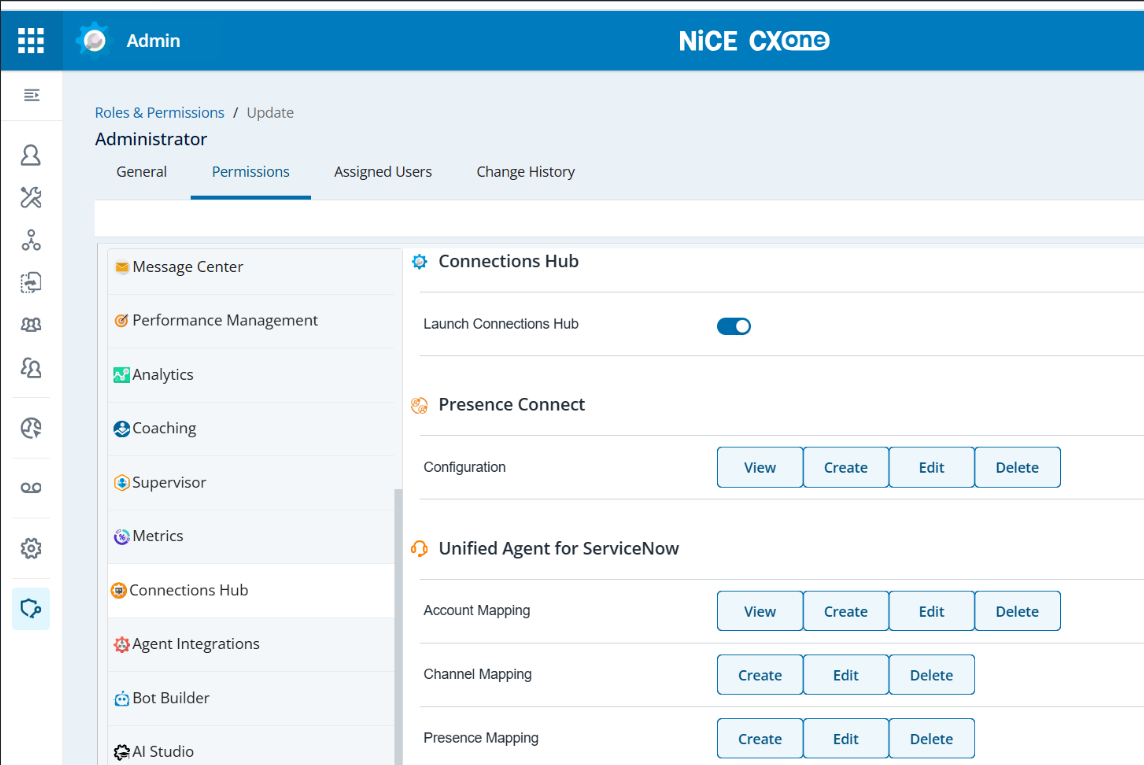
Permission Behavior Reference
| Access Level | Observed UI Behavior and Capabilities |
|---|---|
| No Access | The mapping tab or content is not available to the user. |
| View Only | The user can open the tab and view existing mappings, but cannot create or edit records. |
| View + Create | The user can view mappings and register new environments. Modification controls for existing mappings remain disabled. |
| All Access (View, Create, Edit, Delete) | The user has full administrative privileges to view, register, edit, and remove mapping records. |
Prerequisites
Before you begin the account mapping procedure, verify that the following requirements are met:
-
You have administrative access to CXone UserHub for the target cluster.
-
The Connections Hub > ServiceNow mapping permission on your user.
-
At least one unmapped ServiceNow connector is configured and available in the tenant.
-
A valid email address is available to associate with the environment.
Create an Environment in Account Mapping
-
In CXone UserHub, open Applications → Connections Hub.
-
In the left navigation menu, expand Custom Integrations → Servicenow.
-
Select the Account Mapping tab.
-
Select Add New Environment.
-
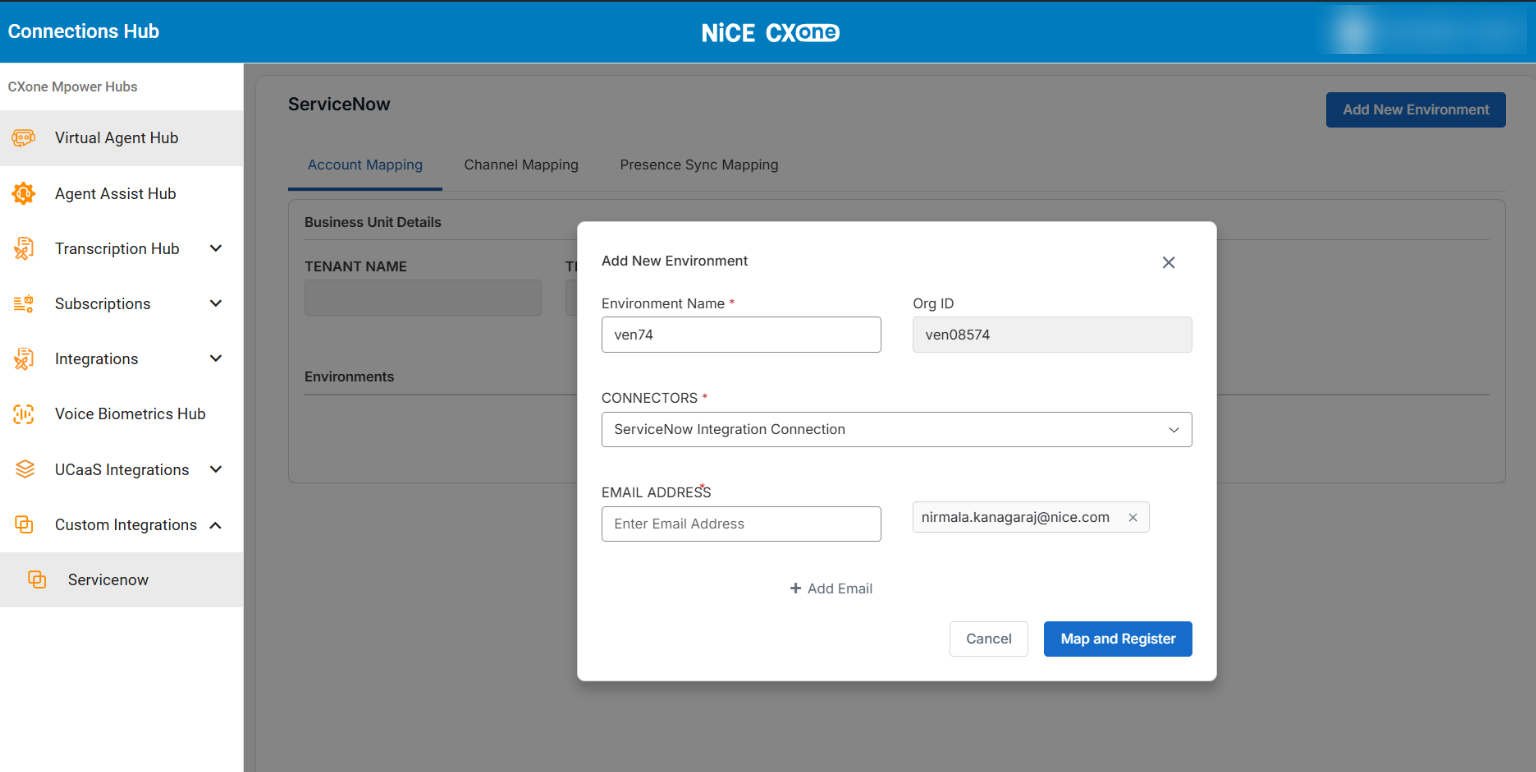
In the Add New Environment dialog:
-
Environment Name: Enter a friendly organization name (e.g., Production_Instance).
-
Org ID: Read-only, system-assigned.
-
CONNECTORS: Select an unmapped ServiceNow connector from the dropdown.
-
EMAIL ADDRESS: Enter the contact email address for this environment. (Select + Add Email to add multiple contacts.)
-
-
Select Map and Register.
The dialog box closes, and the new environment is displayed in the Environments grid.
-
The Map and Register button remains unavailable until all required fields are completed. If the button is not available, verify that a connector is selected.
-
If the Connectors list is unavailable and displays “All ServiceNow connectors are already mapped to an environment”, all available connectors are in use. To continue, delete an existing mapping or create a new connector.
-
Select Cancel to close the dialog box and discard your changes.
-
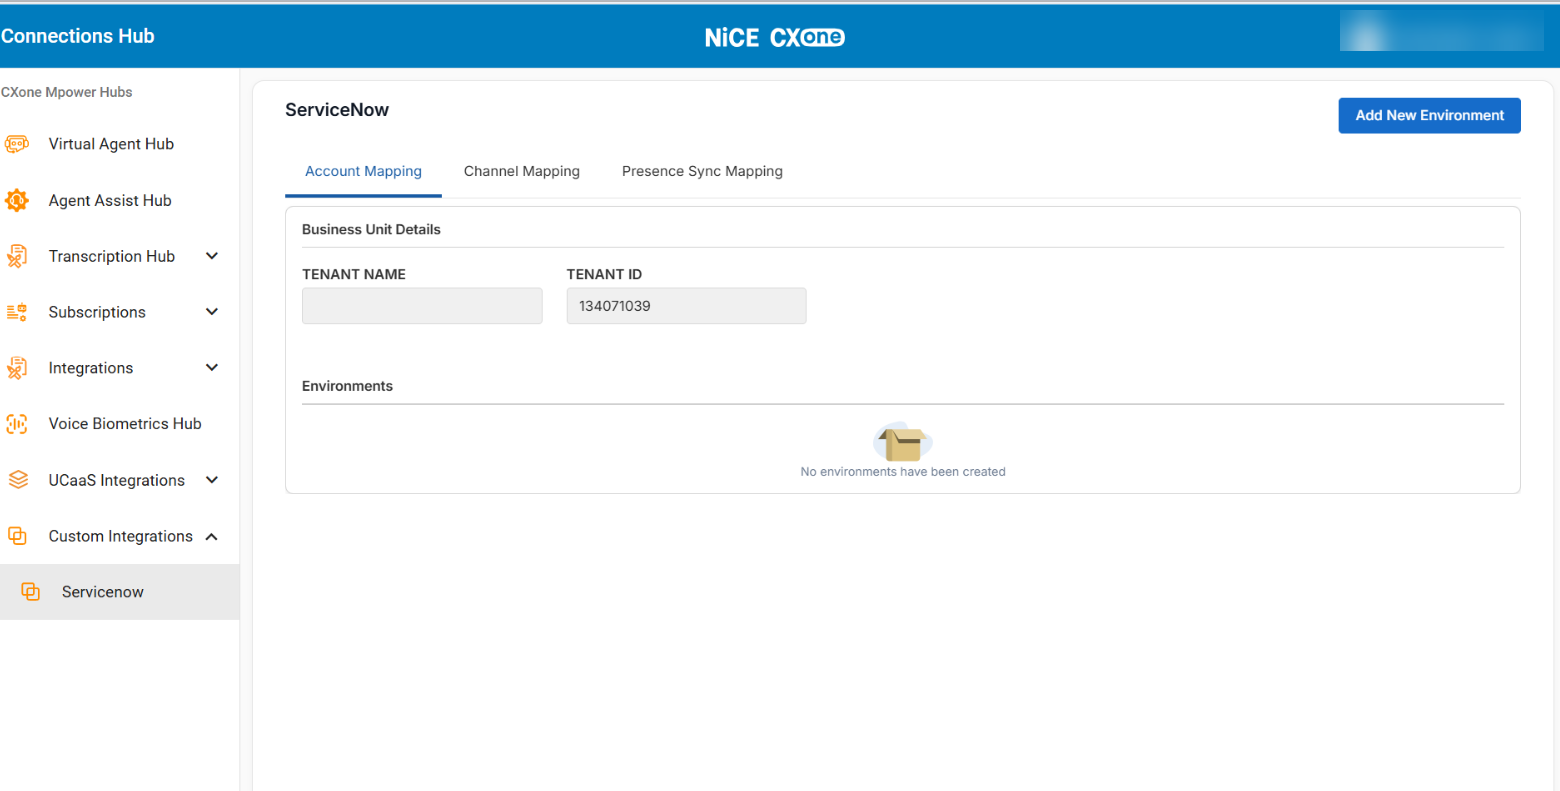
Account Mapping Page Layout.
| UI Section | Description |
|---|---|
| Business Unit Details | Displays the TENANT NAME and TENANT ID. These read-only fields populate automatically based on your active business unit. |
| Environments | Displays active mappings with the following columns: NAME, ORG ID, CONNECTOR, EMAIL ADDRESS, and ACTIONS. |
| Add New Environment | Button (top right) that opens the create form. |
Field Reference
| Field Name | Requirement | Guidelines & Description |
|---|---|---|
| Environment Name | Mandatory | Free text. Chosen by the person creating the mapping |
| Org ID | System Assigned | Read-only identifier generated automatically by the platform. Cannot be edited during or after creation. |
| CONNECTORS | Mandatory | Only connectors not already mapped to another environment are selectable |
| EMAIL ADDRESS | Mandatory | At least one required; use + Add Email for more |
-
Single mapping: Each connector can be mapped to only one environment.
-
Read-only Org ID: You cannot edit the Org ID after creating the mapping. Only the organization name and email addresses can be modified.
Next Steps
After successfully registering the environment, proceed to configure its dependent mapping modules. Select the registered environment from the top-level Environment selector on each corresponding tab:
-
Channel Mapping: Map NICE CXone digital channels to ServiceNow interaction channels for this organization.
-
Presence Sync Mapping: Define the synchronization rules between NICE ACD agent states and ServiceNow presence states.