NiCE Unified Agent Application – Installation & Setup
Overview
This page provides a step-by-step guide to install and configure the NiCE Unified Agent Application integrated with NiCE CXone using OpenFrame, Interaction Control, and External Routing.
Prerequisites
Ensure you have Admin access to the ServiceNow instance before proceeding.
Please install one of the following workspaces based on your requirements:
-
CSM and FSM Configurable Workspace Foundation (sn_cwf_wrkspc)
-
Service Operations Workspace ITSM Application (sn_sow_itsm_cont)
-
Agent Workspace for HR Case Management (sn_hr_agent_ws)
Select and install the workspace that best aligns with your use case.
Required Applications & Plugins
Navigate to Admin → Application Manager and install the following applications and plugins:
-
Interaction Control Component

Detail Value App ID sn_int_control -
This application automatically installs the following dependent plugins:
-
OpenframeLink – sn_openframe
-
Contact Center Integration Core – sn_ct_ctr_it_core
-
Omnichannel Callback – sn_omni_callback
-
OpenFrame – com.sn_openframe
-
-
-
Advanced Work Assignment – External Routing Support
Detail Value App ID com.glide.awa.external -
Mandatory. Automatically installs:
-
Advanced Work Assignment – com.glide.awa
-
-
-
Customer Service Management
Install this plugin only if you are using CSM and FSM Configurable Workspace.
Detail Value App ID com.sn_customerservice -
NiCE Unified Agent: Install the NiCE Unified Agent Application provided by NiCE.
Create users and assign roles
This section describes step-by-step instructions to create users in ServiceNow and assign roles for:
-
Agent User
-
Integration User
Prerequisites
-
Admin access to ServiceNow instance
-
Role → user_admin
If you do not have the user_admin role, contact your ServiceNow administrator to request the necessary permissions before continuing.
User Creation (Agent / Integration User)
-
Login to your ServiceNow instance.
-
Navigate to: All › User Administration › Users.
-
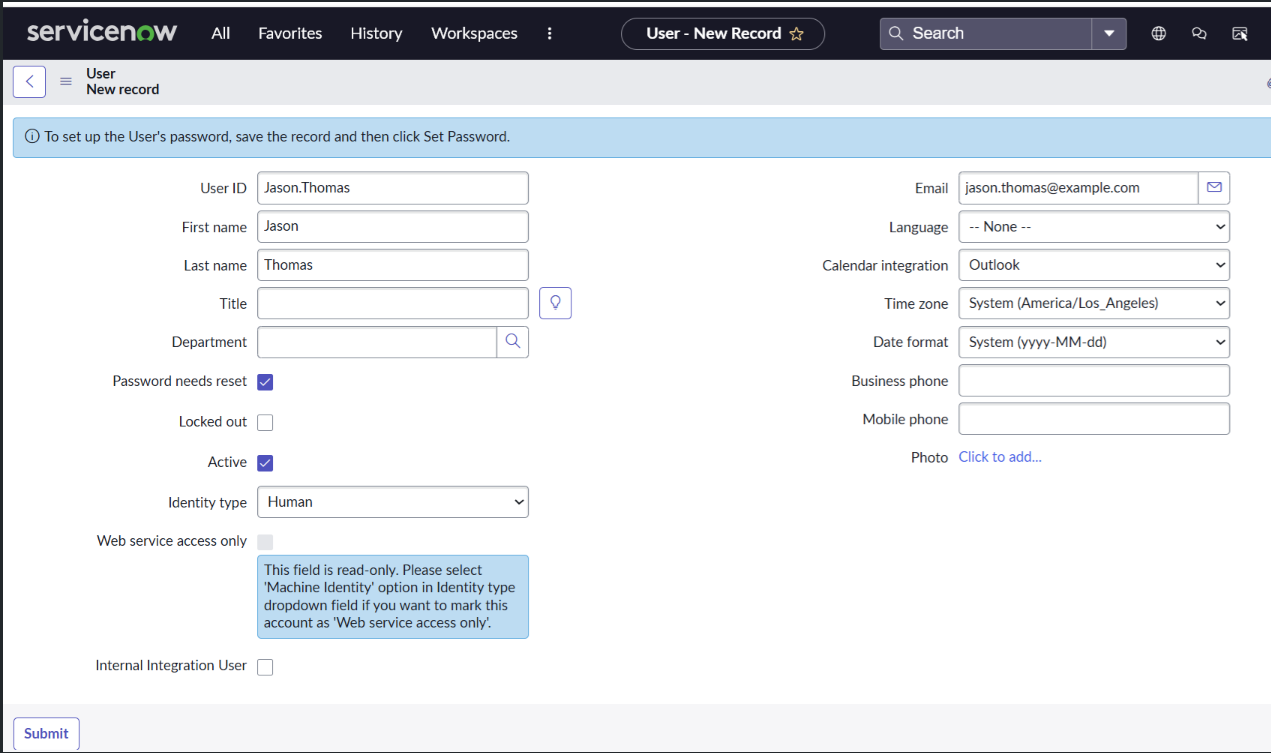
On the Users list page, select New.
-
Complete the required fields for the new user:
-
User ID — Enter a unique identifier.
-
First name and Last name — Enter the user’s name (or a descriptive name for an integration account).
-
Email — Enter the user’s email address.
-
Password — Set an initial password.
-
Configure the following check boxes:
-
Select the Active check box to enable the account.
-
Select the Password needs reset check box so the user is prompted to change the password at first sign-in.
-
-
Select Submit to create the user record.
The Active check box must be selected. An inactive user cannot authenticate or process interactions.
Role Assignment for Agent User
-
Navigate to: All › User Administration › Users.
-
Open the created Agent User.
-
Scroll down to the Roles tab.
-
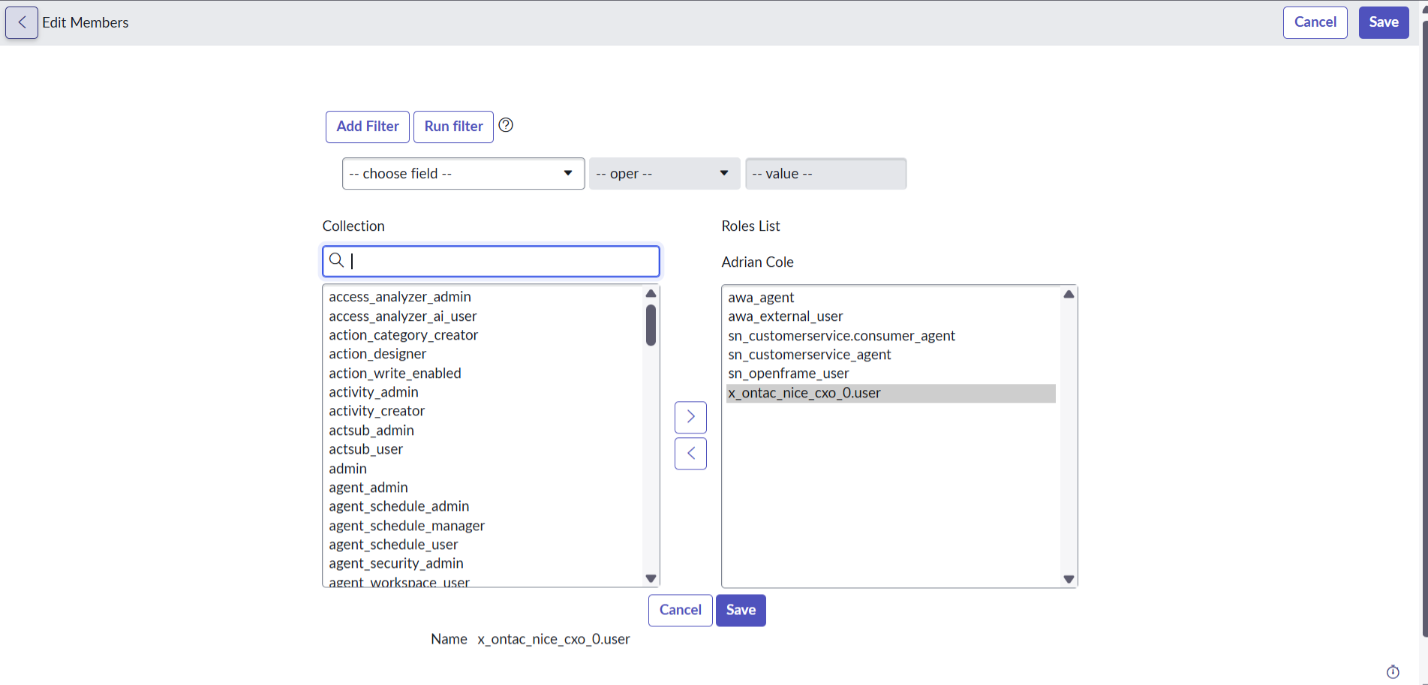
Select Edit.
-
In the Collection list (left pane), search for each role listed in the table below and use the right arrow (>) to move it to the Roles List (right pane). Required roles for the Agent User
Workspace-Specific Additional Roles:
-
If you are using Service Operation Workspace, assign the additional role itil to the agent.
-
If you are using HR Agent Workspace, assign the additional role sn_hr_core.basic to the agent.
Role Purpose awa_external_user Grants access to the Advanced Work Assignment framework as an external channel user. sn_customerservice.consumer_agent
Enables the agent to manage consumer-facing customer service cases.
sn_customerservice_agent Provides core Customer Service Management (CSM) agent capabilities. awa_agent Allows the user to receive work items through Advanced Work Assignment. sn_openframe_user Enables the OpenFrame communication toolbar in the ServiceNow interface. x_ontac_nice_cxo_0.user Standard user access for NiCE CXone scoped app.
-
-
After you add all required roles, select Save.
Role Assignment for Integration User
-
Navigation to: All › User Administration › Users.
-
Open the created Integration User.
-
Scroll down to the Roles tab.
-
Select Edit.
-
In the Collection list (left pane), search for each role listed in the table below and use the right arrow (>) to move it to the Roles List (right pane).
Required roles for the Integration User
Role Purpose awa_integration_user Provides API-level access to the Advanced Work Assignment framework. awa_manager
Allows management of AWA queues, channels, and routing configurations.
interaction_agent Enables the account to create and manage interaction records. interaction_integration_user Grants integration-level access to the interaction framework. snc_internal Provides internal platform access required for service account operations. sn_customerservice.consumer_agent Enables consumer-facing customer service case operations via API. sn_customerservice_agent Provides core CSM agent capabilities for interaction processing. sn_openframe_api_user Grants API access to the OpenFrame telephony integration. snc_basic_auth_api_access Allows the service account to authenticate using basic authentication for API calls. x_ontac_nice_cxo_0.admin Grants administrative access to the NICE CXone scoped application. x_ontac_nice_cxo_0.user Grants standard user access to the NICE CXone scoped application. -
After you add all required roles, select Save.
After you assign roles to both users, verify the configuration by signing in with each account and confirming that the expected modules and features are accessible.
Assign Groups To User
-
Navigate to:
-
All → User Administration → Users
-
-
Open the User record to assign groups.
-
Scroll down and select Groups tab.
-
Click on Edit.
-
On the Group Selection screen, select the required groups from the Available Groups and move them to the Selected Groups list to add the user to those groups.
Ensure that the user is assigned to the same group(s) configured in the OpenFrame configuration. Otherwise, the user will not be able to access OpenFrame.
After you assign roles (and groups) to both users, verify the configuration by signing in with each account and confirming that the expected modules and features are accessible.
Configure system properties
Configure the system properties that ServiceNow requires to communicate with NiCE CXone.
-
In ServiceNow, go to All and search for sys_properties.list.
-
In the System Properties table, filter for properties with the prefix x_ontac_nice_cxo_0.
-
Open each property listed below and update the Value field as described.
If the properties prefixed with x_ontac_nice_cxo_0 are not found in the System Properties table (sys_properties.list), switch the application scope to NiCE Unified Agent using the globe icon in the header, and create the properties.
-
Select Save after updating each property.
Required properties
| Property name | Description | Example value |
|---|---|---|
| x_ontac_nice_cxo_0.acd_base_url | ACD base URL for CXone API calls. | https://api-na1.niceincontact.com |
|
x_ontac_nice_cxo_0.authentication_base_url |
CXone authentication base URL. |
https://cxone.niceincontact.com |
| x_ontac_nice_cxo_0.business_unit_id | Your CXone Business Unit ID. | (Your Business Unit ID) |
| x_ontac_nice_cxo_0.cxa_base_url | Combination of the CXone Agent application URL and ServiceNow instance base URL. | https://cxagent.nicecxone.com/servicenow/index.html?base=https://<<instance>>.service-now.com/ |
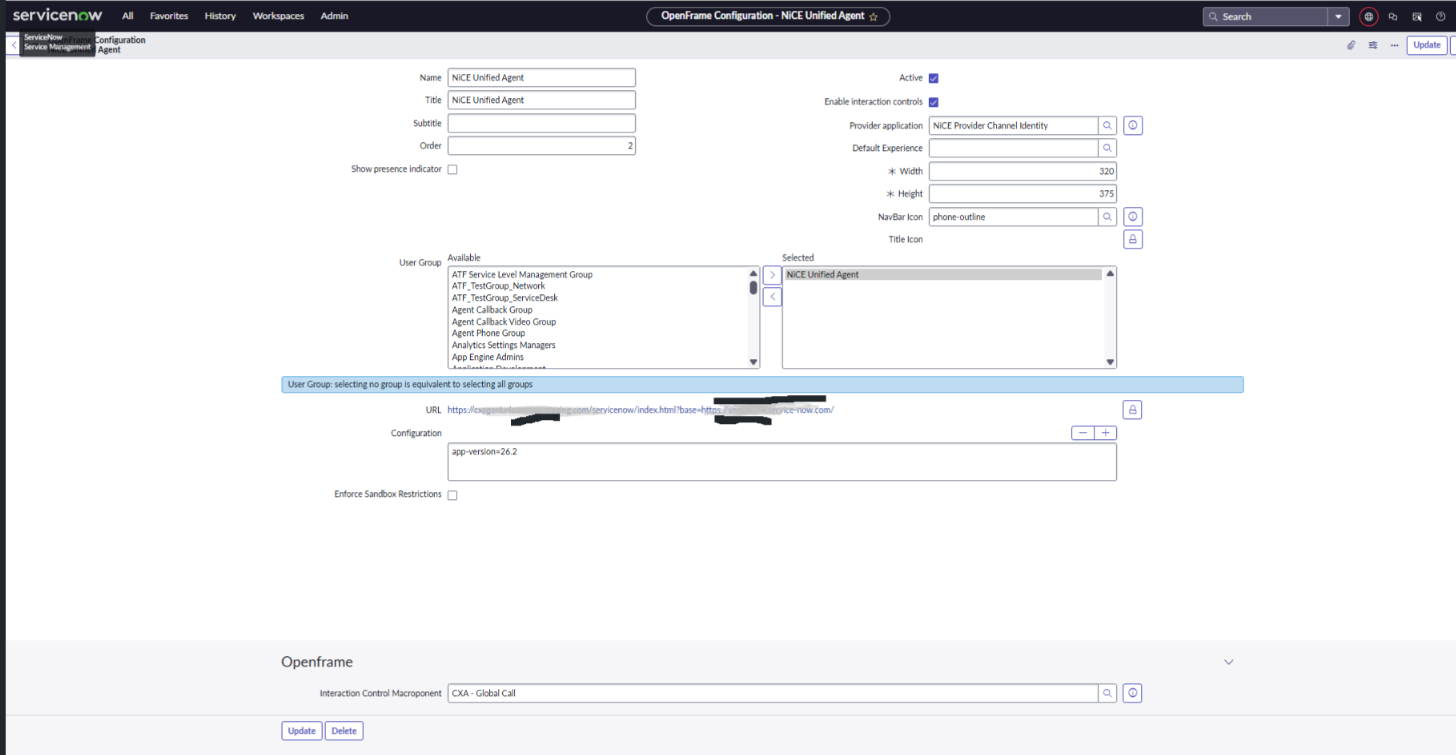
Configure OpenFrame
Configure OpenFrame to launch the NiCE CXone Agent application inside ServiceNow.
-
Navigate to All > OpenFrame > Configurations.
-
Select New to create a configuration.
-
Complete the fields as described in the table below:
Field Description Name A descriptive name for this OpenFrame configuration. Title
Title displayed in the OpenFrame header.
Subtitle Subtitle displayed in the OpenFrame header. Order Priority order. The configuration with the lowest order value takes precedence when multiple configurations exist. Enable collapsed view Allows agents to expand or collapse the OpenFrame window. Default: False. Show presence indicator Displays the agent's availability status in the header. User Group Limits access to selected groups. Leave empty to allow all OpenFrame users. Active Select this checkbox to activate the configuration. Enable interaction controls Select this checkbox to enable call controls on the Interaction page. Width Width of the OpenFrame window (in pixels). Height Height of the OpenFrame window, excluding the header (in pixels). Icon Class Set to icon-phone or icon-video. Title Icon Icon displayed in the OpenFrame header. Configuration JSON configuration field. See Configuration field below. Provider application Set to NiCE Provider Channel Identity.
URL Configuration
This URL defines the page that will be launched inside the OpenFrame panel.
The URL should be composed as below:
-
Application URL to be launched within OpenFrame.
-
Include the query parameter base with the value as the base URL for the ServiceNow instance.
The base parameter is mandatory because it allows the embedded application to identify and communicate with the correct ServiceNow instance.
Format: <APPLICATION_URL>?base=<SERVICE_NOW_INSTANCE_BASE_URL>
Example:https://cxagent.nicecxone.com/servicenow/index.html?base=https://<instance>.service-now.com
Configuration Field
Update the configuration field with the application version installed on the ServiceNow instance.
If the latest released Custom Agent build version is 26.2-CXCA-SNOW-Agent, then update the configuration field as follows: app-version=26.2
This configuration value must be updated every time a new Custom Agent version release to get latest updates.
Interaction Control Macroponent
• Set Interaction Control Macroponent to: Global Call
-
Select Submit or Update to save.
Set up inbound integration
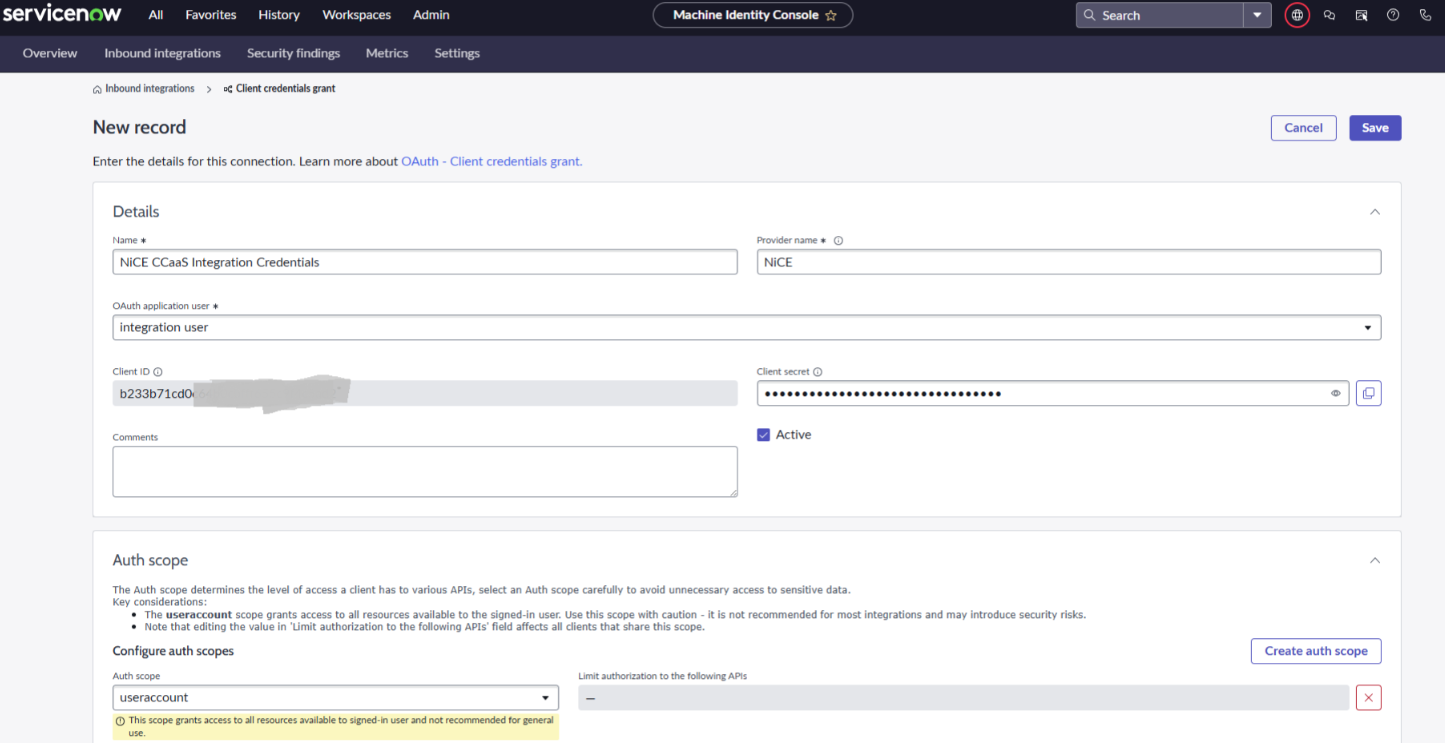
Inbound Integrations allow you to configure and manage external applications to access ServiceNow APIs.
Before creating the Inbound Integration, ensure that you change the application scope to NiCE Unified Agent using the application scope selector (globe icon) in the ServiceNow header.
-
Navigate to All and search for Inbound Integrations. Open the result.
-
Select New Integration > OAuth – Client credentials grant.
-
Complete the fields as described below:
Field Description Example Name A descriptive name for the integration. NiCE CCaaS Integration Credentials Provider name
Name of the service provider.
NiCE OAuth application user Select an integration user account. Integration User Active Select to activate the credentials. Checked Comments Optional description of this integration. - Auth scope Defines the access scope for the integration. Select useraccount -
Select Save.
Do not modify the auto-generated Client ID and Client Secret values.
Fallback Steps
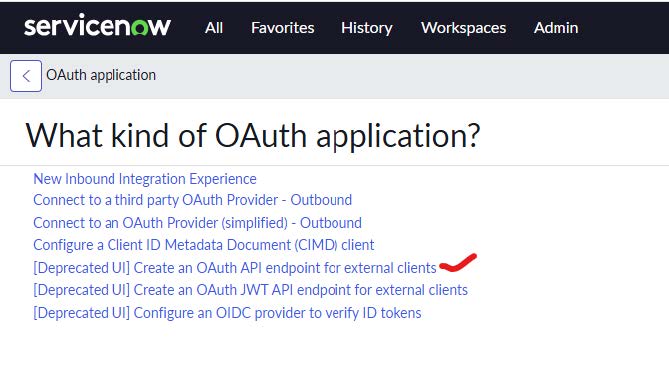
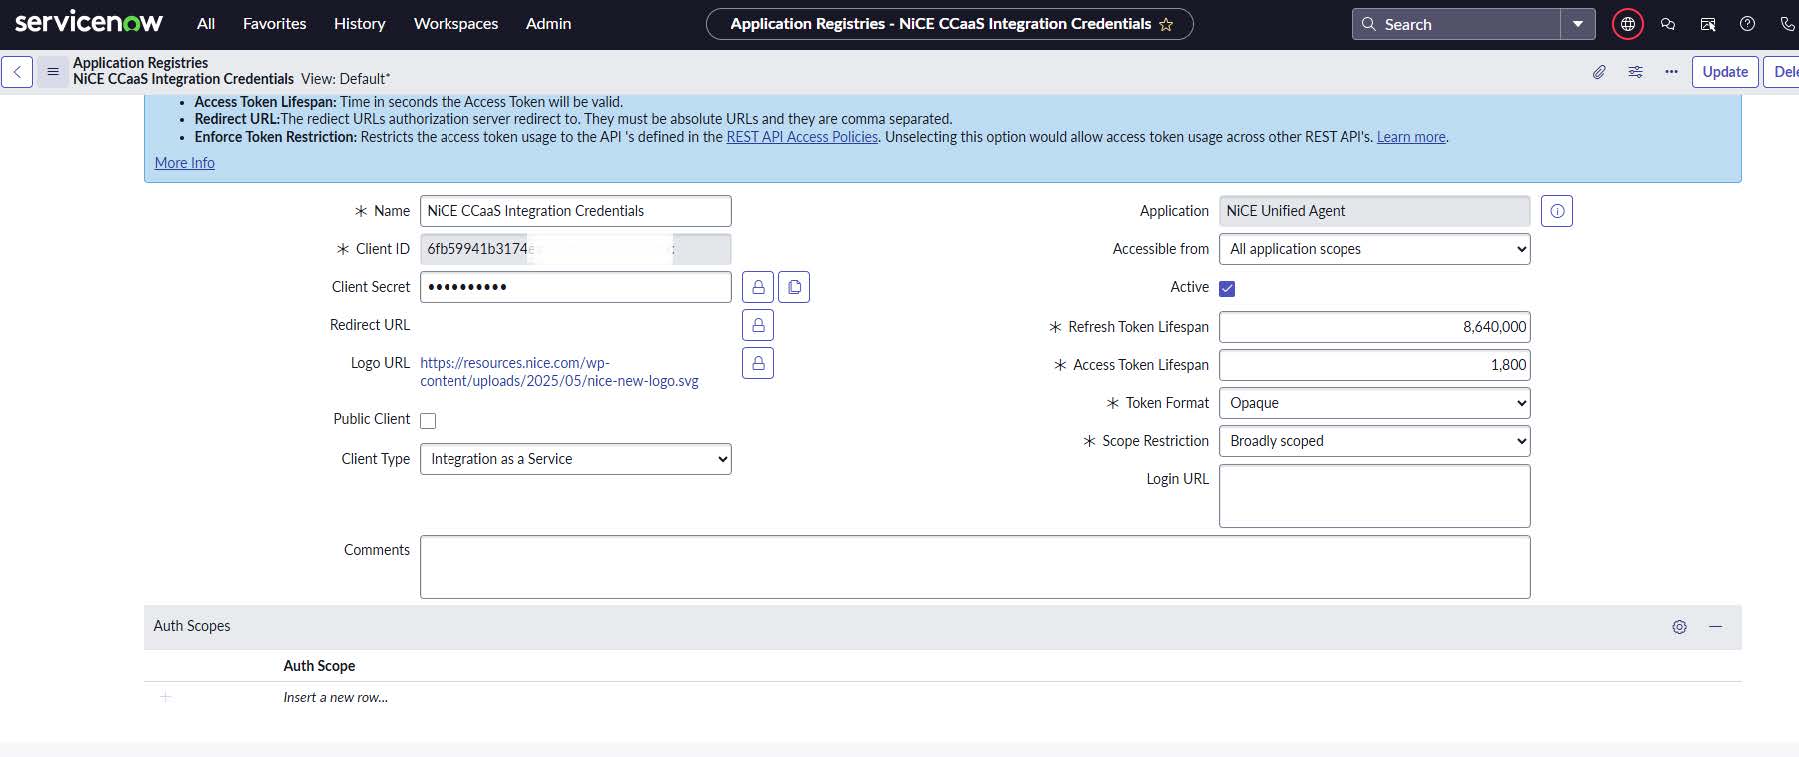
Follow these fallback steps if you are not able to complete the Inbound Integration setup using the steps above.
-
Go to the All menu, search for oauth_entity_list.do, and press Enter.
-
Click the New button.
-
Select [Deprecated UI] Create an OAuth API endpoint for external clients.
-
Fill in the details as shown in the screenshot (Name, Client Type, Active).
NiCE Credential Store Setup
External Routing must be configured to enable CXone-based routing with ServiceNow AWA.
This section describes how to configure the NiCE credential store in ServiceNow so that the NiCE scoped application can authenticate API calls to NiCE CXone.
Prerequisites
-
Advanced Work Assignment (AWA) plugins – Installed and activated on the ServiceNow instance.
-
NiCE Custom Agent Application (Scoped App) – Successfully installed on the ServiceNow instance.
-
Integration User with Admin role – A dedicated CXone user account that holds the Administrator role with My Access Key permission enabled. This user provides the client credentials for authentication.
-
UserHub Application – A registered UserHub App (at the Tenant, Multi-Tenant, or Region level) with a valid Client ID and Client Secret.
Enable Access Key Permissions
-
Log in to CXone UserHub using valid Admin credentials.
-
Navigate to: Admin → Roles & Permissions.
-
Click on the Administrator role.
-
Under the Permissions tab, locate the following sections:
-
Access Key
-
My Access Key
-
-
Enable the following permissions for both sections:
-
View
-
Create
-
Edit
-
Delete
-
-
Click Save to apply the changes.
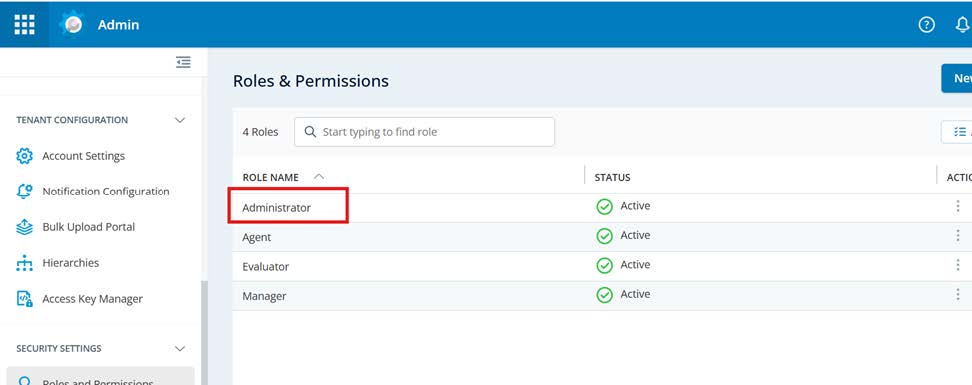
Steps To Generate Access Key for Integration User / Admin (ignore if already generated)
-
In CXone UserHub, select the user profile icon in the upper-right corner.
-
Select Access Key.
-
Copy and securely store both values:
-
Access Key ID
-
Access Key Secret
The Access Key Secret is displayed only once during creation. Store it immediately in a secure location. If lost, you must generate a new access key.
-
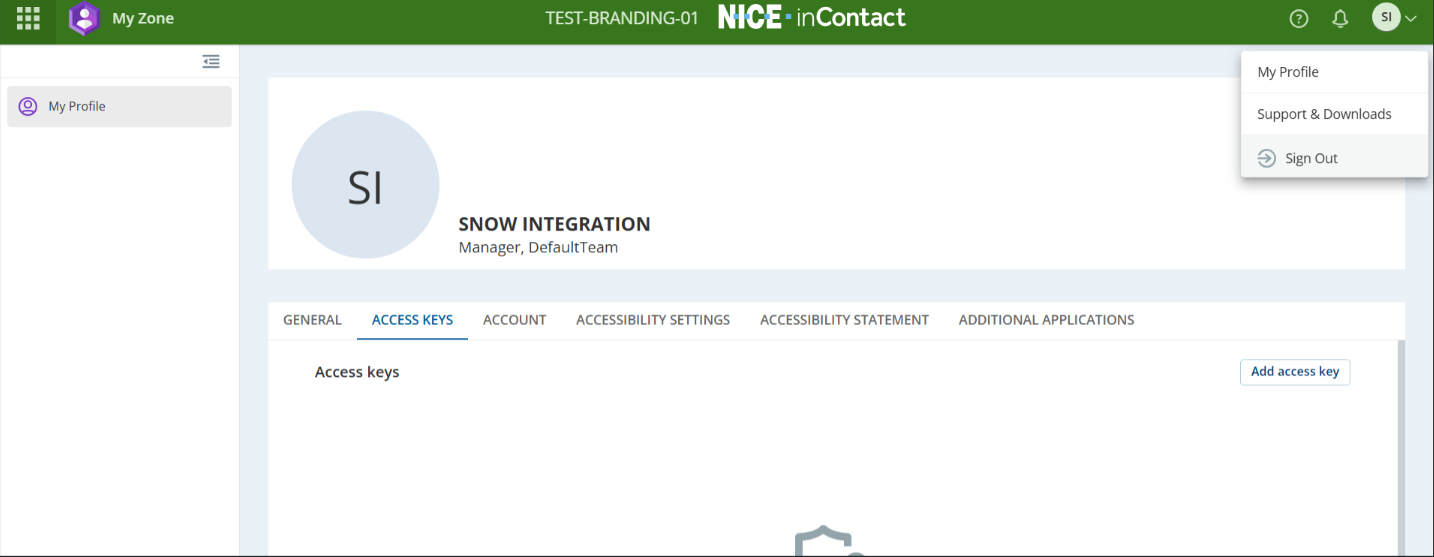
Configure the NiCE Credential Store
-
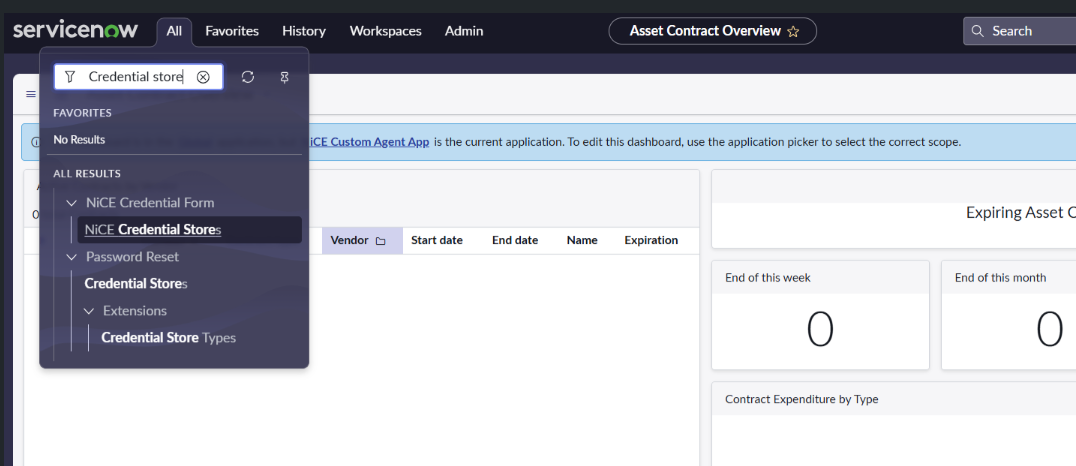
In ServiceNow, use the navigation filter to search for Credentials Store and open it.
-
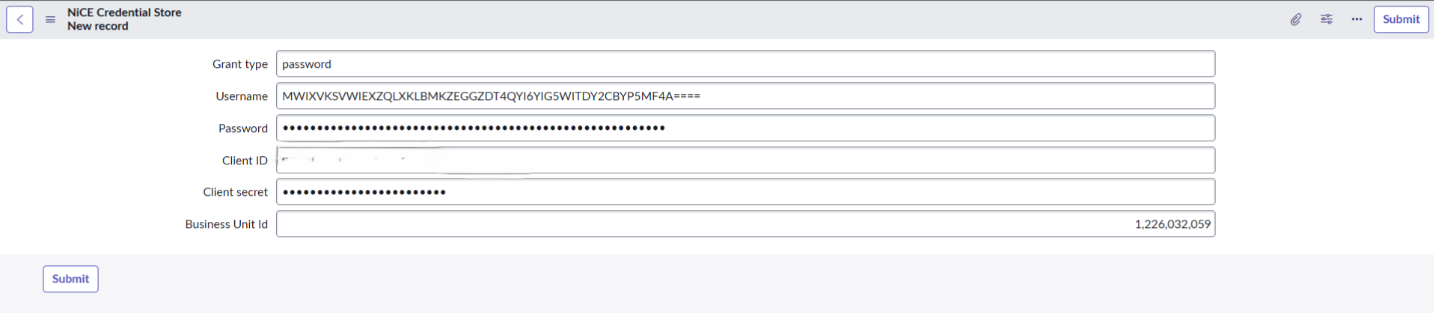
Select New to create a new credential record.
-
Complete the fields as described in the following table:
Field Description Grant Type password UserName
The Access Key ID of the Integration User.
Password The Access Key Secret of the Integration User. Client ID The Client ID of the registered UserHub Application. Client Secret The Client Secret of the registered UserHub Application Business Unit ID The Business Unit identifier, available from the CXone Tenant Details page. -
Select Submit to save the credential record.
To obtain the Client ID and Client Secret for the UserHub Application, contact your Release Manager (RM) or the Product Team.