Required permissions:
-
ACD Settings: Agent Patterns
-
ACD Configuration: Agent Session Control Via API
-
Admin General Permissions: Access Key and My Access Key
-
Adapters: Adapters, Account Mapping, and Directory Sync Configuration
Before You Begin
-
Before creating a directory, you must create apps if you intend to use Microsoft Teams or Zoom. No application creation is necessary for RingCentral or Unify. For help with this, contact your account representative. If you want to sync phone numbers with specific prefixes or other formatting requirements, you must create an agent pattern set so that Advanced Directory Sync will translate the phone numbers correctly.
 Create an Azure application for Microsoft Teams
-
Sign in to Azure Active Directory with a Microsoft Teams administrator account.
-
Create a new application registration.
-
For Supported Account Types, select Accounts in any organizational directory and personal Microsoft accounts. By selecting this option, you register a multi-tenant application that can also support users with personal Microsoft accounts (MSA).
-
Click API permissions > Add a permission > Application permissions. Add permissions to your application. Be sure to select User.Read.All. An administrator should have the following permissions:
- User.ReadWrite.All (Application): Required for the application to create system users.
- User.ReadWrite.All (Delegated): Required to create subscriptions.
- Presence.Read.All (Delegated): Required to read presence information.
- Presence.ReadWrite.All (Application): Required for the application to set the presence for the user.
- Create a client secret. Make a note of the client and tenant IDs. You will need both when you map the account.
Create a Zoom application
-
Log in to Zoom App Marketplace with an administrator account.
-
Build a new Server-to-Server OAuth app.
-
Take note of the account ID and client ID. You will need these when mapping the Zoom account.
- Click Generate and take note of the client secret. You will need it when mapping the Zoom account.
- Click Continue.
- Enter the App name, Short description, and Company Name under Basic information and the Name and Email address of the admin under Developer Contact Information
-
Click Continue.
-
Fill out the following fields:
-
Subscription name
-
Under Event Notification Endpoint URL, enter https://presencesync.niceincontact.com/rta/v1/zoom/web-hook-api/<Zoom Account ID> and click Validate. You can only validate the URL after completing the account mapping process.
-
-
Click Generate beside Secret Token and take note of its value. You will need it when mapping the Zoom account.
-
Under Event Types, select the event subscriptions for Directory Sync and Presence Sync. Separate subscriptions are created for each application.
-
If you are creating a Zoom app for Directory Sync, select the following events:
-
User
-
User has been created
-
User has been disassociated
-
User has been deleted
-
User has been activated
-
User has been deactivated
-
User's profile info has been updated
-
User's settings have been updated
-
User has accepted the account invitation
-
-
User Activity
-
User has signed in
-
User has signed out
-
User's presence status has been updated
-
User's personal notes have been updated
-
-
-
If you are creating a Zoom app for Presence Sync, select the following events:
-
User Activity
-
User's presence status has been updated
-
-
Zoom Phone
-
Callee ended a phone call
-
Caller ended a phone call
-
Caller is connected to the callee
-
Caller answered a phone call
-
-
-
-
Click Continue.
-
Select the following scopes:
-
View all users' contacts
-
View all users' phone information
-
View all user information
-
View users information and manage users
-
View all events information
-
-
Click Done and then click Save.
-
-
You must also map your partner application to NiCE CXone before creating a directory so that they can share information. App creation is needed prior to mapping accounts because you will use details from app creation while mapping accounts.
Create Directory
-
Click the app selector
 and select Adapters.
 -
Click Directory Sync > Create Directory.
-
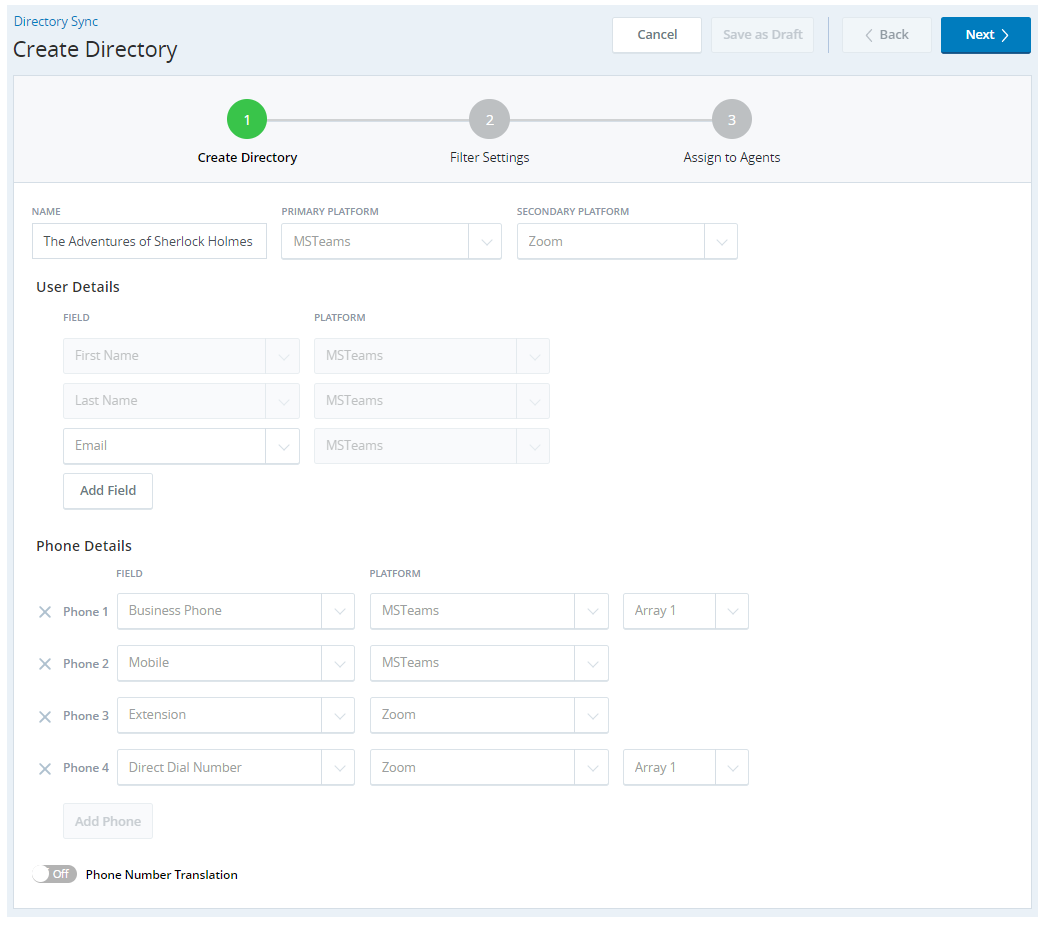
Enter a Name and select a Primary Platform from the drop-down. If you would like, you can enter a Secondary Platform from the drop-down too. This will populate the User Details and Phone Details fields.
-
Configure the User Details as needed. Select which field you want to be used from the partner platform, and then select which platform the directory should use. The following fields display to the agent in their directory: (other fields are used for filtering)
- First Name
- Last Name
- Phone Numbers
- Department
- Job Title
For example, select First Name and then MSTeams. The directory will sync the First Name value from Microsoft Teams.
The Primary Platform, Secondary Platform, and fields that you select will be the same across directories.
-
Configure Phone Details as needed.
- Select which type of phone number to be used from the partner platform then select which platform the directory should use. For example, select Business Phone and then MSTeams. The directory will sync the Business Phone value from Microsoft Teams.
- If there are multiple phone numbers of the same type, you can select a value from the Array drop-down to rank the phone numbers.
-
You can enable Phone Number Translation. If the partner platform phone numbers have any format requirements, such as specific prefixes, you can create agent pattern sets. Once you've enabled Phone Number Translation, if you have created agent pattern sets, you can select the dialing pattern from the drop-down.
-
Click Next.
-
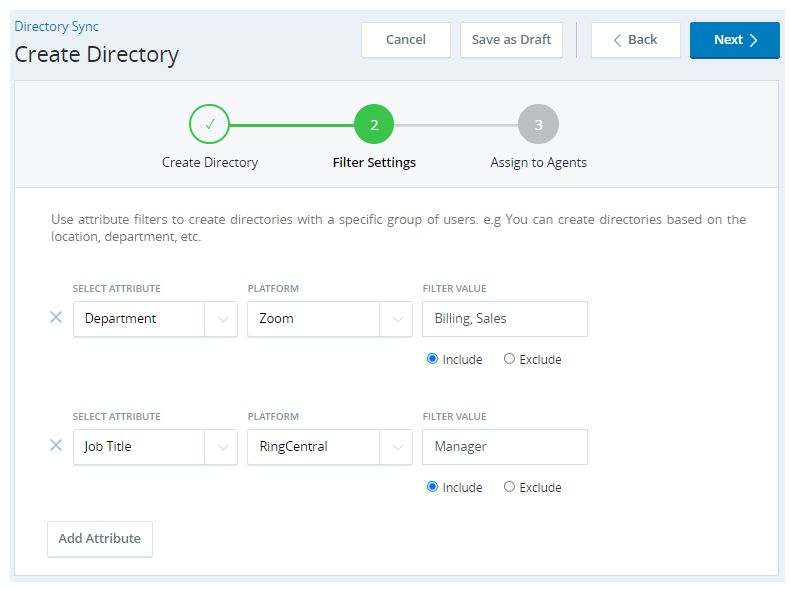
Configure the Filter Settings by using the drop-downs: Select Attribute, Platform, and Filter Value. Then select whether you want the attribute to be included or excluded. For example, select Department, MSTeams, and then enter Sales, Billing. Select Include to include Sales and Billing departments from Microsoft Teams in the directory.
-
Click Next.
-
Use the Assign Agents drop-down to pick Users, Teams, or All Agents. This will determine which agents have access to the directory. Once you select a team or agent, your choice shows in the Selected tab to the right.
-
Click Save & Activate.
You can create a maximum of five directories.