This topic provides guidelines for configuring Genesys T-Lib interface with SIPREC for Real-Time Third Party Telephony Recording (Multi-ACD).
Genesys site engineer is responsible for all procedures in the Genesys environment. The procedures described in this section are by recommendation only!
Follow these steps to set up the Genesys T-Lib interface with SIPREC:
Step 1: Prepare Genesys T-Lib Environment
Step 2: Prepare AudioCodes Session Border Controller (SBC) to integrate with Real-Time Third Party Telephony Recording (Multi-ACD):
Step 3: Download and save the Essential Data for 3rd Party Connectivity Config in NiCE CXone Excel file. You will be required to fill in essential information as you proceed. Once you have finished entering all the necessary details and prepared your environment for Real-Time Third Party Telephony Recording (Multi-ACD), you must submit the Excel file to your NiCE Professional Services Engineer.
Prepare Genesys T-Lib Environment
You must configure the Genesys T-Lib before configuring Real-Time Third Party Telephony Recording (Multi-ACD).
Perform these steps to prepare the Genesys T-Lib environment:
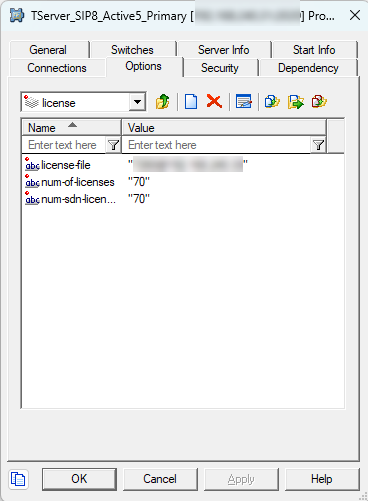
Step 1: Verify Genesys License
Step 2: Verify Genesys T-Lib Listening Port
Step 3: Configure RTP Password for Genesys T-Lib
Verify Genesys License
To enable NiCE NiCE CXone to monitor interactions within the Genesys T-Lib environment, you must obtain the appropriate licenses from Genesys, which cover both device and agent seat access.
The following license information is provided for reference only. For detailed licensing requirements, contact Genesys directly.
Types of Monitoring Licenses
-
tserver_tdn – Required for monitoring devices.
-
tserver_sdn – Required for monitoring agent seats.
These licenses allow NiCE NiCE CXone to monitor all available PBX devices, such as agent extensions, positions, VDNs, ACD/Queue components, IVR/VRU ports, and other routing entities. In addition, they enable full support for CTI features, including compound call tracking, call direction, and trunk information.
To verify license availability in Genesys Configuration Manager:
-
Open Genesys Configuration Manager.
-
Navigate through the configuration tree to locate the Genesys T-Server.
-
Right-click the T-Server Application and select Properties.
-
Go to the Options tab.
-
Select a license from the list.
-
Confirm that there are sufficient licenses available for your monitoring needs.
Verify Genesys T-Lib Listening Port
To verify the listening port configuration for the Genesys T-Lib:
-
In Genesys Configuration Manager, navigate through the configuration tree to locate the relevant Genesys T-Lib.
-
Right-click the required T-Server Application and select Properties.
-
Go to the Server Info tab.
-
Identify and provide the Listening port number to the NiCE Professional Services Engineer.
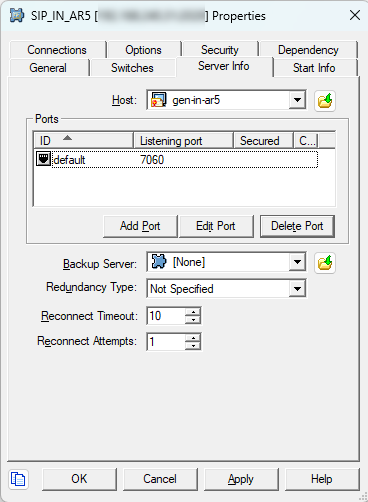
If you are configuring High Availability (HA) for a T-Lib, provide the listening port number for each application in the HA pair.
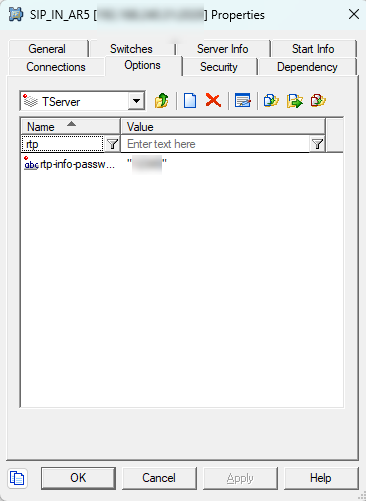
Configure RTP Password for Genesys T-Lib
In a VoIP environment where CTI-activated active recording is not used, it is necessary to identify the IP address—and sometimes the port—of the RTP stream carrying the call audio. If the IP address of the IP phone is dynamic (e.g., assigned via DHCP), this information must be obtained from CTI events known as RTP events.
RTP events are supported only in Cisco CUCM and Genesys T-Lib configurations and are not enabled by default. To activate RTP event reporting, you must configure the rtp-info-password parameter on the Genesys T-Lib. This password is then used in the NICE environment when setting the RTP Password parameter in the Genesys interface.
To enable RTP events:
-
In Genesys Configuration Manager, navigate through the configuration tree to locate the relevant Genesys T-Lib.
-
Right-click the required T-Server Application and select Properties.
-
Go to the Options tab and select TServer.
-
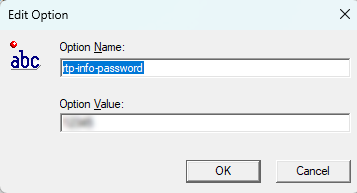
Use the filter to locate the rtp-info-password option.
-
Double-click rtp-info-password to open the Edit Option window.
-
In the Option Value field, enter the desired RTP password.
-
Click OK, then click OK again to close the TServer Properties window.
-
Repeat this process for each T-Lib in a High Availability (HA) pair, and provide the configured RTP password to the NiCE Professional Services Engineer.
Prepare AudioCodes SBC
This section describes how to prepare and configure the AudioCodes Session Border Controller (SBC) to integrate with Real-Time Third Party Telephony Recording (Multi-ACD).
The supported AudioCodes SBC version is 7.4.
The procedures described in this section are recommendations only. The AudioCodes site engineer must perform the AudioCodes preparation and configuration.
The SBC must have a valid TLS certificate installed. The certificate must be signed by a trusted Certificate Authority (CA) listed in the Supported Certificate Authorities for SIPREC section.
Workflow
Use this workflow to prepare your AudioCodes SBC system for secure SIPREC configuration with Real-Time Third Party Telephony Recording (Multi-ACD).
Step 1: Verify the License
Step 2: Configure the Proxy Set
Step 3: Configure Secure IP Profile
Step 4: Configure the IP Group
Step 5: Import and Export Certificates for SIP Recording
Step 6: Configure SIP Recording
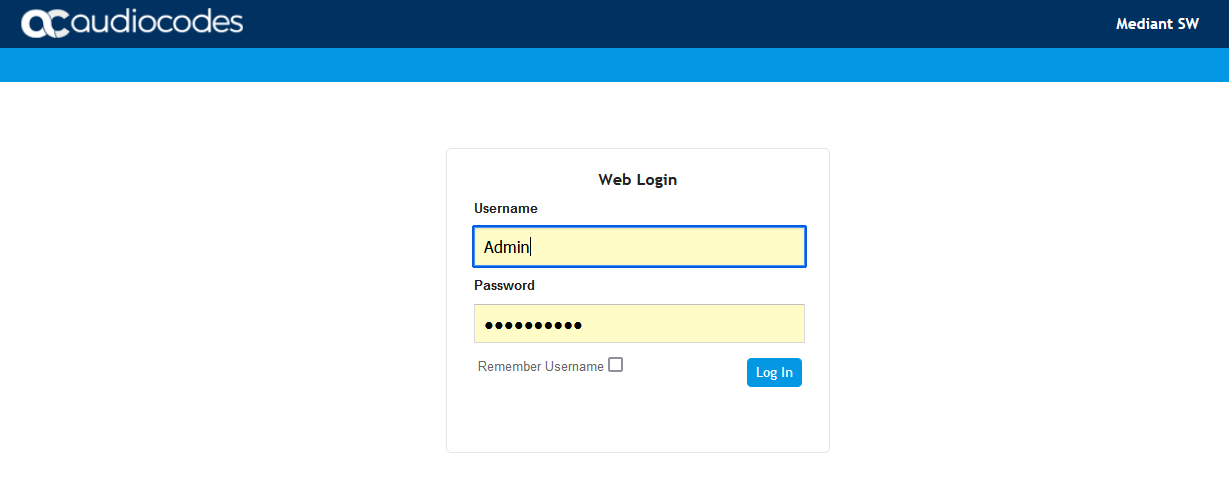
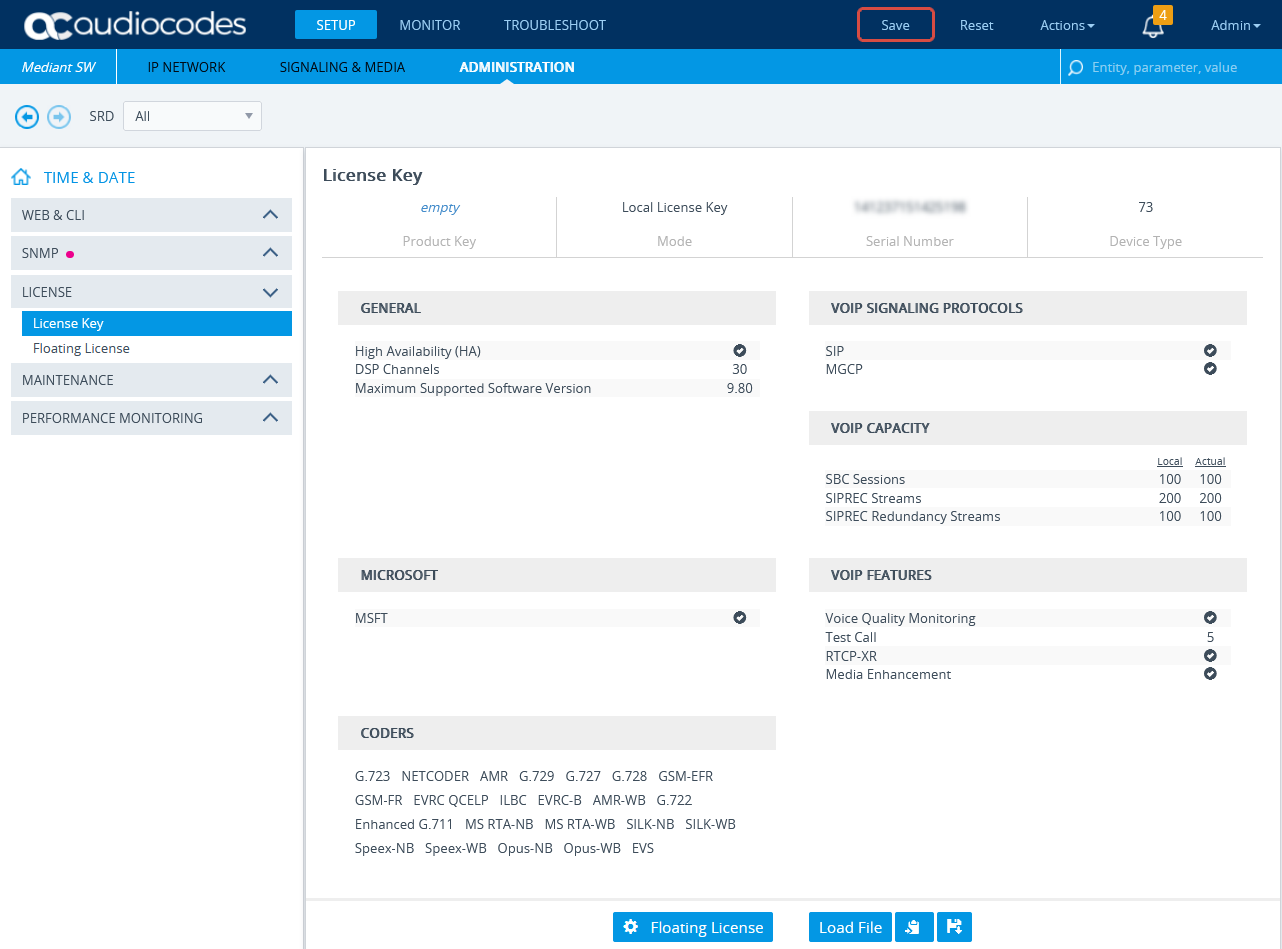
Verify the License
Verify that the license is valid and that the SBC-SIPREC feature is supported.
-
Connect to the AudioCodes SBC via web.
-
Click the ADMINISTRATION menu.
-
Under TIME & DATE, expand MAINTENANCE and select License Key.
-
Under VOIP FEATURES, verify that the license supports SIPRec Sessions.
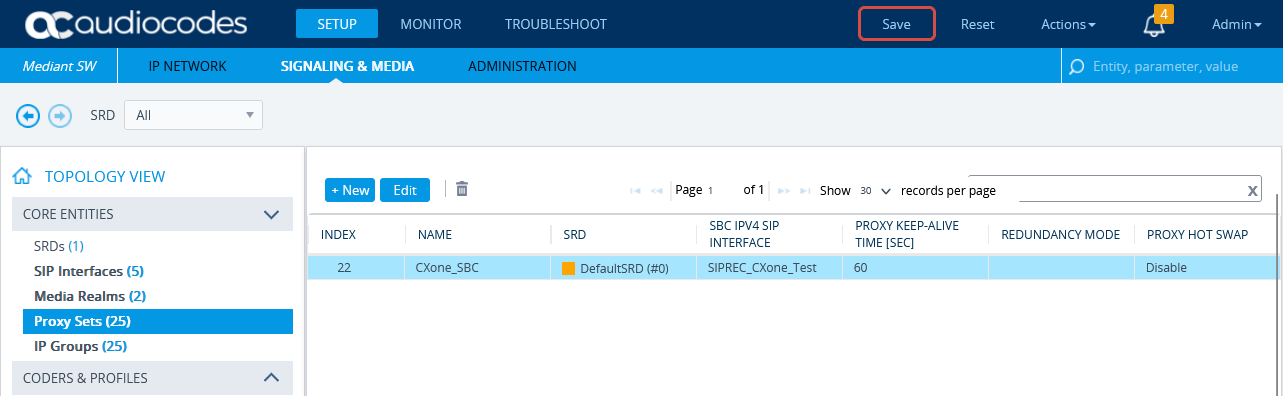
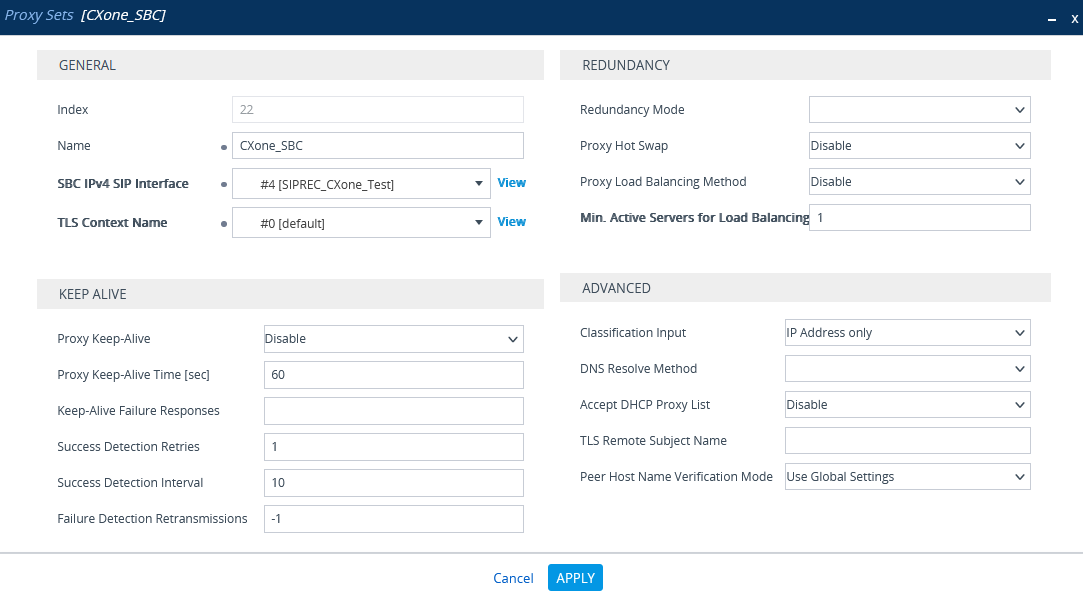
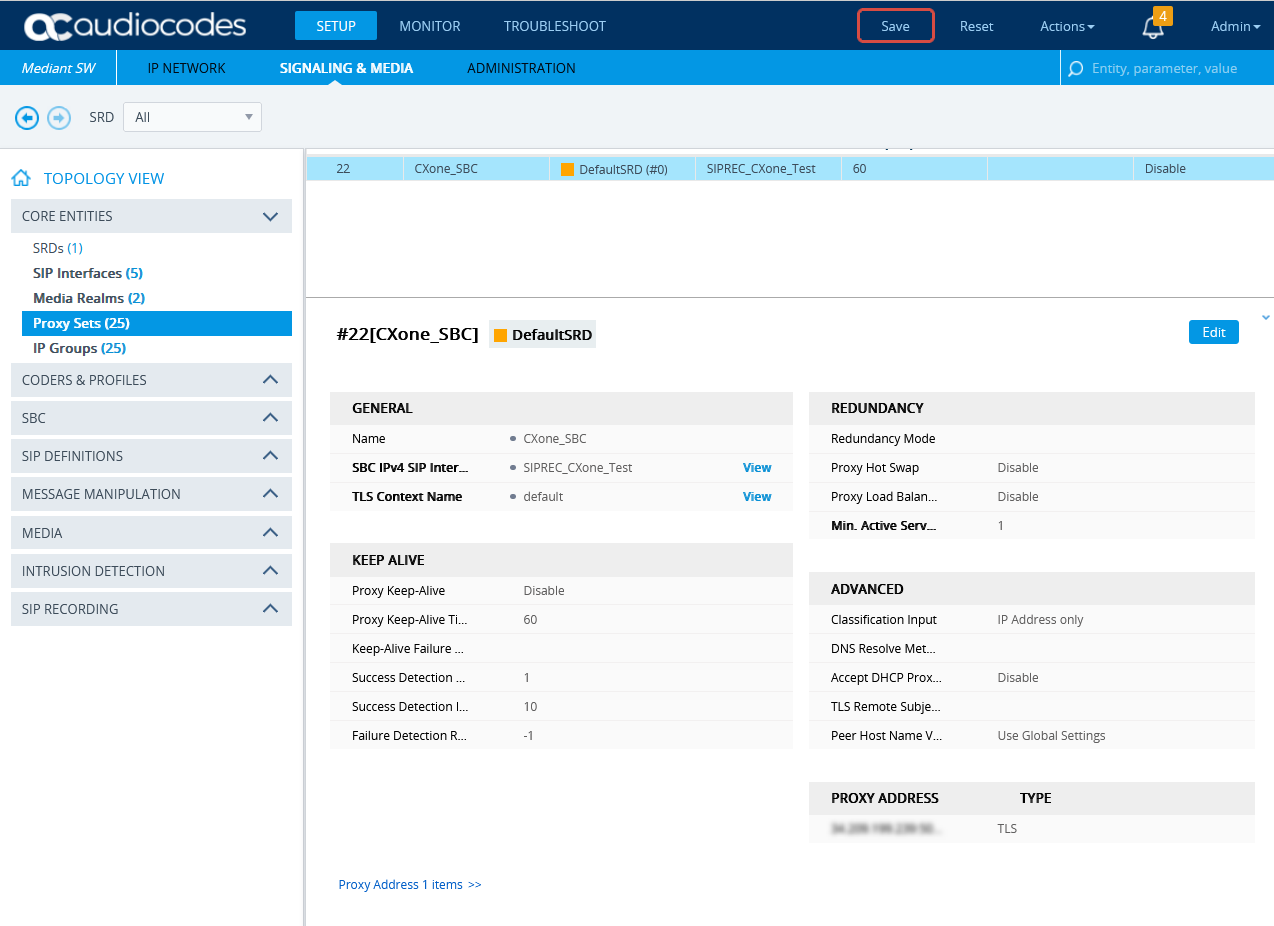
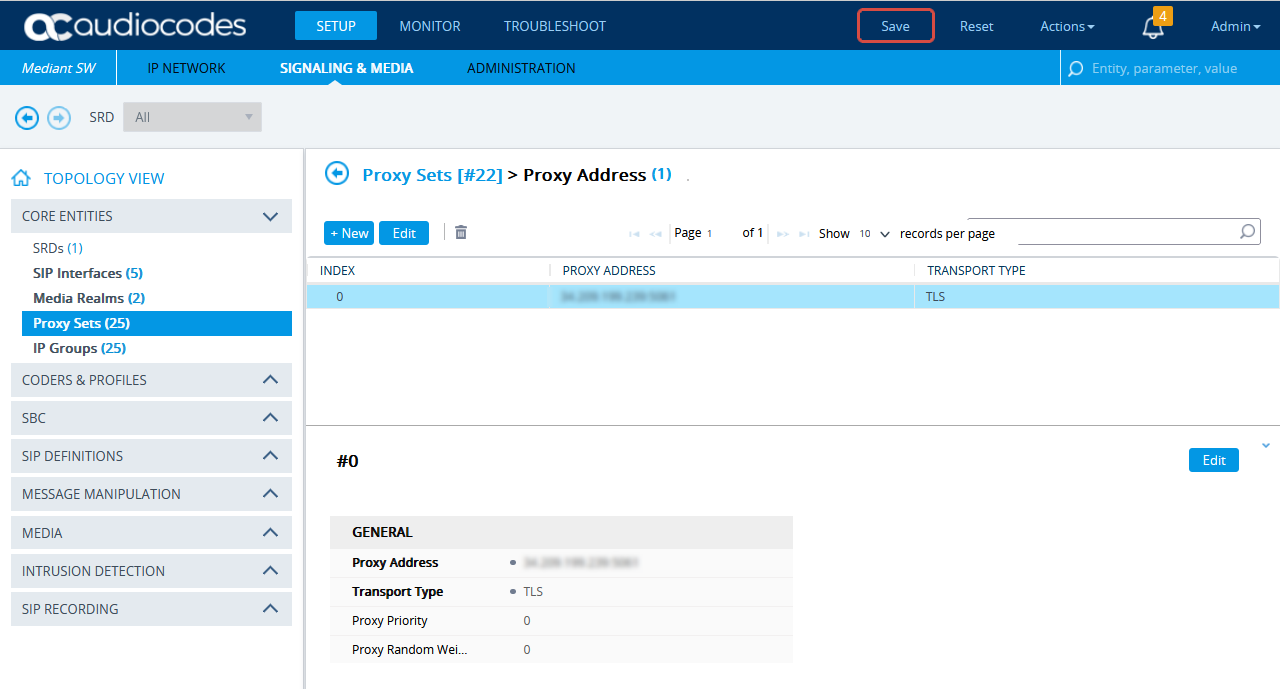
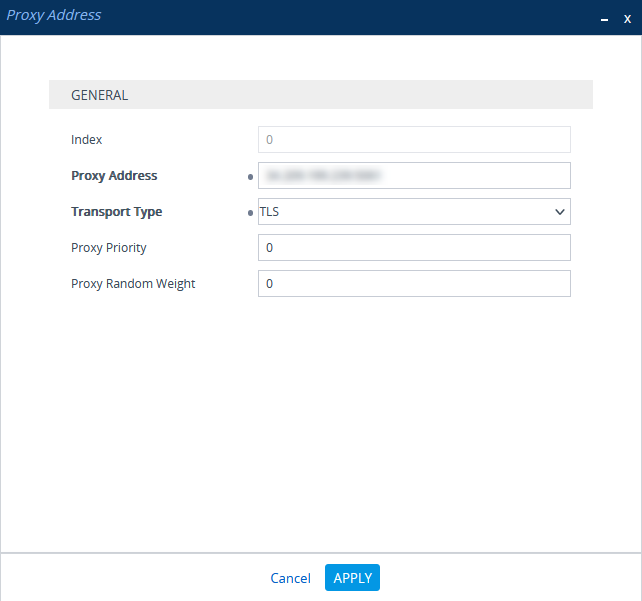
Configure the Proxy Set
This procedure provides guidelines for configuring the SBC Proxy Set and the Proxy IP address for the NiCE CXone AudioCodes SBC for secure connection.
-
In the menu, click SIGNALING & MEDIA.
-
Under TOPOLOGY VIEW, expand CORE ENTITIES and select Proxy Sets.
-
In the list of Proxy Sets, click New.
-
In the Proxy Set window, under GENERAL:
-
In the Name field, enter a name.
-
From the SBC IPv4 SIP Interface drop-down list, select the SIP interface.
-
From the TLS Context Name drop-down list, select the TLS Context with the SBC certificate.
-
-
Scroll down and click the Proxy Address link.
-
In the Proxy Sets > Proxy Address window, click New and add the IP address for NiCE CXone AudioCodes SBC.
-
In the Proxy Address window, under GENERAL, in the Proxy Address field, enter the NiCE CXone AudioCodes SBC IP address and set the Transport Type to TLS.
-
Click APPLY.
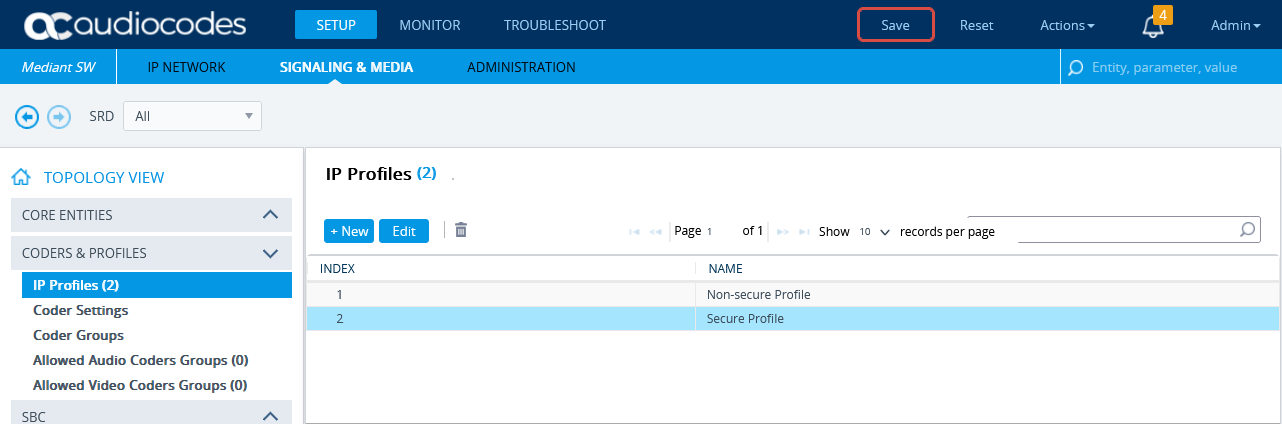
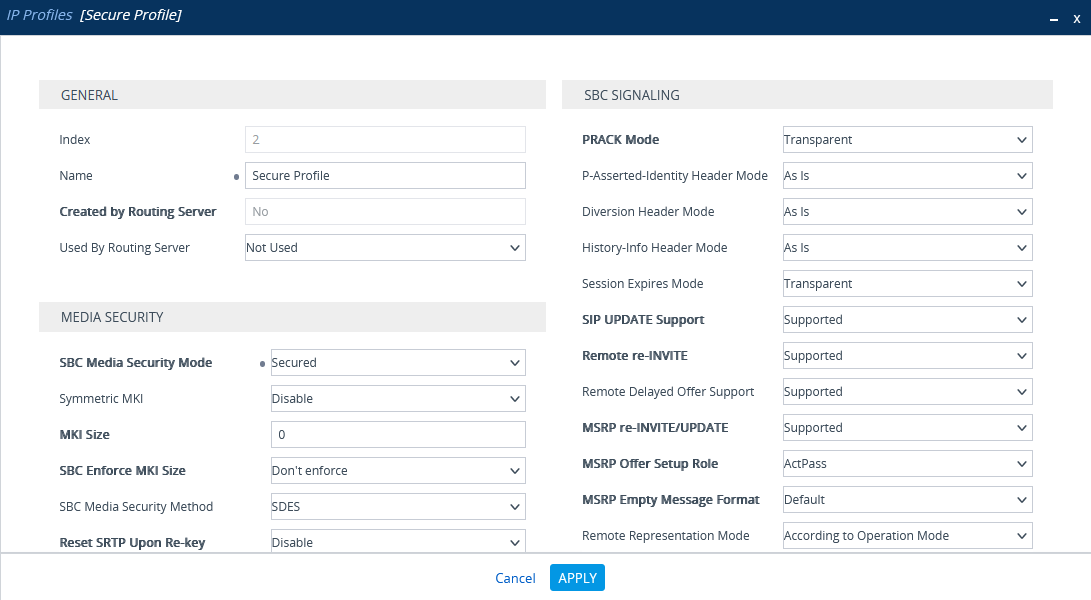
Configure Secure IP Profile
-
From the Setup menu, go to SIGNALING & MEDIA. Under TOPOLOGY VIEW, expand CODERS & PROFILES and select IP Profiles.
-
In the list of IP Profiles, click New.
-
In the list IP Profiles window, under MEDIA SECURITY, make sure the SBC Media Security Mode is set to Secured.
-
Click APPLY.
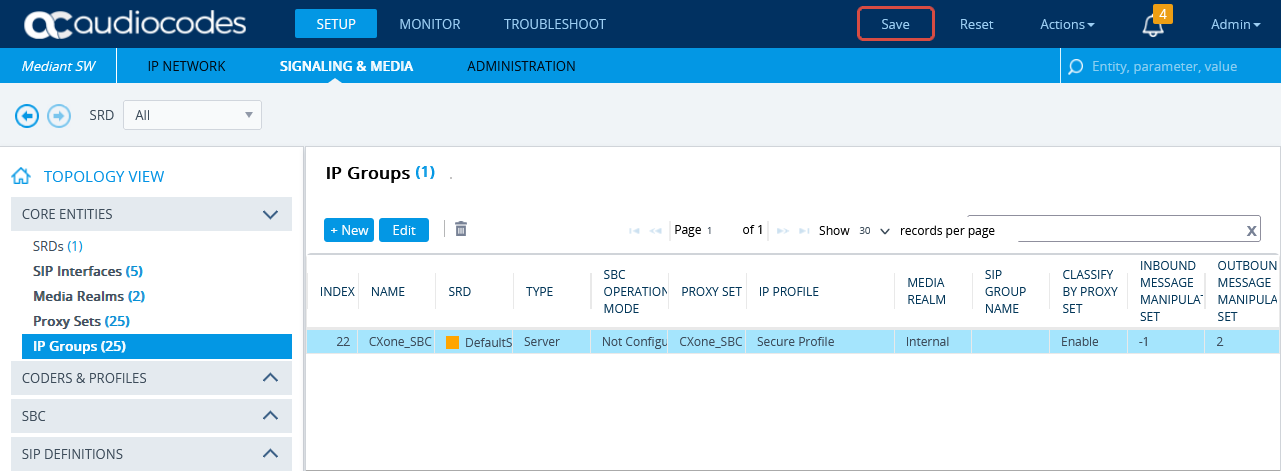
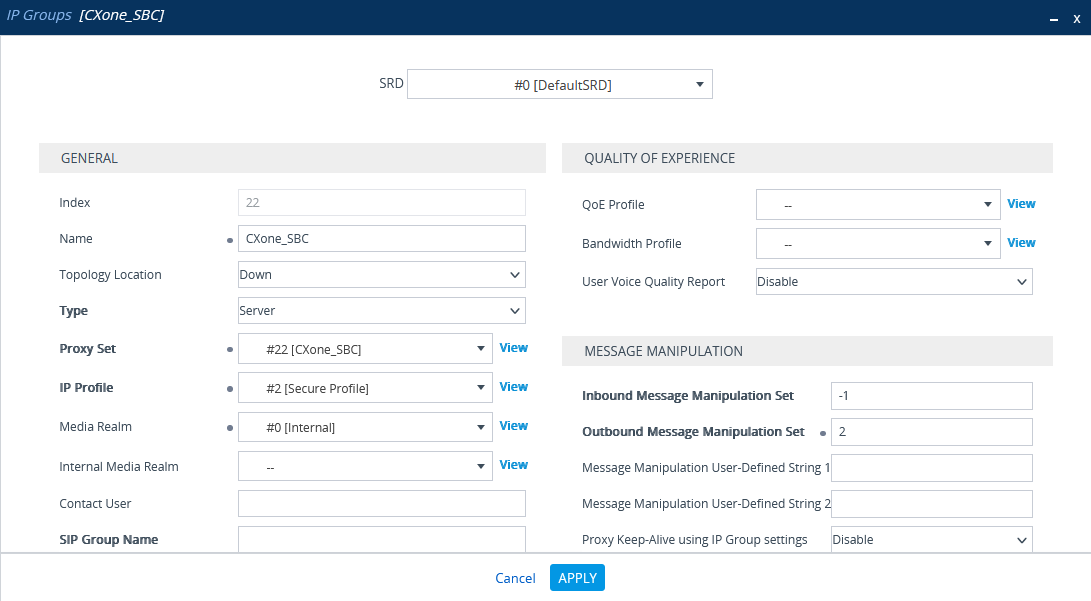
Configure the IP Group
Verify that the secure IP Profile was configured. See Configure Secure IP Profile.
-
In the menu, click SIGNALING & MEDIA.
-
Under TOPOLOGY VIEW, expand CORE ENTITIES and select IP Groups.
-
In the list of IP Groups, click New.
-
In the IP Groups window, under GENERAL:
-
In the Index field, configure the next sequential number.
-
In the Name field, enter a name.
-
From the Topology Location drop-down list, select the location.
-
From the Type drop-down list, select Server.
-
From the Proxy Set field, select the NiCE CXone Proxy Set for this IP Group.
-
In the IP Profile field, select the secure IP Profile previously created in Configure Secure IP Profile.
-
In the Media Realm Name field, select the existing Media Realm name.
-
-
Click APPLY.
-
Then click Save.
Import and Export Certificates for SIP Recording
At the end of this step, you are required to provide to NiCE Professional Services:
-
The certificate in PEM format
Before import, the NiCE CXone AudioCodes SBC certificate must be saved in PEM format.
-
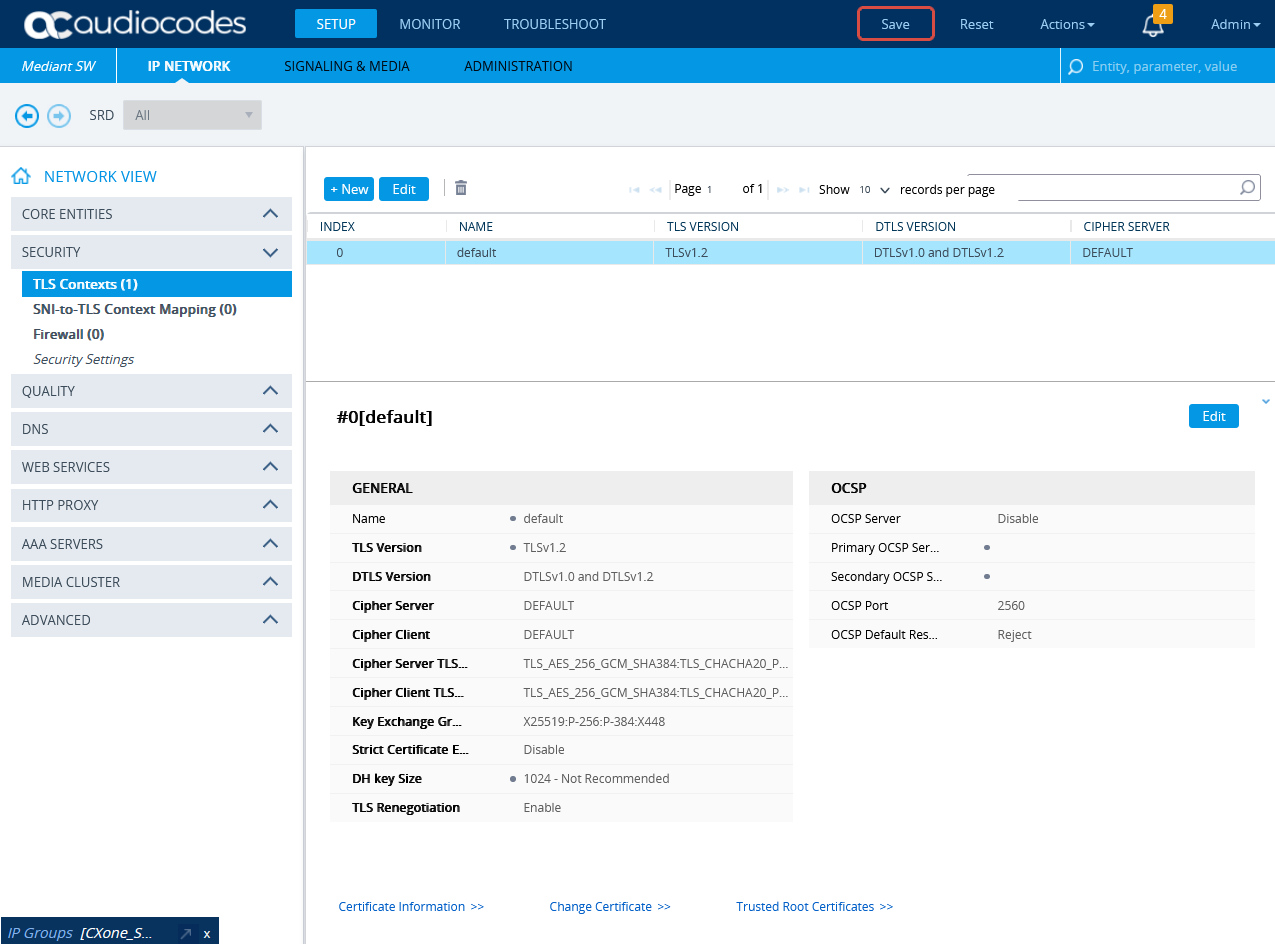
To import the NiCE CXone AudioCodes SBC certificate to the SBC, go to SETUP > IP NETWORK. Under NETWORK VIEW, expand SECURITY and select TLS Contexts.
-
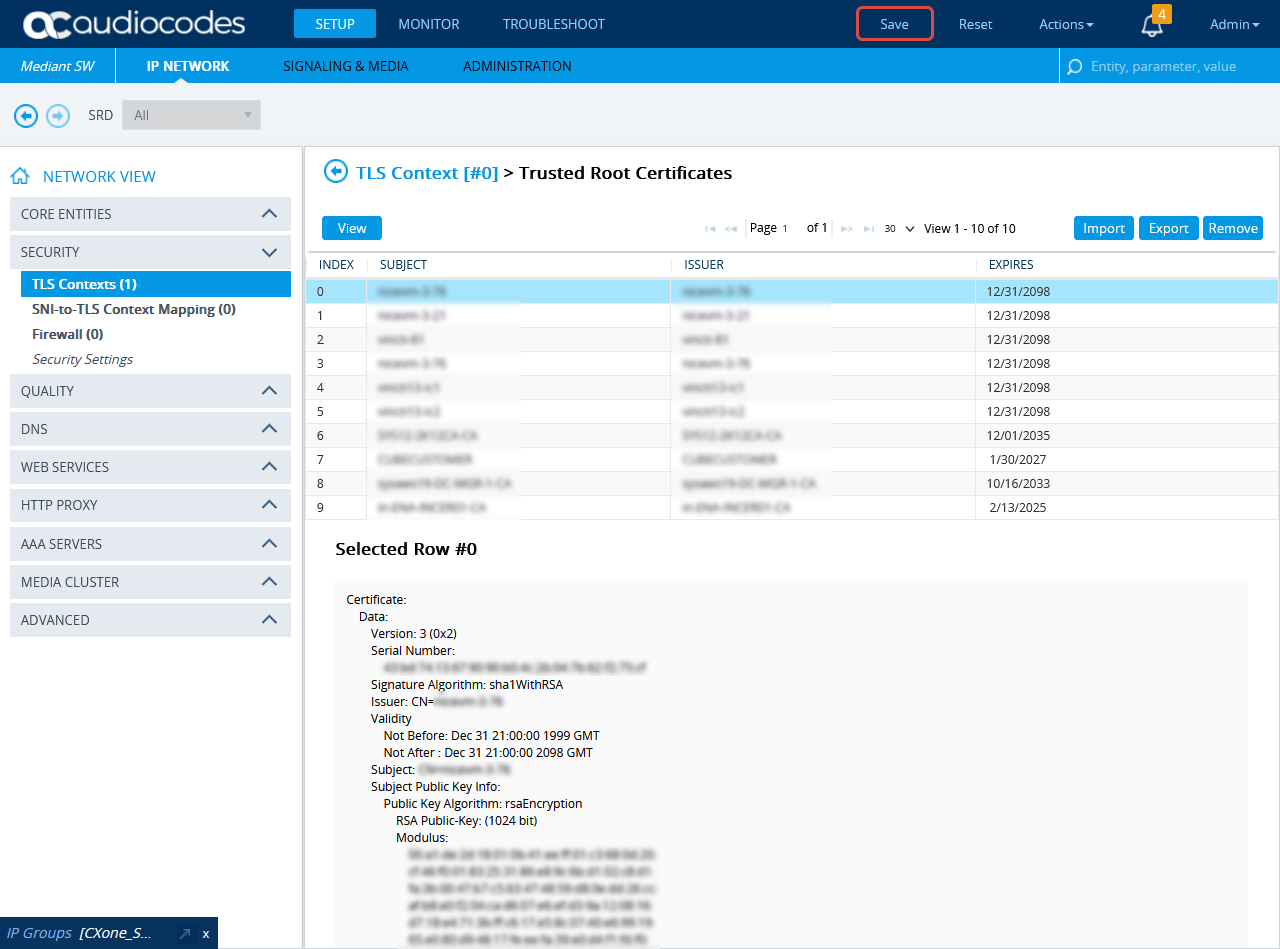
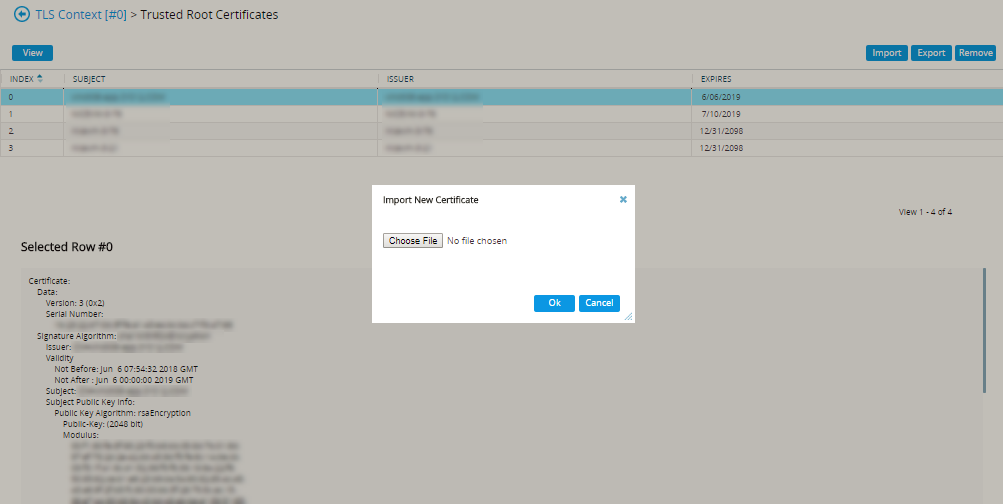
In the TLS Context window, click Trusted Root Certificates.
-
Click Import.
-
In the Import New Certificate window, click Choose File and browse to the NiCE CXone AudioCodes SBC certificate. Verify the NiCE CXone AudioCodes SBC certificate is in PEM format.
-
Click OK.
-
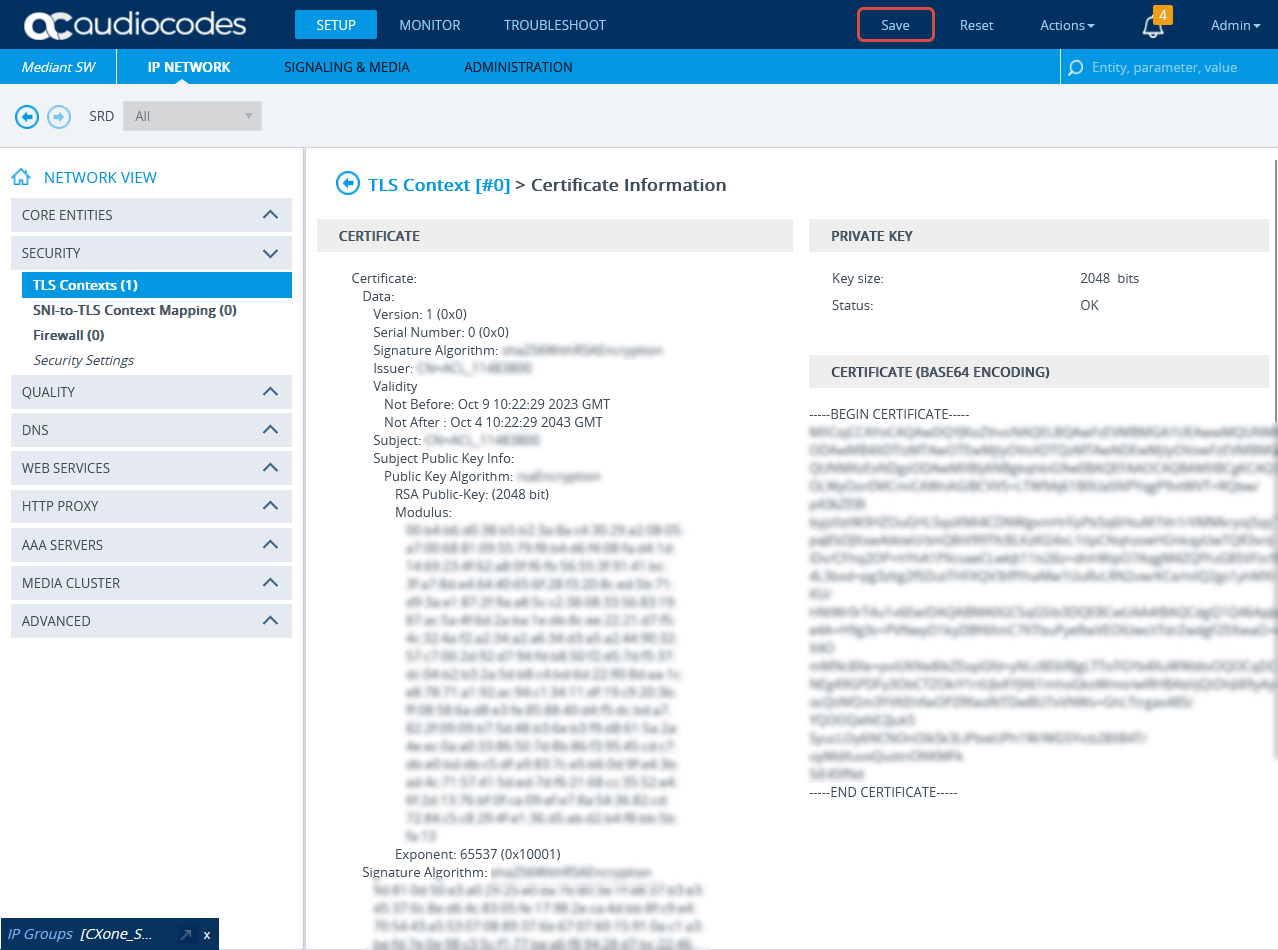
In the TLS Contexts window, click Certificate Information.
-
On the Certificate Information page, under CERTIFICATE, copy the text of the certificate. Create a certificate from this text.
-
Send the certificate in PEM format to the NiCE Professional Services together with the CA, if it exists.
Configure SIP Recording
This section describes the procedure for SIP Recording enablement and the SIP Recording routing configuration.
-
In the menu, click SIGNALING & MEDIA.
-
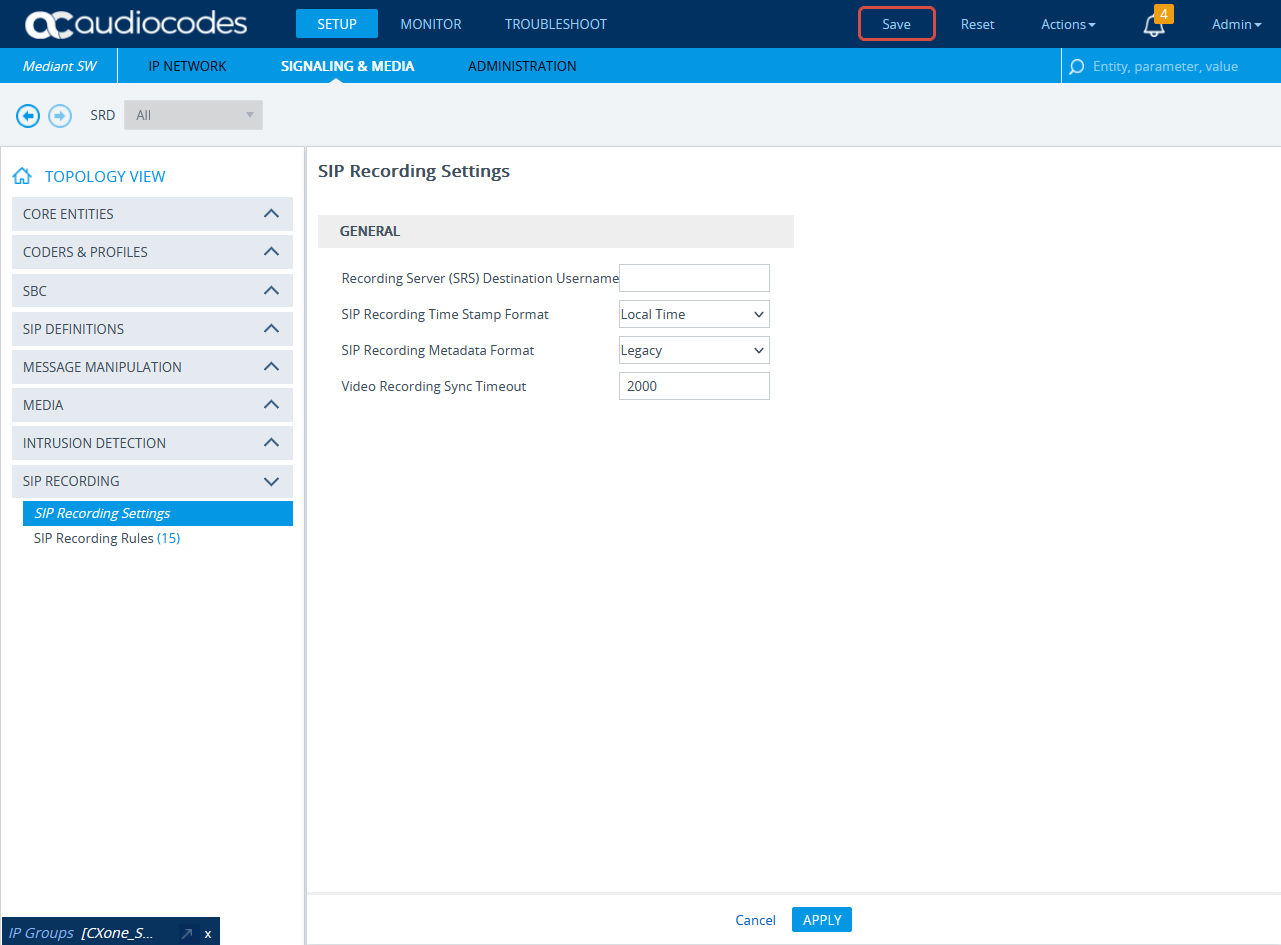
Expand SIP RECORDING and select SIP Recording Settings.
-
Under General, from the SIP Recording Metadata Format drop-down list, select either Legacy or RFC 7865 Metadata option. Real-Time Third Party Telephony Recording (Multi-ACD) supports both options. Configure according to your preferences.
-
Click APPLY.
-
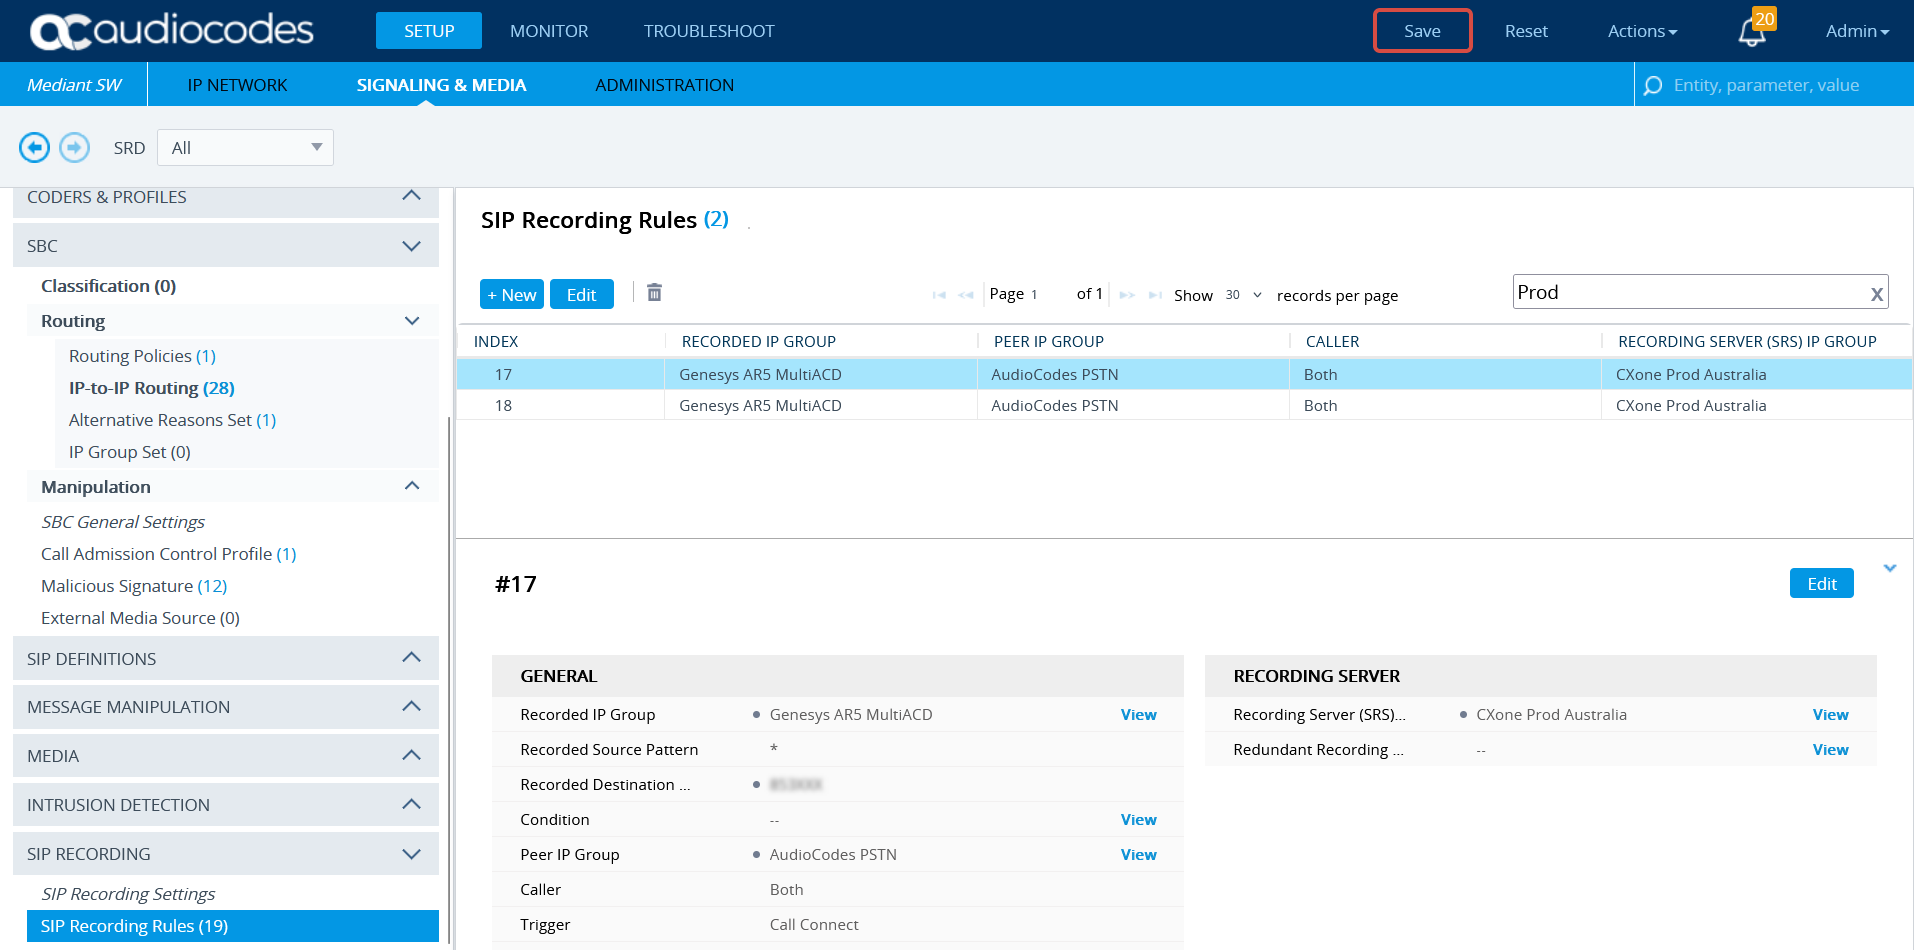
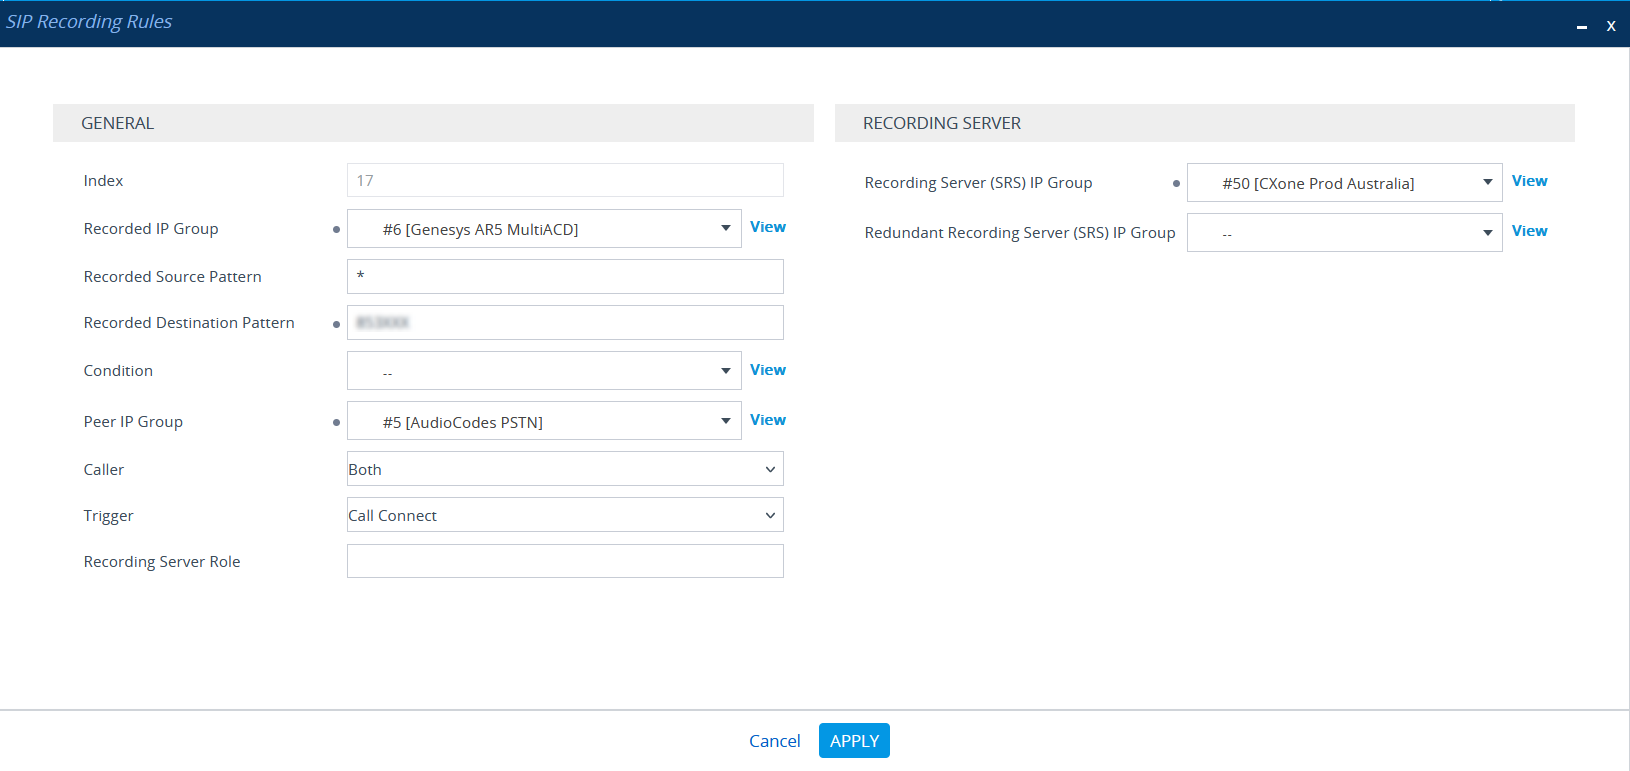
Form SIP RECORDING, select SIP Recording Rules.
-
In the SIP Recording Rules area, click New.
-
In the SIP Recording Rules window, under GENERAL:
-
From the Recorded IP Group list, select the existing agent's side group ID.
-
In the Recorded Source Pattern field, enter the source prefix to be recorded.
-
In the Recorded Destination Pattern field, enter the destination prefix to be recorded.
-
From the Peer IP Group list, select the Service Provider side's group ID.
-
From the Caller list, select Both.
-
-
Under RECORDING SERVER:
-
From the Recording Server (SRS) IP Group list, select the previously created IP Group for the Recorder. See Configure the IP Group.
-
-
Click APPLY.
-
A new row is added in the SIP Recording Routing section.
-
To save all new information, click Save.