

When a quality plan![]() A tool for quality assurance. It samples random interactions based on filters you define, and sends those interactions to evaluators for review. assigns you an interaction for evaluation, you can play the interaction and open the associated evaluation form
A tool for quality assurance. It samples random interactions based on filters you define, and sends those interactions to evaluators for review. assigns you an interaction for evaluation, you can play the interaction and open the associated evaluation form![]() A collection of questions used to evaluate agent interactions. directly from your Evaluation Tasks page.
A collection of questions used to evaluate agent interactions. directly from your Evaluation Tasks page.
Two types of evaluations can be distributed via the Quality Planner:
- Standard Evaluation—You receive an agent's interaction to playback and answer the questions on the assigned form.
- Collaborative Evaluation—You receive an agent's interaction to playback and answer the questions on the assigned form. At the same time, the agent receives their interaction and performs a self-assessment using the same form.
For standard evaluations, you can delete or replace the tasks if necessary
If you replace a task, you will be assigned a new one that matches the same filter criteria. If you delete a task, you can add a reason for the deletion. This information will be included in the Evaluation report. Keep in mind that the quality plan will not send you a new interaction for evaluation if you delete an evaluation task.
Davis Jones receives a number of interactions to review and evaluate in the Classics, Inc. contact center. When reviewing an interaction, he notices it is too short before he even scores it. Believing it won’t provide enough information for a fair evaluation, he decides to replace it.
He initiates the replacement process, fills in the reason, and clicks Replace. The system looks for a new interaction to evaluate that matches the quality plan parameters. Davis then continues his evaluation with the new interaction.
A flag  in a form means that it contains at least one critical question. A wrong answer on a critical question will fail the form, automatically setting the score to zero.
- Click the app selector
 and select My Zone.
 -
Click Evaluation Tasks.
-
Click on the interaction you want to evaluate.
The player and the form open in new windows.
If one of the windows does not open, ensure you have enabled your browser's pop-ups.
 The tasks listed in My Tasks are based on the teams assigned to you in Views.
If the evaluation view access is removed after the task was assigned to the evaluator, the evaluator will not be able to perform the evaluation.
Example 1:
If an evaluator has access to Team A as per the Evaluation view, the evaluation can be played back and the evaluation of the interaction assigned to Team A can be performed.
Example 2:
If an evaluator does not have access to Team A as per the evaluation view, then the evaluator will not be able to perform the evaluation. An error message will show when trying to open the task.
-
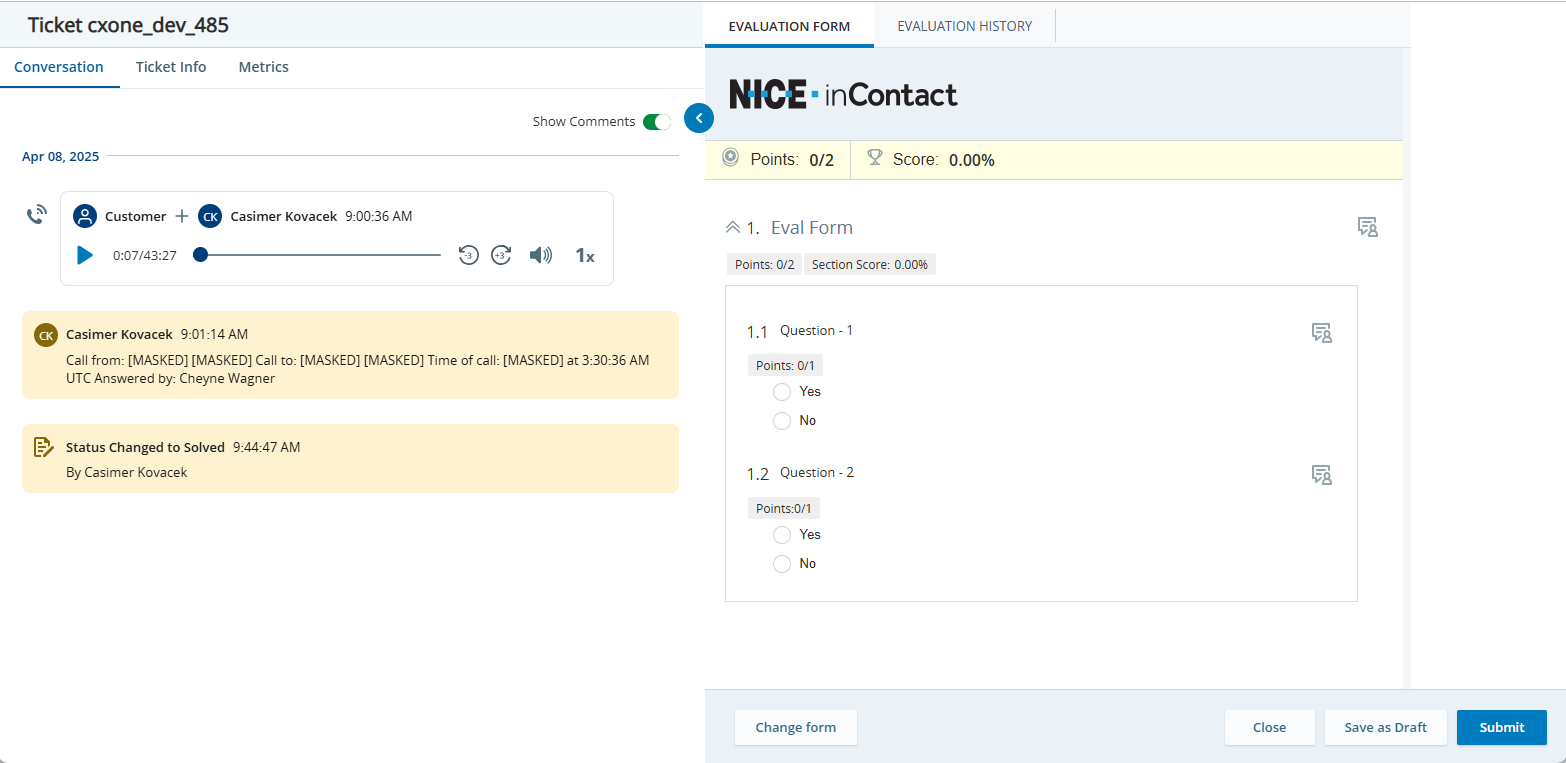
Play back the interaction and answer the questions on the form.
You can view the points earned and the maximum possible points for each individual question as you assess and score them. You can see the total score at the top of the form and the section score at the top of each section.
A flag
before a question means it is a critical question. -
You can add a comment on any of the questions. These comments will be visible to anyone viewing the evaluation.
Click the comment icon, enter your comment, and click Submit.
-
If the evaluation is standard, you can change the form if necessary. Click Change Form and select a new one from the list.
-
Once you have completed the evaluation, save it by doing one of the following:
-
Click Save as Draft to save the evaluation for later.
-
Click Send to Agent to complete the evaluation.
-
Click Close to cancel the evaluation.
Depending on the evaluation workflow defined in the form, the evaluation may or may not go to the agent.
-
Evaluating a Ticket
Evaluators can now evaluate and calibrate the tickets from the Ticket Search page allowing you to create a new evaluation and calibration for each ticket.
When a quality plan![]() A tool for quality assurance. It samples random interactions based on filters you define, and sends those interactions to evaluators for review. assigns you an evaluation for a ticket, you can access the ticket and open the corresponding evaluation form directly from your Evaluation Tasks page. Each time a ticket is resolved and closed, it will be distributed for evaluation. This helps the evaluators to stay updated and manage their ticket evaluations more effectively. Evaluating a ticket involves a comprehensive review of the ticket information, agent interaction, ticket information, and quality metrics.
A tool for quality assurance. It samples random interactions based on filters you define, and sends those interactions to evaluators for review. assigns you an evaluation for a ticket, you can access the ticket and open the corresponding evaluation form directly from your Evaluation Tasks page. Each time a ticket is resolved and closed, it will be distributed for evaluation. This helps the evaluators to stay updated and manage their ticket evaluations more effectively. Evaluating a ticket involves a comprehensive review of the ticket information, agent interaction, ticket information, and quality metrics.
To create an evaluation on a ticket:
- Click the app selector and select Interactions Hub.
-
Click Tickets Search
 on the left.
 -
Click Options
 and select Evaluate.
You can see Evaluate in the Actions menu only if the ticket belongs to a team that is assigned to you in views.
-
In the Create New Evaluation window, select evaluator, agent, and a form. Click Evaluate.
The evaluation is saved successfully.
-
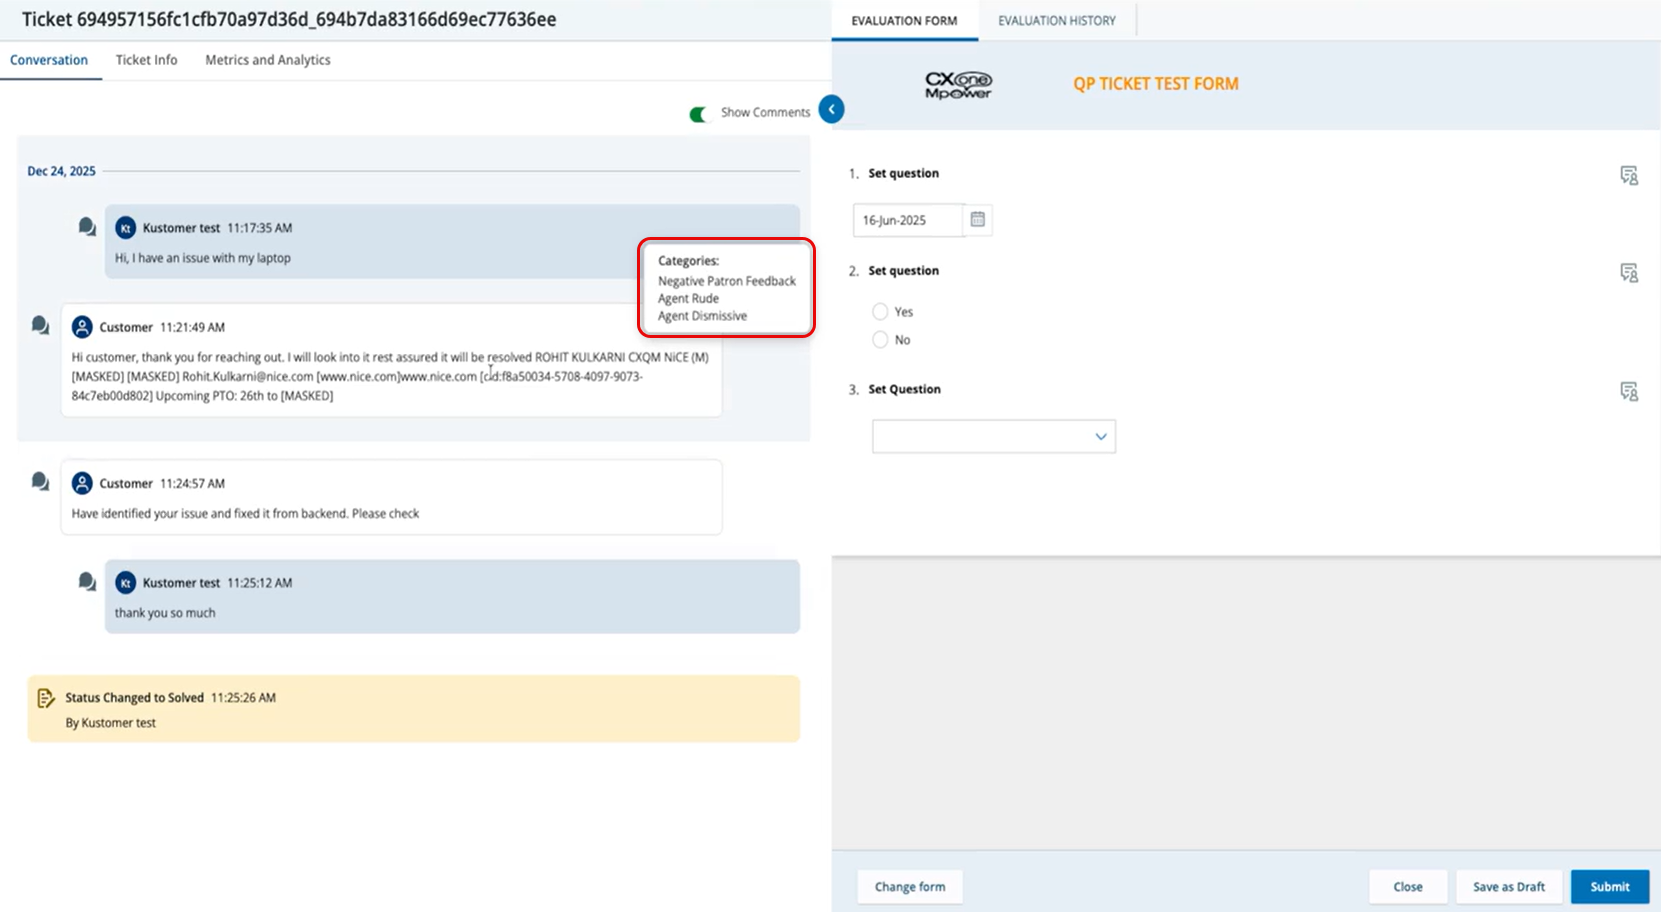
The Ticket viewer and evaluation form is displayed together side by side.
-
From To evaluate an interaction, follow Step 4, Step 5, Step 6, and Step 7. Depending on the evaluation workflow defined in the form, the evaluation of a ticket may or may not go to the agent.
Ticket Viewer
The ticket viewer provides a centralized interface for reviewing and managing ticket details. It is designed to give users a clear and organized view of each ticket's lifecycle, interactions, and performance metrics. The ticket viewer also displays analytics for each segment of an interaction. With this update, Supervisors and Analysts can quickly find specific topics, sentiments, or categories in different parts of a conversation, making quality checks faster and more accurate. The ticket viewer is divided into the following three main tabs:
If the data in the Ticket Info and Metrics tab is missing, it will not be displayed here.
-
The Conversation tab displays a transcript of the actions and interactions on the ticket. This includes all the supported channels used during the ticket's lifespan, from start to resolution. Each interaction appears at it's time stamp on the transcript.
- Text based interactions from chat messaging apps, emails, and live chats are transcribed.
- Inbound or outbound call recordings are embedded as audio playback bars in the transcript, with the participants and call duration listed. You can control the playback speed and fast forward and rewind of the recording.
- Toggle on Show Comments to view all of the internal comments, changes in ticket status and handling notes added by the agent to the ticket.
Supervisors can also view analytic categories for specific segments directly within the Ticket Viewer. Hovering over a segment now reveals an analytics card that displays only the analytic categories associated with that specific part of the interaction. This card makes it clear which segment the data belongs to, giving supervisors immediate, focused insight without adding clutter or confusion.
-
The Tickets Info tab provides the following additional information and a link to the ticket in the originating CRM.
- Ticket Details Overview
- External Ticket ID: A unique identifier assigned to the ticket by CRM system.
- Description: The title or brief summary of the issue or request described in the ticket.
- Created date: The date and time when the ticket was initially created in the CRM.
- Ticket Type: The classification of the ticket, such as Request, Incident, Problem, or Task.
- First Channel Type: The channel through which the ticket was first received. For example, Email, Chat, or Voice.
- Ticket Direction Type: Indicates whether the ticket was initiated by the customer Inbound or by an agent Outbound.
- Priority level: The urgency or importance of the ticket, typically categorized as P3-Low, P2-Medium,or P1-High.
- Current Ticket Status: The present state of the ticket, such as Open, Pending, Resolved, or Closed.
- Tags: Keywords or labels added to the ticket to help categorize or filter it based on Return Request or Issue Type.
- Source URL: The original link or webpage from which the ticket was submitted or where the issue was reported.
- First Responder Information
- Agent Name: The name of the agent who first responded to the ticket.
- Team Name: The name of the team agent belongs to. For example, Technical Support, Billing, Customer Success and so on.
- Agent Group Name: A broader group of agents, often used for routing or reporting the tickets.
-
First Resolver Information
-
Agent Name: The name of the agent who first took ownership of the ticket.
-
Team Name: The group or department the first resolver belongs to. For example, Technical Support, Billing, Customer Success and so on.
-
-
Last Resolver Information
-
Agent Name: The name of the agent who resolved the ticket.
-
Team Name: The department or group to which the last resolving agent belongs.
-
-
Ticket Closer Information
-
Agent Name: The name of the agent who officially closed the ticket after confirming that the issue was resolved.
-
Team Name: The department or group to which the agent who closed the ticket belongs to.
-
- Ticket Progress Timestamps
- Start Time: The timestamp in mmddyy mm:ss format when the ticket was first created or entered the CRM system.
- Last Update Time: The most recent time the ticket was updated in mmddyy mm:ss format —this could include agent replies, customer responses, or internal notes.
- Ticket Closed Time: The timestamp in mmddyy mm:ss format when the ticket was officially marked as resolved or closed.
- Ticket Details Overview
-
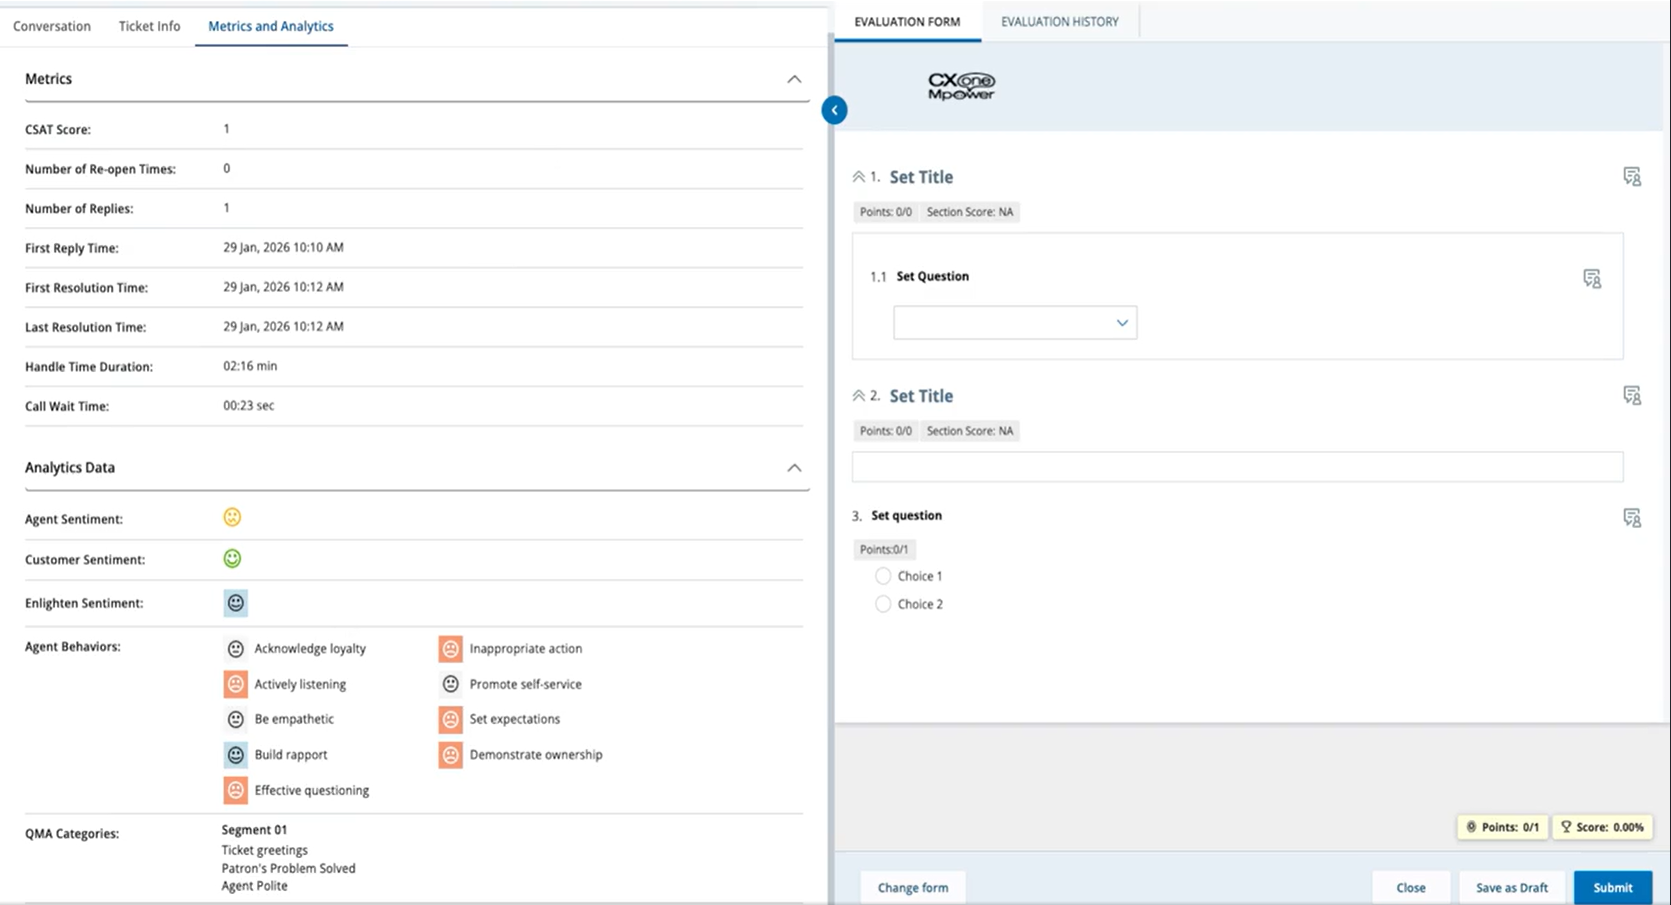
The Metrics and Analytics tab provides analytics on the ticket's information. These are reported from the integrated CRM and include:
- Customer Satisfaction Score
- CSAT Score: A numerical rating (typically 1–10) provided by the customer to indicate their satisfaction with the support experience. This score is automatically passed from the CRM system.
- Engagement Information
- Number of Re-open Times: The number of times a previously closed ticket was reopened by the customer or agent for further action.
- Number of Replies: The total count of message exchanges (from both customer and agent) within the ticket thread.
- Number of First-Time Interactions: The count of initial engagements between the agent and the requester for a specific ticket.
- Number of Visible Comments: The total number of comments added to the ticket that are visible to the requester or end user.
- Number of Internal Comments: The number of comments exchanged privately among agents or teams, not visible to the requester.
- Number of Completed Interactions: The total number of interactions that led to a resolution or closure of the ticket.
- Response & Resolution Duration
- First Reply Time: The time elapsed between ticket creation and the first response from an agent in mmddyyyy mm:ss format.
- First Reply Duration: The time taken from when the ticket was created to when the first response was sent by an agent.
- First Resolution Time: The time taken to provide the first resolution to the customer, regardless of whether the ticket was closed in mmddyyyy mm:ss format.
- First Resolution Duration: The total time from ticket creation to the first resolution, typically measured in hours or minutes.
- Last Resolution Time: The timestamp when the most recent resolution was provided in mmddyyyy mm:ss format, which may differ from the first if the ticket was reopened.
- Last Resolution Duration: The time taken from the last agent interaction to the point when the ticket was marked as resolved.
- Final Resolution Time: The timestamp when the ticket was most recently closed or resolved.
- Interaction Duration
- Talk Time: The total duration of active conversation in minutes and seconds between the agent and the customer during a call.
- Handle Time Duration: The complete time an agent spends on the ticket in mmddyyyy mm:ss format, including talk time, hold time, and wrap-up time.
- Hold Time Duration: The total time in minutes and seconds the customer was placed on hold during the interaction.
- Wrap Time: The time spent by the agent in minutes and seconds after the call ends to complete related tasks such as logging notes or updating the ticket.
- Call Wait Time: The time the customer waited in the queue in minutes and seconds before the call was answered by an agent.
- Customer Satisfaction Score
- Analytics Data
- Agent Sentiment: It evaluates the agent's language throughout the interaction. This sentiment score is derived from speech or text analysis and indicates how positive, neutral, or negative the conversation was.
- Customer Sentiment: Shows the emotional tone of the customer during the interaction. It helps identify the customer’s mood positive, neutral, or negative—based on their language.
- Enlighten Sentiment: Provides an AI‑driven sentiment assessment using Enlighten models. This score reflects a deeper analysis of conversational indicators across both agent and customer segments. A value used to categorize sentiment into five levels: Strongly Negative, Moderately Negative, Neutral, Moderately Positive, and Strongly Positive.
- Agent Behaviors: These are specific, AI-driven 9 predefined metrics that measure how well an agent demonstrates key soft skills and soft behaviors during an interaction. These are used to correlate specific behaviors with high or low sentiment events to provide targeted coaching.
- QMA Categories: Shows the Quality Management and Analytics categories associated with the selected segment. These categories highlight key moments like ticket greetings, problem resolution, politeness, or other tagged behaviors, helping supervisors quickly identify important conversation themes.
Deleting an Evaluation
Managers can delete evaluations to maintain relevance and accuracy within the Quality Management platform. When deleting an evaluation, you must provide a reason for the deletion, which will be displayed in one of the Quality Management (CXone) reports.
You must have these permissions:
-
QM Tools Permissions > Evaluations > Perform Evaluations: All Permissions (View, Evaluate, Replace, Delete, Assign, Edit)
If you cannot delete an evaluation, check with your administrator. The administrator can find these permissions in NiCE CXone. Go to Admin > Security Settings > Roles and Permissions and select the role.
-
QM Tools Permissions > Evaluations Summary.
You can delete an evaluation when:
-
Draft/In-progress – Evaluations that have been started but not yet completed.
-
New/Claimed – Evaluations that are newly created or claimed by an evaluator.
-
Completed – Evaluations that have been completed or Auto Acknowledged.
-
Expired – Evaluations that have passed their due date or validity period.
-
Sent to Supervisor – Evaluations that have been forwarded to a supervisor for review.
-
Sent to Agent – Evaluations that have been shared with the agent.
-
Appealed – Evaluations that are under review due to an appeal.
-
In situations where deleting an evaluation requires opening it such as in Engagement Hub the user may be unable to access the evaluation if they are not the designated recipient of the appeal. However, evaluations in an Appeal status can be deleted directly using the trash can icon, without needing to open the evaluation.
-
To delete an evaluation:
- Click the app selector and select My Zone.
-
Click Quality Performance.
-
In the list, click on
 delete against the evaluation that you want to delete.
 -
Add a Reason to explain why you are deleting the evaluation in the Delete Evaluation pop-up window and click Delete.
The following message displays: Deleting this evaluation may change the average evaluation score. Continue?
-
Click Yes to delete the evaluation.
-
When an evaluation is deleted, the agent's average evaluation score is recalculated.
-
The deleted evaluation is removed from the agent's Evaluation page and no longer appears in Search.
-
Additionally, the evaluation score is excluded from the average scores shown in Quality Management (CXone) widgets, including Team Performance, Evaluations and Coaching Events, and Agent Scoring.