

Exporting schedules or net staffing is done in the Schedule Manager.
You can export schedule data for multiple scheduling units or for a single agent, as well as net staffing data for multiple scheduling units. Both export options are available from the settings icon in the Schedule Manager, and the data is downloaded as a CSV file.
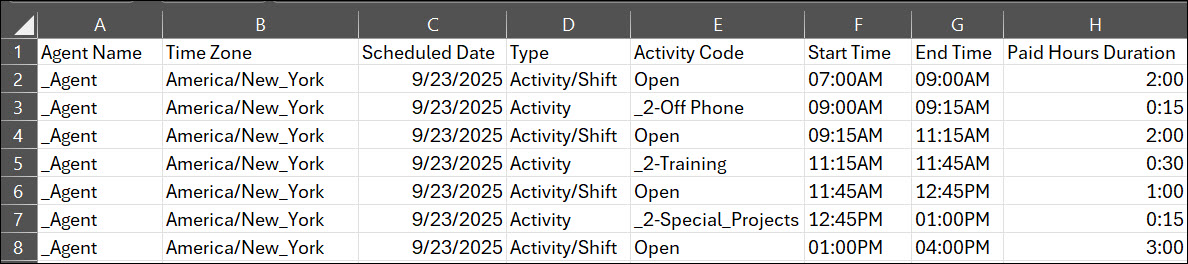
The exported CSV files are easier to read and understand, with a clear, line-by-line breakdown of daily activities. Each entry is labeled as an activity, shift, or other type, providing a more organized view of the schedule. The data is sorted by timeline, making it easier to follow and use. These improvements make exported files more useful for reporting, analysis, and workforce planning.
The following example shows how schedule data appears in the exported CSV file:
The exported CSV file includes a Comments column that provides additional context for scheduled activities.
-
When a comment is associated with a shift that appears multiple times in the export, the comment is displayed only for the first occurrence of that shift and is not repeated for subsequent instances.
-
Only comments entered in Schedule Manager appear in the Comments column of the exported CSV file. Comments added by agents in MyZone, or by managers when approving activities, are not included
If the CSV file includes multiple open shift entries—such as 5:30 PM–6:30 PM, 7:00 PM–8:30 PM, and 9:00 PM–1:30 AM—the comment appears only for the first open shift entry and is omitted for the remaining occurrences.
Export Schedules
-
Click the app selector
 and select WFM.
 -
Click Schedule Manager.
-
Click the settings icon and select Export.
-
Select what to export: Scheduling unit schedule, Agent schedule, or Net staffing.
-
Deactivated agents do not appear in the Agent dropdown when you select the Agent schedule export option.
-
To export schedules for dates prior to an agent’s deactivation, use the Scheduling unit schedule (SU schedule) export option.
-
-
Select the Scheduling units or Agents.
The Agent dropdown displays agents with Active or Pending status when exporting schedules using Agent Schedule.
-
Select the Duration.
-
Select the range of data to export. After selecting the From date, the End date is added based on the selected duration.
-
Click Download.
The schedule data is exported to a CSV file and downloaded to your computer.
-
Open Excel.
-
Select the Data tab.
-
Click From Text/CSV.
-
Select the CSV file you want to fix and click Load.
Keep in mind, the text in the CSV might be garbled (for example: æ–‡å—化ã). This can happen when the text has multibyte characters (such as Chinese and Japanese).