

In Agent Workspace for Salesforce Voice, agents can assign dispositions, tags, and notes to calls. You can set up data mapping so that these values appear in voice call records in Salesforce. For example, if the agent assigns the call a disposition of Resolved, the Disposition field in the voice call record displays a value of Resolved. These values also map to the Primary Disposition, Disposition Comments, and Tags fields of the Active Contacts and Contact History reports in NiCE CXone.
Agents must refresh the voice call record after a call is disconnected to see the mapped data. To do this, select the drop-down arrow  next to the selected voice call record and click Refresh Tab.
Complete each of these tasks in the order given.
Before You Begin
In NiCE CXone, ensure dispositions and tags are assigned to the voice skills Used to automate delivery of interactions based on agent skills, abilities, and knowledge. you want to enable data mapping for.
Verify Fields in the Voice Call Object
In order for dispositions, tags, and notes to appear in voice call records, the voice call object in Salesforce must have these fields:
-
CXNotes
-
Disposition
-
Tags
Those fields will appear in voice call records and offer a place for the dispositions, tags, and notes to appear. They are automatically imported into the voice call object when you install the latest version of Agent Workspace for Salesforce Voice. Verify that these fields have been imported into your voice call object.
-
Open Salesforce and click Setup
 in the top right corner. Launch the Setup application.
 -
Click the Object Manager tab at the top, then select the Voice Call object.
-
Click Fields & Relationships in the left menu. Make sure that CXNotes, Disposition, and Tags are listed on the page that appears. If they are not listed, you do not have the latest version of Agent Workspace for Salesforce Voice installed. Install it, then repeat these steps.
Configure Voice Call Page Layout
Configure the Voice Call object record page layout to display required call details such as disposition, call flow navigation, and notes to agents and supervisors.
-
Open Salesforce and click Setup
in the top right corner. Launch the Setup application. -
Use the Quick Find box to search for Object Manager, then click Object Manager.
-
Search for Voice Call in the Object Manager list, then click Voice Call.
-
Click Page Layouts.
-
Open Voice Call Layout.
-
In the layout editor, search for the required fields. Eg: CXNotes (for Disposition), Call Next (for Call Flow tracking) and Call Previous (for Call Flow tracking)
-
Drag and drop the required fields into the appropriate section of the layout.
-
Arrange the sections for visibility and usability.
-
Click Save.
After this configuration, agents can view additional call details directly on Voice Call records.
Next, open the page layout of the voice call object in Salesforce to check that the CXNotes, Disposition, and Tags fields appear there. You can also configure where in the voice call record they appear.
Migrate Wrap-Up Dispositions to Companion App
The Wrap-up component follows the same configuration model as Companion Applications (Copilot and Live Transcript). However, the Wrap-up component remains available to users even when Companion Applications are not configured or enabled for the customer. For information about configuring Companion Applications, see Set Up Copilot, Live Transcript, and Contact History in Agent Workspace for Salesforce Voice
Starting with Package 26.3, the disposition UI moves from the Voice Extension to the Wrap-Up section in the Companion App. You can use this new location to submit call dispositions after voice interactions.
If you currently use dispositions through the Voice Extension, you must update your Voice Extension configuration. This ensures that the new disposition UI and your existing indicators continue to function correctly.
You must complete this migration after your environment is upgraded to Package 26.3. If you do not remove the old Voice Extension configuration, agents may see duplicate or non-functional disposition controls.
Before and After: Disposition UI Location
The following table shows how the disposition UI location changes after you complete the migration.
| Before (Voice Extension) | After (Companion App Wrap-Up Section) |
|---|---|
| The disposition UI appears inside the Voice Extension panel during a call. |
The disposition UI appears in the Wrap-Up section on the right side of the voice call record in the Companion App. |
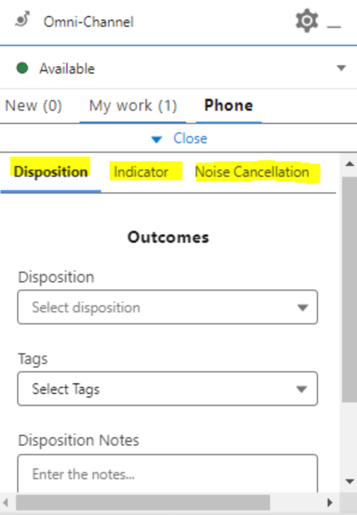
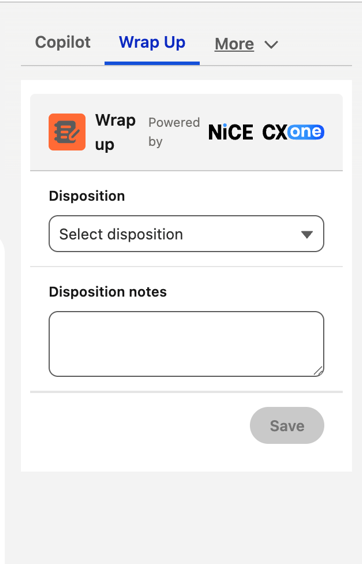
The disposition functionality remains the same. Only the UI location changes from the Voice Extension to the Companion App.
Confirm the following before you start the migration:
-
Your CXone environment is upgraded to Package 26.3 or later.
-
You have Salesforce System Administrator permissions, or equivalent access to modify Lightning App Builder pages and Partner Telephony Contact Centers settings.
-
You know which Voice Extension currently contains the disposition configuration.
Before you delete the old Voice Extension, note its name and settings. You may need this information for reference after the migration.
Remove the Old Disposition UI from the Voice Extension
You must delete the existing Voice Extension that contains the disposition configuration. This prevents duplicate disposition controls from appearing for agents.
-
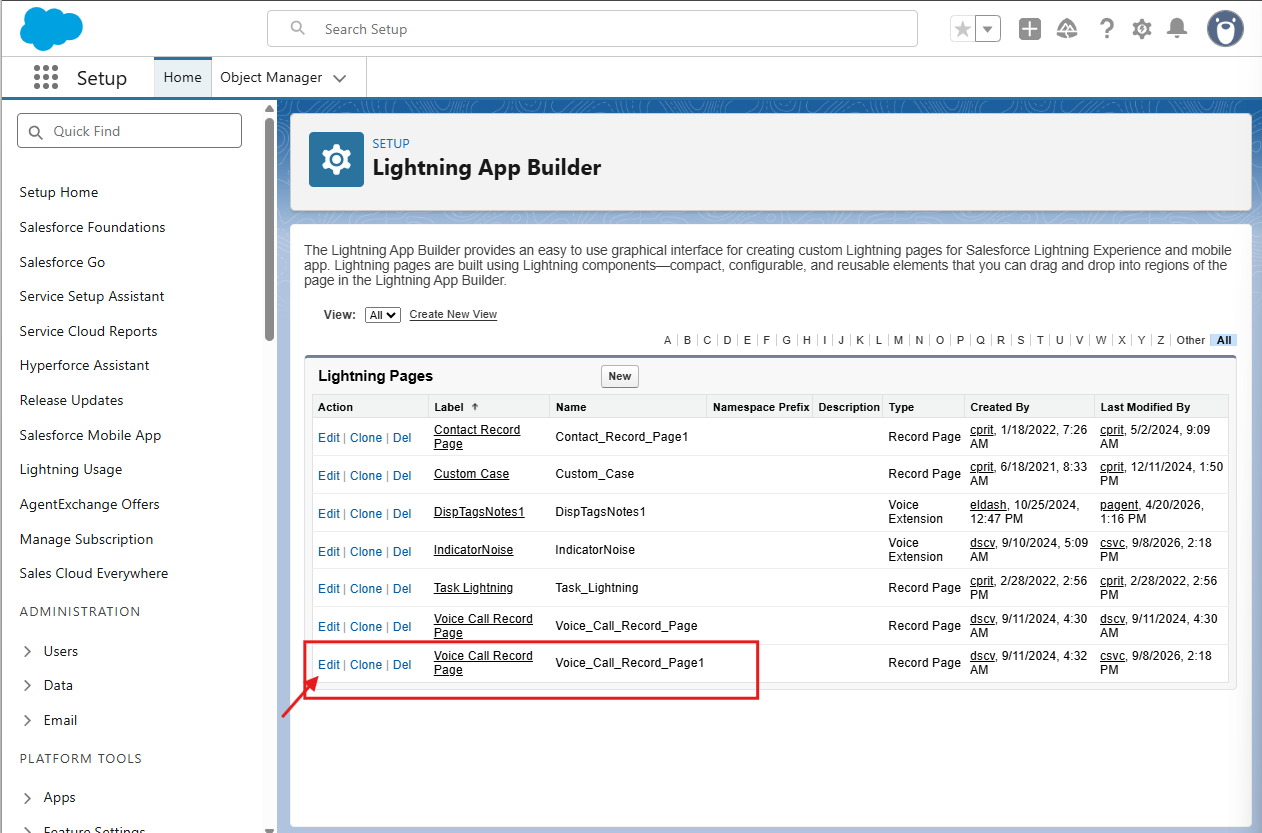
In Salesforce, navigate to Setup > Lightning App Builder.
-
Locate the existing Voice Extension that contains the disposition configuration.
-
Delete the Voice Extension.
Create a New Voice Extension
To enable data mapping and auxiliary controls for dispositions, notes, and tags in (formerly Agent for Service Cloud Voice), you must add the NICE Companion Application component to your Salesforce Voice Call Record Page.
-
In Salesforce, select Setup (Setup gear icon) in the upper-right corner.
-
In the Quick Find box, enter Lightning App Builder, and then select Lightning App Builder.
-
In the list of Lightning Pages, locate Voice_Call_Record_Page (or your custom Voice Call record page), and click Edit.
-
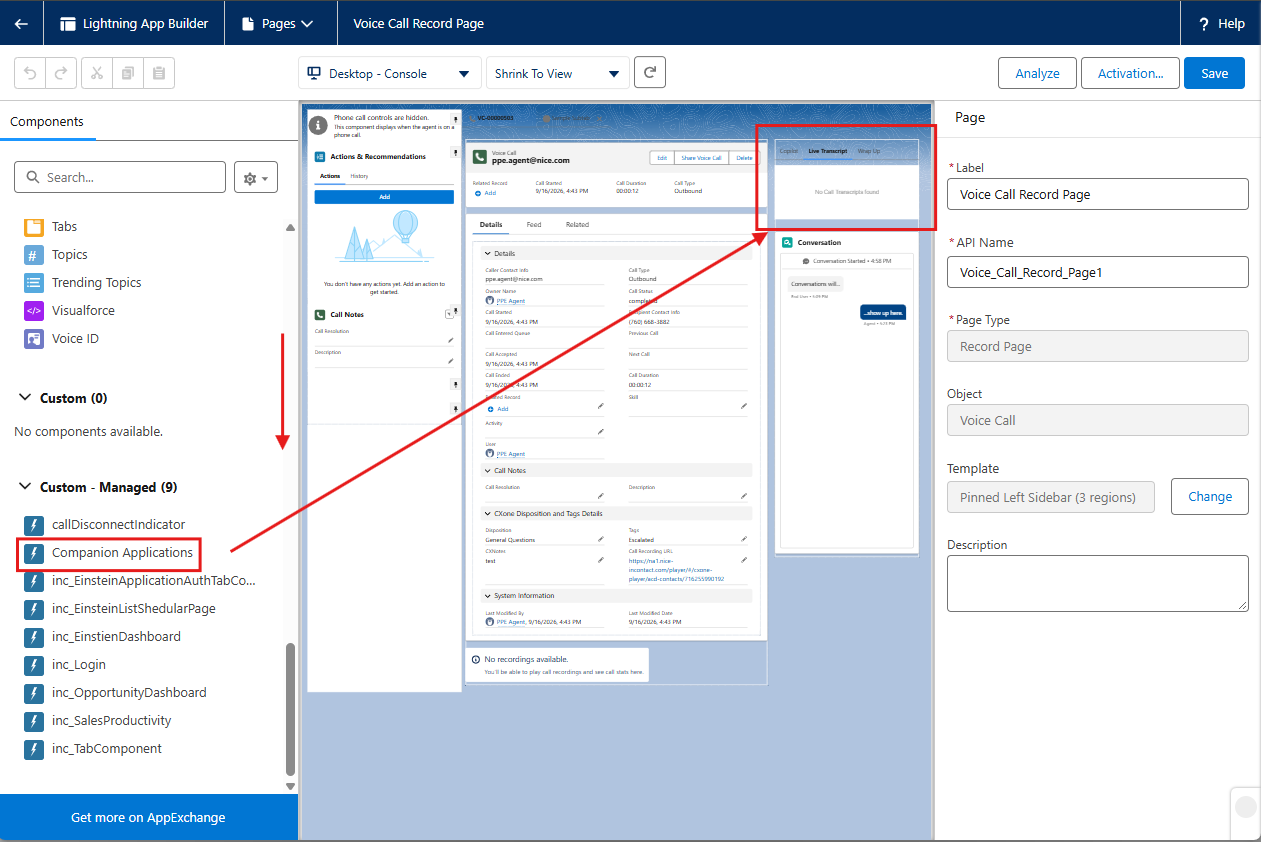
In the left pane, scroll to the Custom - Managed section of the component palette.
-
Locate the Companion Application component.
-
Drag and drop the Companion Application component to your desired location on the page canvas. Place the component in the upper-right region of the page layout for optimal agent visibility and interaction during active voice calls.
-
Click Save.
Associate the New Voice Extension with the NICE Contact Center
After you remove the old Voice Extension, associate the new Voice Extension with your NICE Contact Center configuration. This links the updated extension to your telephony environment.
-
In Salesforce, navigate to Setup > Partner Telephony Contact Centers.
-
Open the NICE Contact Center configuration.
-
Click Edit.
-
In the Voice Extension section, select the newly created Voice Extension from the dropdown list.
-
Click Save.
After you save, the Companion App uses the new Voice Extension. Agents see the disposition UI in the Wrap-Up section of the Companion App for all subsequent voice calls.