

You can handle calls in Unified Agent Workspace for ServiceNow if your administrator enables them. Calls assigned to you appear in your Inbox  .
.
Use Voice Controls
During calls, the voice control panel appears. It shows these call controls:
| Icon | Details |
|---|---|
Recording Options |
Click Recording Options > Start Recording to record the call. No notification appears, but a recording icon  appears next to the call timer. appears next to the call timer. |
Mute yourself |
Mute your microphone so that the contact The person interacting with an agent, IVR, or bot in your contact center. cannot hear you. The person interacting with an agent, IVR, or bot in your contact center. cannot hear you. |
Unmute yourself |
Unmute your microphone so that the contact can hear you. |
Hold |
Place the contact on hold. |
Resume |
Take the contact off hold. |
Mask |
Play white noise over the call recording. Use this to hide sensitive information. You cannot end a call while masking. |
Unmask |
Stop playing white noise over the call recording. |
Toggle keypad |
Open the keypad. Use this if you need to press a number while making an outbound call. To close the keypad, click Clear keypad  in the top right corner. in the top right corner. |
Toggle transfer menu |
Transfer the contact to a queue, another agent, or an external number. |
End call |
End the call. The contact's ServiceNow record is automatically updated to a Status of Closed Complete. |
Make Outbound Calls
-
Launch and log in to Unified Agent Workspace for ServiceNow.
-
In the NICE Unified Agent panel, click the skill selector. By default, the first skill is selected.
-
Enter part of a skill name to filter the list. The skills are listed in alphabetical order.
-
Select a skill.
-
Enter the phone number in the Enter a number field.
-
Click Call contact
 . When the contact The person interacting with an agent, IVR, or bot in your contact center. answers, a ServiceNow Interaction record appears. If you close the record, click the phone icon
  in the top menu and select Open interaction to reopen it.
You can also click Call Number  in the phone field of a ServiceNow record to dial it.
Place an Outbound Call Using a Selected Skill
-
Launch and log in to Unified Agent Workspace for ServiceNow.
-
In the NICE Unified Agent panel, click the skill selector. By default, the first skill is selected.
-
Turn on Select option to use queue for all outbound calls to use the selected skill for all outbound calls.
-
Enter a phone number.
-
Click the phone number to place the call.
When Select option to use queue for all outbound calls is enabled, the call is initiated without clicking the Call button
.
Use the phone directory
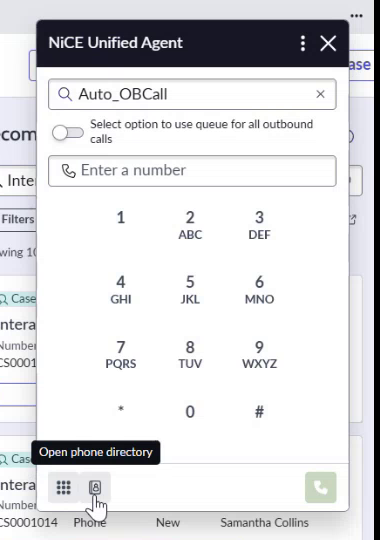
After you select an outbound skill, you can browse the phone directory and place the next outbound call. The selected skill stays in the skill box while you work in the NiCE Unified Agent panel.
-
In the NiCE Unified Agent panel, confirm that the skill you want is shown in the skill box.
-
At the bottom of the panel, click Open phone directory.
-
Click the External tab to view external contacts
Accept Inbound Calls
-
Launch and log in to Unified Agent Workspace for ServiceNow.
-
In the left menu, click Inbox
. -
Set your Status to Available.
-
When a call appears in your inbox, click Accept.
A ServiceNow Interaction record appears. If you close the record, click the phone icon
in the top menu and select Open interaction to reopen it.
Reject Inbound Calls
You must enter a reason to reject a call.
-
When a call appears in your inbox, click Reject.
-
In the pop-up, select the Reason you're rejecting the call.
-
Click Submit.
Consult and Transfer Calls
You can transfer calls in three ways:
-
Consult: Talk to the new party first, then transfer the call.
-
Warm transfer: Bring the contact
The person interacting with an agent, IVR, or bot in your contact center. and the new party into a conference to introduce them, then transfer the call. -
Blind transfer: Transfer the call right away without speaking to the new party.
-
During a call, click Toggle transfer menu
. -
Find the party you want to transfer the call to. You can:
-
Use the search bar at the top.
-
Click the Queues, Agents, or External tabs.
-
-
Choose how to transfer:
-
To consult, click Actions
 > Consult next to the party's name. Once you've talked to the new party, click Leave & transfer.
 -
To warm transfer, click Actions
> Consult next to the party's name. Click Merge calls to bring the contact and the new party into a conference. Then click Leave & transfer. -
To blind transfer, click Actions
> Blind next to the party's name.
-
Conference Calls
You can conference with other people, such as other agents, to resolve a contact's issue.
-
During a call, click Toggle transfer menu
. -
Find the party you want to add to create the conference. You can:
-
Use the search bar at the top.
-
Click the Queues, Agents, or External tabs.
-
-
Click Actions
> Consult next to the party's name. -
In the consult, click Merge calls.
-
You can add additional parties by clicking Toggle transfer menu
and repeating the steps above.
Use Copilot for Agents
If your administrator has enabled it for you, you can use Copilot for Agents, an AI-driven agent assist application. Copilot for Agents uses artificial intelligence to help you handle calls. You can ask it for information about how to resolve a contact's The person interacting with an agent, IVR, or bot in your contact center. issue. Click the Copilot tab under the active call's voice controls. Then enter a prompt in the search bar and press Enter on your keyboard.
View Real-Time Transcription
If your administrator has configured continuous stream transcription, agents can view a real-time transcript of voice conversations in Unified Agent Workspace for ServiceNow. The transcript displays both the agent's and the contact's utterances during a live call. Only final transcripts are displayed. To view the transcript during a call:
-
Click Show Transcript to display the transcript panel.
-
Scroll through the transcript to review previous lines.
-
Click Hide Transcript to close the transcript panel.
-
The agent must have the following:
-
The Voice Transcript ACD permission enabled in their role.
-
The organization must have the Continuous Stream Transcription license.
-
-
Transcripts for conference and transfer call scenarios are not supported.
-
If your administrator has enabled this for you, you can see real-time transcriptions of calls in Unified Agent Workspace for ServiceNow. Click the Call Transcript tab under the active call's voice controls. The name of the person speaking, what they said, and timestamps appear. You can scroll to see earlier or later parts of the transcription.
Assign Dispositions to Calls
If the Wrap up window appears when a call ends, you must assign the call a disposition Result assigned by the agent or system at the end of a voice (disposition) or digital (status) interaction.. Your status may automatically change to an after call work (ACW) State that allows an agent to complete work requirements after finishing an interaction. status while you do this. In ServiceNow, dispositions are called wrap up codes.
-
In the Wrap up window, select a Wrap up code from the drop-down.
-
You can enter Notes about the call.
-
Click Submit & close.