

The Desktop Discovery Client for Windows is available with a Desktop Discovery license. It gathers comprehensive information on user actions performed on an agent’s desktop, running in the background and automatically uploading data to the NiCE CXone data lake. You can install it on agents’ computers. Support for additional environments will be available in future versions.
You can watch a video that gives an overview of the installation of Desktop Discovery Client on an agent's computer. The video includes the download and installation steps.
You can install the Desktop Discovery Client on agents' computers or in a virtual desktop infrastructure (VDI) environment. Supported VDIs include:
-
Citrix Virtual Desktops (formerly XenDesktop) – Windows 11 and Windows Server 2022 multisession
-
Microsoft 365 (Office 365) – Windows 11
-
Amazon Workspaces – Windows 11
Client Installation Prerequisites
Microsoft Software and Component Requirements
-
Microsoft .NET Framework Version 4.8 must be installed. It is installed with Windows 10 and above. It is not installed by default on Windows Server 2016 and above and has to be installed separately.
-
To ensure compatibility with both 64-bit and 32-bit applications on a 64-bit computer, install both versions of the Microsoft Visual C++ Redistributable:
-
Download the 32-bit version (vc_redist.x86.exe)
32-bit applications (x86) running on a 64-bit system still require the 32-bit version of the redistributable because they rely on 32-bit libraries.
-
Download 64-bit version (vc_redist.x64.exe)
64-bit applications require the 64-bit version of the redistributable.
Many programs, especially older ones, are built as 32-bit and will need the 32-bit redistributables even on a 64-bit system. Installing both versions ensures compatibility with both types of applications.
-
-
Your anti-virus software must be up to date. With some outdated software, some files may be considered dangerous by the anti-virus software.
-
For additional requirements, refer to Platform Requirements and Connectivity Requirements Wizard (select the Desktop Discovery Client application).
-
Generate an access key for Desktop Discovery Client.
You can use the same access key for installing Desktop Discovery Client on all agents' computers in your tenant.
The access key inherits all permissions of the NiCE CXone user who generates it. If this user is an administrator, then anyone with the access key will have administrator privileges. So for security reasons, first create a NiCE CXone user and role for Desktop Discovery Client, and then generate the key with the Desktop Discovery Client user.
-
Create a role for the Desktop Discovery Client:
- Click the app selector
 and select Admin.
 -
Go to Security > Roles and Permissions.
-
Click New Role.
-
Give a name for the role, such as Desktop Discovery Client access key.
-
Remove all permissions for the role, except Access Key and My Access Key.
-
Click Save & Activate the profile.
- Click the app selector
-
Create an employee for the Desktop Discovery Client service:
- Click the app selector and select Admin.
-
Click Employees.
-
Click New Employee.
-
Give a name for the employee, such as DesktopDiscoveryClient.
-
From the Primary Role drop-down list, select the Desktop Discovery Client access key role you just created.
-
On the General tab, clear all the attributes.
-
Create the DesktopDiscoveryClient employee.
You can generate access keys only after you create the account.
- Click the app selector
-
Open the DesktopDiscoveryClient employee again and go to the Security tab. Click Add access key to generate an access key.
-
Copy both the Access Key ID and Secret Access Key and save them somewhere safe. If you don't copy the Secret Access Key or if you lose it, you'll need to create a new one. Use this access key ID and secret access key when installing Desktop Discovery Client on all agents' computers.
-
Activate the DesktopDiscoveryClient employee account by clicking the Activate Account button in the activation email.
-
-
Download the Desktop Discovery Client MSI:
-
Go to NiCE CXone, and log in as a user with the Can access support downloads permission.
-
Click your Username and select Support and Downloads.
-
Download the required MSI. Note where you download the MSI to, you'll need the file location later.
-
Security, User Accounts, and Permissions
Before installing, verify you have Administrator rights on the Desktop Discovery Client machine.
The OS Login value for each employee profile must be unique. The OS Login value cannot be used for multiple employee profiles, even if some of the duplicate employee profiles are inactive. If multiple employee profiles have the same OS Login value, Desktop Discovery Client will not run for any agent using that OS Login value.
Installing the Desktop Discovery Client
You can install Desktop Discovery using a deployment tool or install it manually on each agent's computer.
If you're using a deployment tool, do the following with Administrator privilege:
-
In the command line, navigate to where you downloaded the MSI and enter the installation command with the relevant parameters:
Use this procedure for a clean installation of the Desktop Discovery Client.
This procedure must be repeated on each Desktop Discovery Client machine.
Before you begin
If a previous version of Desktop Discovery Client is installed, it must be uninstalled before you can install a new version. Use Programs and Features or Add or Remove Programs in the Control Panel.

Verify that you have Administrator rights on the Desktop Discovery Client machine.
The installer doesn't allow multiple installations on the same Client machine.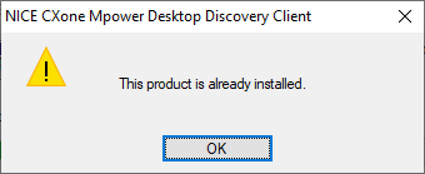
-
Go to the folder where you downloaded the MSI, and copy the path to the folder. This is typically the %UserProfile%\downloads folder.
-
Run the command prompt as Administrator:
-
In Windows, click the Windows button and type cmd.
-
Right-click the Command Prompt tile and click Run as administrator.
-
-
Type cd/ and press Enter.
-
Type cd and paste your file location, then press Enter.
For example, cd %UserProfile%\downloads.
-
Copy and paste the command into the Command Prompt, and edit the Unattended (Silent) Installation parameters.
Use this command:
msiexec /i CXDClientSetup.msi CXONE_HOSTNAME="<CXOne Server host name>" ACCESS_KEY="<CXone Server account access key>" SECRET_KEY="<CXone Server account secret key>" /l*v "C:\temp\install.log"
Example: Installation command:
msiexec /i CXDClientSetup.msi CXONE_HOSTNAME="https://cxone.niceincontact.com/" ACCESS_KEY="12345ABCDEF" SECRET_KEY="12345ABCDEF" /l*v install.log
Verify installation success from the log file. The install.log file is in the folder you installed the MSI from, this is typically the %UserProfile%\downloads folder.
Verify that the installer has admin privileges.
If the agent's computer doesn't have Microsoft .NET Framework 4.8, then install it.
Unattended (Silent) Installation
Parameters for the Unattended (Silent) Installation are detailed in the following table.
| Property | Mandatory | Values | Default Value | Description |
|---|---|---|---|---|
| CXONE_HOSTNAME | No |
https://cxone.niceincontact.com/ |
NiCE CXone Server host name. This is a global URL of the CXone environment. Production Global URLs Production: https://cxone.niceincontact.com/ Production-fedramp (Nvir): https://cxone-gov.niceincontact.com/ Production-fedramp-high (Oregon): https://nicecxone-fed.com/ |
|
| ACCESS_KEY | Yes | NiCE CXone Server account access key, derived from the deployed tenant. | ||
| SECRET_KEY | Yes | NiCE CXone Server account secret key, derived from the deployed tenant. | ||
| AUTO_UPDATE_ENABLE | No | true/false | true | Enable auto update. |
| RTA | No | true/false | false | Enable RTA (Real-Time Adherence) |
| IEX_HOSTNAME | No | URL to the IEX (WFM) on‑prem server for sending the RTA reports. | ||
| IEX_USERNAME | No | IEX (WFM) username. Used when calling the WFM API. | ||
| IEX_PASSWORD | No | IEX (WFM) password. Used when calling the WFM API. | ||
| INSTALLDIR | No | Directory path
(Example: D:\CustomPath) |
C:\NICE_Systems | Installation directory. |
Desktop Discovery Client installer prompts for any missing mandatory argument and stops the installation.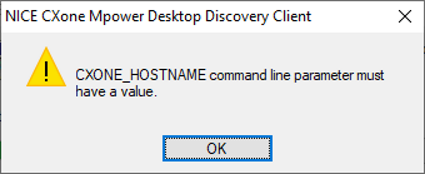
By default, the client is installed in the 'C:\NICE_Systems\CXDiscovery' directory.
The Desktop Discovery Client connects to the server with the agent's OS Login information.
The agent's OS Login is defined in the General tab of the Employee setup in the format Domain\Username.
Post Installation
The Desktop Discovery Client installation includes adding its launcher to Windows Startup. Once the installation is complete, the launcher will automatically start after the next client machine restart.
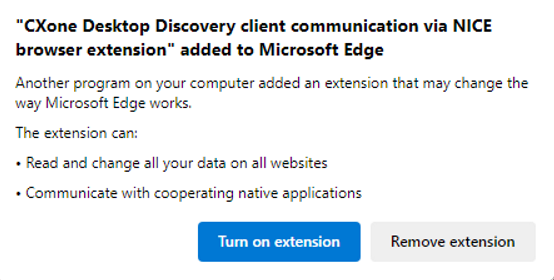
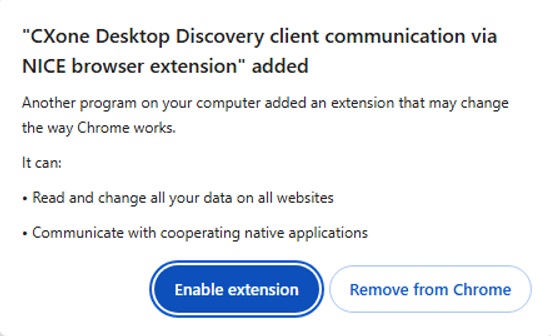
Additionally, the CXone Desktop Discovery client communication via NiCE browser extension is added to Edge and Chrome browsers during the installation. Enable this extension in both browser applications after installing the Desktop Discovery Client.
Microsoft Edge
Google Chrome
Troubleshooting the WEB Extensions
If you don't see the Desktop Discovery browser extension in your installed extensions, install them directly from the following links: