

The Export API enables you to download data from the Observability Dashboard as a CSV file. It supports the same export options available in the dashboard, including filters for date range, team, skill, and other variables, allowing you to export exactly the data you need. This API is intended for users who want to automate or customize their data export workflows.
For the latest endpoint paths, request body details, supported filters, and response codes, see the DEVone UserHub API – Table Export.
Register an Application and Generate Client Credentials
Use this procedure to register a new application and generate a Client ID and Client Secret for CXone. You submit a Microsoft Form and specify the required authentication settings as part of the registration request.
Prerequisites
Before you start, make sure you have the following:
-
An active Microsoft account to sign in to Microsoft Forms.
-
Your full name and email address.
-
The application name and a short description.
-
One or more technical contact email addresses.
-
Your preferred method to receive the password (Email or through your Technical Account Manager).
-
Tenancy details (single-tenant or multi-tenant).
-
The CXone environments your application will support.
-
The required authentication method (client_secret_post).
-
The application type: back-end (OAuth 2.0 is used with no user interaction).
Get your Client ID and Client Secret
-
Open the application registration form using the provided link and sign in with your Microsoft account.
-
In the field What is your email address?, enter your email address. This email will be used for communication related to your request.
-
In the field What is your name?, enter your full name. This identifies you as the requester.
-
In the field What is the name of your application?, enter a clear and unique application name.
-
In the field Describe your application, provide a brief description of the application and its purpose.
-
In the field Provide technical email addresses for this application, enter one or more technical contact email addresses.
-
Add one email address per line.
-
Registration details and notifications are sent to these contacts.
-
-
In the Method to receive password for application registration information, select how you want to receive the password:
-
Through your Technical Account Manager – Select this option if your email system blocks ZIP files.
-
Email – Two emails are provided: one with an encrypted ZIP file and another with the password.
-
-
In the field What is the tenancy of the application?, select one of the following:
-
Single Tenant: If the application authenticates users from a single tenant.
-
Multiple Tenants: If the application authenticates users from multiple tenants. Multi-tenant applications require additional review.
-
-
In the field What CXone environments will the application support?, select one or more environments from the list.
Only NiCE employees can select Other and request access to specific internal systems. Enter comma separated values from he following list only:
ic-pune-perf, dev, test, staging, perf, perf-wcx.
Any other values will cause the request to be blocked.
-
In the field Which authentication method will you use?, select client_secret_post. Credentials are included in the request body.
-
In the field What type of application are you registering?, select Back-end. OAuth 2.0 will be used with no user interaction.
-
Review all entries and click Submit to send the form.
-
After submission, an email containing the registration details is provided:
-
If you selected Email, two emails are provided: one with an encrypted ZIP file and another with the password.
-
If you selected Technical Account Manager, a completion notification is provided, and you must contact your Technical Account Manager to obtain the password.
-
-
Once your application registration is approved, the client ID and client secret are provided.
Store these credentials securely. You may not be able to view the client secret again.
-
Use the client ID and client secret in your application to authenticate using OAuth 2.0.
Parameter Description
|
Parameter |
Description |
|---|---|
| Client ID | A unique identifier for your application. This value is provided in the application registration email. |
| Client Secret | A secret used by your application to authenticate. This value is provided in the application registration email. Store it securely and do not share it. |
|
OAuth 2.0 |
An authorization framework that issues access tokens so applications can call APIs. |
| OpenID Connect | An identity layer on top of OAuth 2.0, primarily for user authentication and sign-in. |
| Tenancy | Indicates whether the application authenticates users from a single tenant or multiple tenants. |
| client_secret_post | An OAuth 2.0 client authentication method where the client credentials are sent in the request body. |
Retrieving the Access Token
After you obtain your Client ID and Client Secret, you can generate an access token using OAuth 2.0. This process also requires an Access Key and Access Secret from your CXone profile, which are used as the username and password.
Prerequisites
Ensure that you have the following:
-
A Client ID and Client Secret from your application registration.
-
An Access Key and Access Secret from your CXone profile (used as username and password when requesting the token).
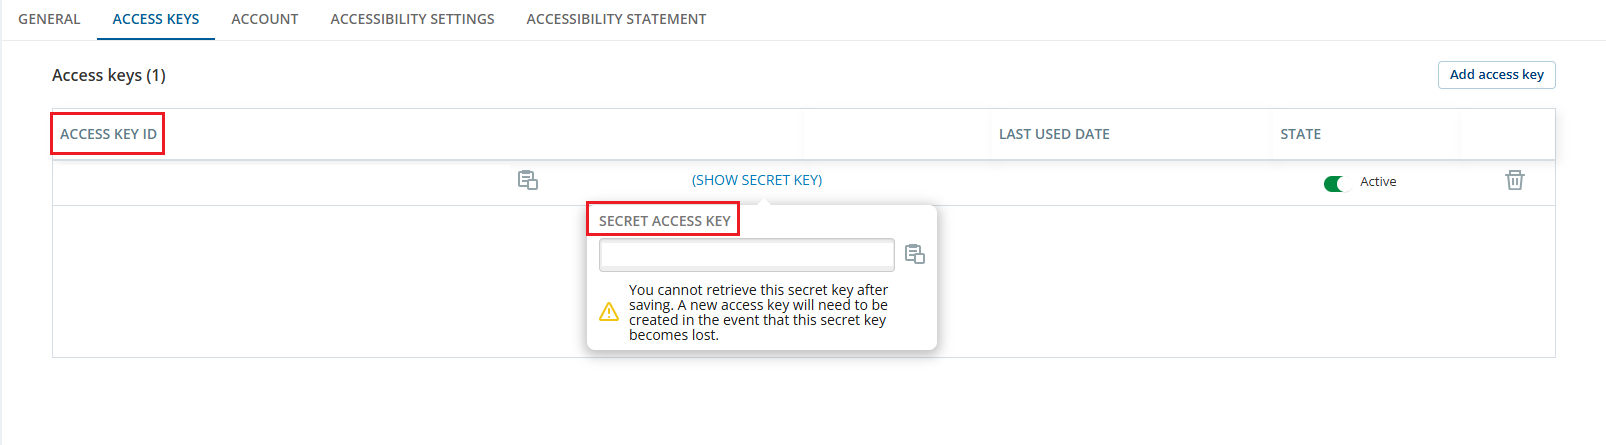
Find the Access Key and Access Secret
-
Login to the CXone application and click My Profile in the top-right corner.
-
Go to Access Keys.
-
Copy the Access Key (used as the username).
-
Copy the Access Secret (used as the password).
You can view the Access Secret only once. Store it securely.
-
Get the Access Token
-
Prepare a POST request to the token endpoint:
-
Endpoint: POST https://cxone.dev.niceincontact.com/auth/token
-
Content-Type: application/x-www-form-urlencoded
-
-
Include the following parameters in the request body:
-
client_id
-
client_secret
-
grant_type
-
username
-
password
-
-
Example request body:
{
"client_id": "s6BhdRkqt3",
"client_secret": "ikaudfUkdaWQ",
"grant_type": "password",
"username": "AJ26OWRCU6OR4MS2KQMV4GSDLCMDM5M7XN3XYXD7KXDFIFT6FFXA%3D%3D%3D%3D",
"password": "C5UJHWRFOPDPWV7ZJQAZQRS5NJFIQLC5VD2SK6GKD6PHKI7OC6ZQ%3D%3D%3D%3D"
}
-
Send the POST request to the token endpoint.
-
Review the response. A successful response returns a JSON object containing the access token:
Example response:
{
"access_token": "eyJhbGciOi...",
"token_type": "Bearer",
"expires_in": 360 "expires_in": 3600
}
-
Store the access token securely and include it in the Authorization header when making API calls: Authorization: Bearer {access_token}
Parameter Description
|
Parameter |
Description |
|---|---|
| Access Key | Your CXone username for API authentication. |
| Access Secret | Your CXone password for API authentication (visible only once). |
|
Access Token |
A temporary token used to authenticate API requests. |
Exporting Data
After you obtain a valid access token, you can export data from the API.
Endpoint
POST https://api-{region}.niceincontact.com/observabilitydashboard/v2/tables/{parameter}/export-data
-
Replace {region} with your region (e.g., na1).
-
Replace {parameter} with the table you want to export.
Use this endpoint to request a data export from the Observability Dashboard. The API generates a CSV file based on the filters and parameters in your request.
The complete endpoint definitions, including request body schemas and example responses for each table, are maintained on the DEVone UserHub API – Table Export.
Parameter Description
|
Value for {parameter} |
What it exports | When to use it | Example Endpoint |
|---|---|---|---|
| Copilot/KBTable | Copilot Generated Suggestions data (knowledge based suggestions) | Use this value to analyze how often Copilot suggests knowledge entries, which suggestions are used most, and how effectively knowledge content supports agents and customers. | .../tables/Copilot/KBTable/export-data |
| Copilot/ASTable | Copilot Automated Summary (AutoSummary) data | Use this value for reporting or auditing Automated Summary (AutoSummary) usage, including adoption, volume, and summary performance across teams, skills, or profiles. | .../tables/Copilot/ASTable/export-data |
|
Copilot/AQTable |
Copilot Agent Q&A (Questions) data | Use this value to understand how agents use Copilot for Q&A, the types of questions they ask, and where training or knowledge content improvements may be needed. | .../tables/Copilot/AQTable/export-data |
| AutopilotKnowledge/GRTable | Autopilot Knowledge GR table data from the Observability Dashboard. | Use this value to export a complete and detailed view of Autopilot Knowledge GR data as it appears in the Observability Dashboard, when your environment exposes the AutopilotKnowledge namespace. | .../tables/AutopilotKnowledge/GRTable/export-data |
| autopilot/GRTable | Autopilot Knowledge GR data (same dataset as above) | Use this value when your environment or sample configuration references the autopilot/GRTable path. If you are unsure which GR table name to use, check your Observability Dashboard integration examples or environment documentation. | .../tables/autopilot/GRTable/export-data |
Request Headers
|
Header |
Value | Required | Description |
|---|---|---|---|
| Authorization | Bearer {your_user_token} | Yes | Use your access token to authenticate API requests. |
| Content-Type | application/json | Yes | Specifies that the request body is in JSON format. |
Request Body
The request body depends on the table you are exporting. Some exports support more filters than others. For example, some Copilot exports support filters such as team, skill, profile, agent, and channel, while some Autopilot Knowledge exports require only a date range and time zone.
For the exact request structure and examples for each table, see the DEVone UserHub API – Table Export.
Example Request
import requests
url = "https://api-na1.niceincontact.com/observabilitydashboard/v2/tables/Copilot/KBTable/export-data"
headers = {
"Authorization": "Bearer your_user_token",
"Content-Type": "application/json"
}
data = {
"dateRange": {
"startDate": "2024-01-01T00:00:00.000Z",
"endDate": "2024-12-31T23:59:59.999Z"
},
"timeZone": "UTC",
"channels": ["digital", "voice"],
"filters": {
"Team": ["Support Team A"],
"Skill": ["Technical Support"],
"CopilotProfileId": ["profile-abc123"],
"AgentNumber": ["12345"]
}
}
response = requests.post(url, headers=headers, json=data)
print(response.json())
Parameter Description
|
Field |
Type | Required | Example | Description |
|---|---|---|---|---|
| dateRange | object | Yes | 2024-01-01T00:00:00.000Z | Specifies the time period for the export. This object must include both startDate and endDate in format (YYYY-MM-DDTHH:MM:SSZ). The export returns only records within this range. |
| timeZone | string | Yes | "UTC" | Specifies the time zone used to interpret date and time values in the export. Use standard time zone identifiers such as UTC or America/New_York. |
|
channels |
array | Optional | "digital", "voice" | Lists the communication channels to include in the export. Examples include digital for chat or messaging interactions, and voice includes phone calls. If omitted, all available channels are included. |
| filters | object | Optional | Export for a single team, a specific skill, or a group of agents. | Defines additional filtering criteria for the export. You can filter by team name, skill name, profile ID, or agent ID. Each filter should be provided as a key-value pair, where the key is the filter type and the value is an array of matching values. |
Poll for Export Status
After you submit an export request, the response includes a Location header. This header provides the polling endpoint for checking the status of the export.
Endpoint
GET https://api-{region}.niceincontact.com/observabilitydashboard/v2/tables/export-data/{exportId}/status?fileName=yourfilename
-
Replace {region} with your CXone region (for example, na1).
-
Replace {exportId} with the ID from the Location header.
-
Add ?fileName=yourfilename (the .csv extension is added automatically).
When the export is complete, the response includes a download URL.
Download the File
After the export is complete, use the provided download URL to download the CSV file.
Error Codes and Troubleshooting
|
Error Code |
Message | Cause/Resolution |
|---|---|---|
| 400 | Export date range cannot be more than 4 months ago without authorization | This error occurs when the startDate and endDate in your export request cover a period that begins more than four months in the past. |
| 400 | Too many export requests. The limit is 3 exports per 24 hours for non-Observability Dashboard users | This error occurs when you exceed the allowed number of export requests within a 24-hour period. Non - Observability Dashboard (non-OD) users can only request up to three exports per day to prevent system overload. |
Additional HTTP status codes and error response schemas for table export endpoints are documented in the DEVone UserHub API – Table Export.