

SharePoint v2 Connector
The SharePoint v2 connector uses OAuth-based authentication to sync content from SharePoint into a knowledge base. This page describes how to configure it.
Setting up SharePoint is a single process completed in two parts. Your Azure Active Directory (Azure AD) or SharePoint administrator configures the app registration in Azure, and your NiCE CXone User Hub administrator configures the connector in Knowledge Hub. You can complete both parts, depending on how your organization is set up.
Complete each of these tasks in the order given.
How the SharePoint v2 Connector Works
Knowledge Hub handles OAuth token generation, storage, and renewal automatically. You do not need to run a script or copy and paste tokens at any point in this setup.
For each site you configure, the connector syncs three content types:
- Pages: ASPX and HTML files.
- Drive files: The document libraries you select when you configure sites and drives.
- Lists: Including list-item content.
Knowledge Hub includes pages and lists automatically for the whole site. You select which document libraries to include. After the knowledge base is created, the connector syncs once a day.
Prerequisites
Before you begin, make sure the people completing this setup hold the following roles:
|
Role |
Requirement |
|---|---|
| Azure AD administrator | The Global Administrator or Application Administrator role, so they can register apps and grant admin consent. |
| SharePoint administrator | Site Collection Administrator on the sites you want to sync. |
| NiCE CXone User Hub administrator | Access to the Knowledge Hub application in NiCE CXone. |
You also need the following:
- A modern web browser.
- Read access to the SharePoint sites and document libraries you want to sync, for the account you authenticate with.
Register the App in Azure
Your Azure AD or SharePoint administrator completes this task and the three tasks that follow it.
Register an application in the Azure portal. This generates the client ID and tenant ID that Knowledge Hub needs.
- Log in to the Azure portal at portal.azure.com
 .
. - Enter App registrations in the search bar and select it in the results.
- Click New registration.
- Enter a meaningful name for the application. For example, NiCE CXone KH - SharePoint Integration.
- Under Supported account types, select Accounts in this organizational directory only (Single tenant).
- Click Register.
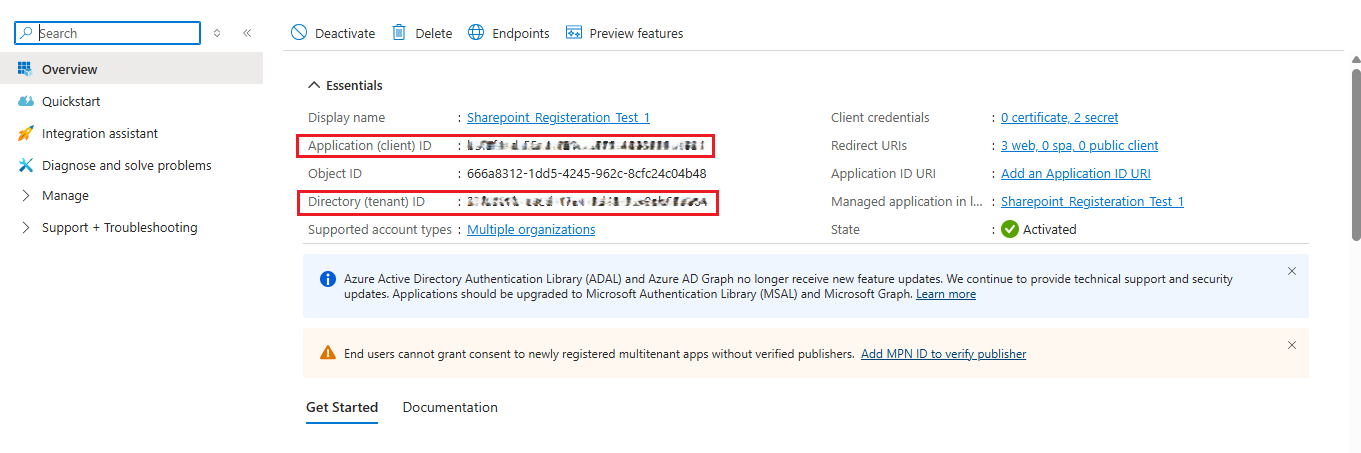
- On the Overview page, copy the following values and store them in a secure location. You need them when you configure Knowledge Hub.
Azure portal field
Knowledge Hub field Application (client) ID Client ID Directory (tenant) ID Tenant ID
 View image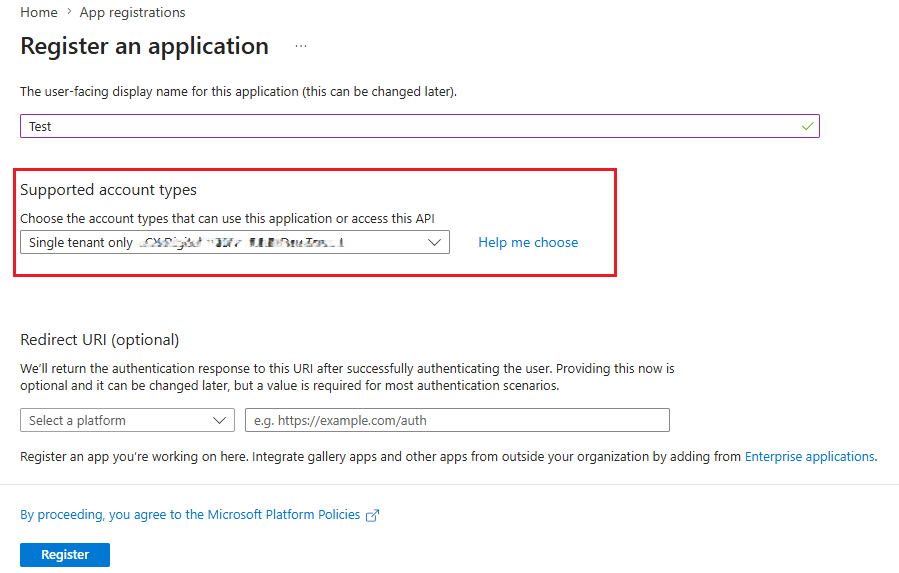
Generate a Client Secret
Add a client secret to the app registration you created. This is the third credential Knowledge Hub needs.
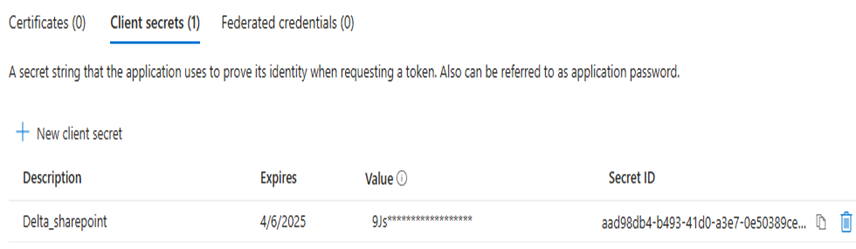
Copy the client secret value immediately after you create it. Azure hides the value permanently when you navigate away from the page. If you lose it, you must generate a new secret.
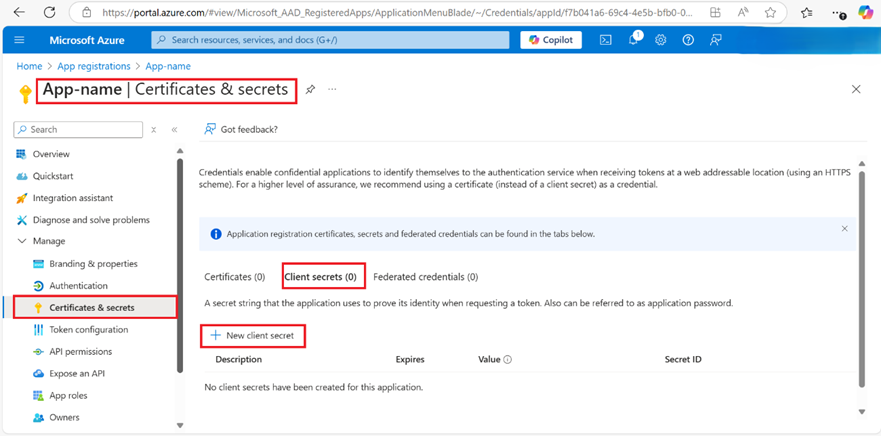
- In the app registration you created, click Certificates & secrets in the left menu.
- Click the Client secrets tab.
- Click New client secret.
- Enter a description for the client secret. For example, KH Integration Secret.
- In the Expires drop-down, select 24 months. NiCE recommends this value.
- Click Add.
- Copy the client secret Value and store it in a secure location. This is the Client Secret field in Knowledge Hub. You do not need the secret ID.
Set a calendar reminder to rotate the secret before it expires. When the secret expires, the Knowledge Hub connector stops syncing until you configure a new secret.
Configure the Redirect URI
Configure the redirect URI that matches the region your NiCE CXone system runs in.
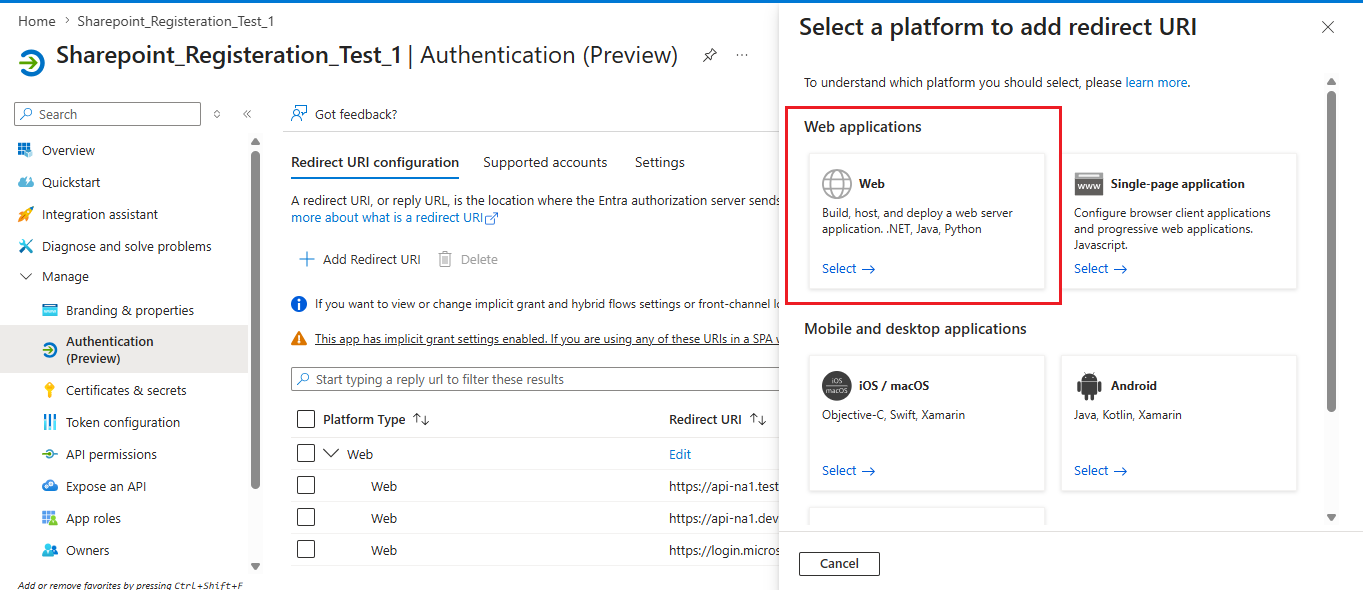
- In the app registration you created, click Authentication in the left menu.
- Under Redirect URI configuration tab, click Add Redirect URI.
- Under Web applications, select Web.
- Under Redirect URI, enter the URI for your region exactly as it appears here.
- Click Configure.
- Under Advanced settings, make sure Allow public client flows is set to No.
- Under Implicit grant, clear the Access tokens and ID tokens boxes.
|
Region |
Redirect URI |
|---|---|
| NA1 | https://api-na1.niceincontact.com/eai-kh-public-services/config/v1/knowledgehub/oauth/callback |
| NA2 | https://api-na2.niceincontact.com/eai-kh-public-services/config/v1/knowledgehub/oauth/callback |
| CA1 | https://api-ca1.niceincontact.com/eai-kh-public-services/config/v1/knowledgehub/oauth/callback |
| AU1 | https://api-au1.niceincontact.com/eai-kh-public-services/config/v1/knowledgehub/oauth/callback |
| AU2 | https://api-au2.nicecxone-sov1.au/eai-kh-public-services/config/v1/knowledgehub/oauth/callback |
| DE and EU1 | https://api-eu1.niceincontact.com/eai-kh-public-services/config/v1/knowledgehub/oauth/callback |
| UK1 | https://api-uk1.niceincontact.com/eai-kh-public-services/config/v1/knowledgehub/oauth/callback |
| UK2 | hhttps://api-uk2.nicecxone-sov1.uk/eai-kh-public-services/config/v1/knowledgehub/oauth/callback |
| JP1 | https://api-jp1.niceincontact.com/eai-kh-public-services/config/v1/knowledgehub/oauth/callback |
Set API Permissions
There are two paths for API permissions. You add them in the same place in Azure, but each path adds a different delegated permission, and that permission decides how much of SharePoint the app can reach. Choose the path that matches how you want to scope site access, then complete Add Application-Level Site Listing Permission.
|
Field name |
Path A: Standard access | Path B: Restricted access |
|---|---|---|
| Delegated permission you add | Sites.ReadWrite.All and offline_access | Sites.Selected and offline_access |
| What the app can reach | Every site the signed-in user can reach. | Only the sites you select in Knowledge Hub. |
| How access is limited | By the signed-in user's own SharePoint permissions. | Knowledge Hub grants the app read-only access to each site you select, one site at a time. |
| Account you authenticate with | Any account with read access to the sites you want to sync. | A Global Administrator or SharePoint Administrator account. |
| Choose this when | You want the simplest setup. | You need the app scoped to named sites only. |
Path A: Standard Access
Use this path for a simpler setup that gives the app broader access to your SharePoint sites.
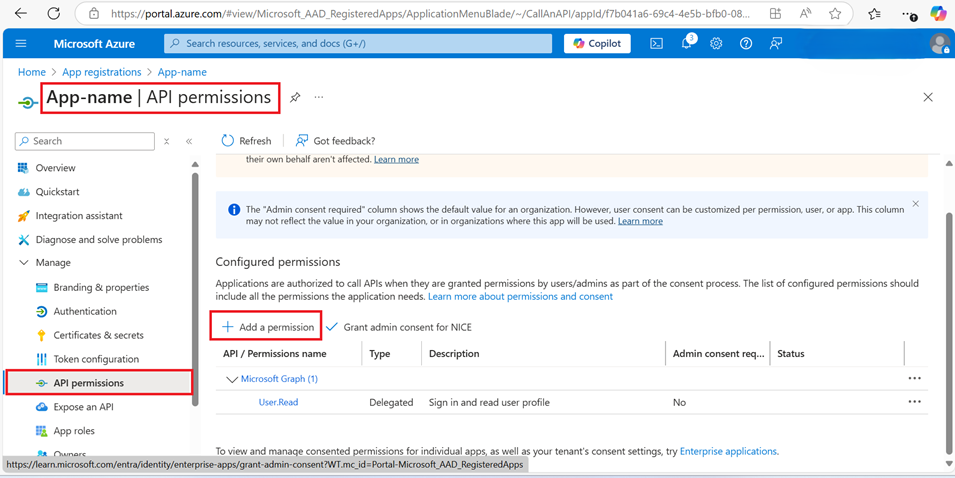
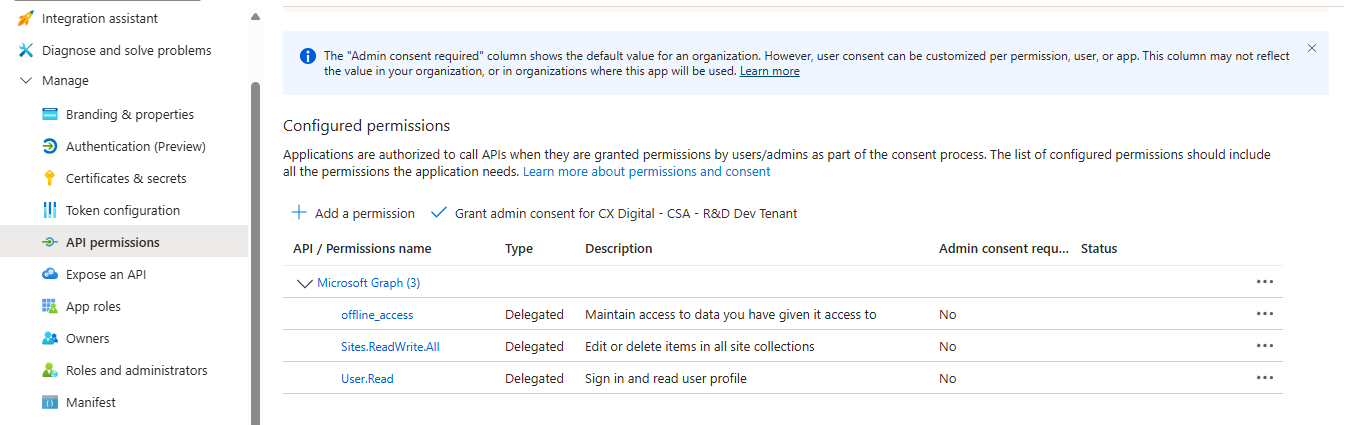
- In the app registration you created, click API permissions > Add a permission > Microsoft Graph > Delegated permissions.
- Add Sites.ReadWrite.All and offline_access.
- Click Add permissions, then click Grant admin consent for [tenant].
- Continue to Add Application-Level Site Listing Permission.
Path B: Restricted Access
Use this path to limit the app to specific sites. Sites.Selected gives the app no site access at all on its own. Knowledge Hub adds the access, one site at a time, when you configure sites and drives.
Before you start this path, make sure the person who authenticates in Knowledge Hub is a Global Administrator or SharePoint Administrator. Knowledge Hub needs that level of access to grant the app permission to each site. A Site Collection Administrator is not enough, and the app ends up with access to nothing.
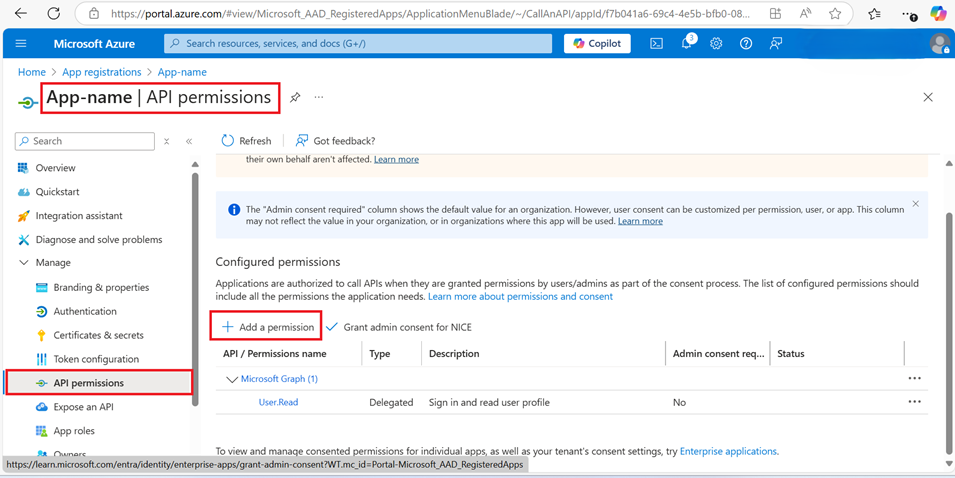
- In the app registration you created, click API permissions > Add a permission > Microsoft Graph > Delegated permissions.
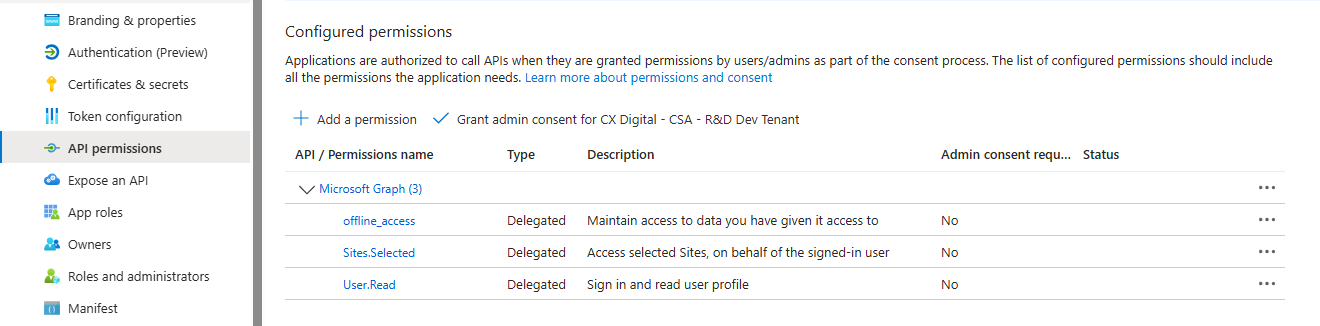
- Add Sites.Selected and offline_access.
- Click Add permissions, then click Grant admin consent for [tenant].
- Wait for the new site permissions to propagate across the Microsoft directory before you continue.
- Continue to Add Application-Level Site Listing Permission.
Add Application-Level Site Listing Permission
Knowledge Hub uses this permission to list all your SharePoint sites reliably when you configure sites and drives. Without it, site listing falls back to a search index method that might not show newly created sites right away. If a site you just created does not appear in the drop-down, this permission is the fix.
- In the app registration you created, click API permissions > Add a permission.
- On the Microsoft APIs tab, select Microsoft Graph.
- Select Application permissions.
- Search for Sites.Read.All, select the box next to it, and click Add permissions.
- Click Grant admin consent for [tenant].
- Confirm that the Status column shows Granted for [tenant] for each permission.

Create the Knowledge Base
Your NiCE CXone User Hub administrator completes this task and the three tasks that follow it, using the client ID, tenant ID, and client secret gathered in Azure.
-
In NiCE CXone, click the app selector
 and select General > AI Studio > Knowledge Hub.
 - Select SharePoint from the Knowledge Source drop-down.
- Enter your SharePoint parameters in the corresponding fields.
-
In Sync Frequency, confirm the default value of Every Day. This field cannot be edited.
- Click Save.
Authenticate with SharePoint
You cannot change the configurations after authentication completes. You can edit them only if source creation or the sync has failed. To correct a mistake at any other time, you must delete the configuration and create it again.
Configure the Source Configurations page. Then authenticate the connection.
- Click Authenticate at the bottom right of the page.
- In the Microsoft sign-in window that appears, select or enter the appropriate account:
- On the Permissions requested prompt, select the Consent on behalf of your organization box, then click Accept. Knowledge Hub exchanges the authorization code for tokens and stores them. You do not need to enter tokens manually.
- Wait for the Authentication Completed message to appear, then click Next.
Configure Sites and Drives
On the SharePoint Site Selection page, choose the sites and drives you want to sync to your knowledge base. There is no limit on the number of sites you can add.
Double-check your site and drive selections before you continue. To correct a mistake afterward, you must delete the configuration and create it again.
- From the Sites Name drop-down, select the sites you want to sync. Use the search box to find a site by name, or select All to include every site.
- From the Drives Name drop-down, select the drives you want to sync. Drives are grouped under the site they belong to.
- Review your selections in the Saved Configurations table. To remove an entry, click Remove in that row.
- Click Save.
If you used Path B, Knowledge Hub calls the Microsoft Graph permissions API for every site you add here and grants the app read-only access to that site. Knowledge Hub never grants write access, and you do not need to use Graph Explorer, no matter how many sites you add, as long as you authenticated with an administrator account.
Review and Ingest
- Review the configuration summary. It shows your knowledge base settings and the SharePoint client ID, tenant ID, site URL, site names, drives, and sync frequency.
- Click Create and Ingest. A message confirms that knowledge base creation started, and the knowledge base appears in the Knowledge Hub list.
- After the creation job completes, click Sync in the row for the knowledge source.
Troubleshooting
Use the following table to resolve common SharePoint v2 connector problems.
|
Problem |
Possible cause | Solution |
|---|---|---|
| A site does not appear in the Sites Name drop-down | The Sites.Read.All application permission is missing, or the site was created very recently. | Add the Sites.Read.All permission in Azure AD and grant admin consent, then allow time for the new site to propagate. |
| Syncing stops unexpectedly | The client secret expired. | Generate a new client secret in Azure AD, then update the connector configuration with the new value. |
| The authentication window fails, or access is denied | The account you signed in with does not have enough permissions for the path you chose. | For Path A, use an account with read access to the sites you want to sync. For Path B, use a Global Administrator or SharePoint Administrator account. |
| No sites are accessible after authentication with Path B | Site permissions have not finished propagating, or you did not authenticate with an administrator account. | Confirm that you authenticated with a Global Administrator or SharePoint Administrator account, then wait for propagation before you configure sites. |
| You need to change a site or drive selection after authentication | The configuration locks after authentication completes, unless source creation or the sync has failed. | Delete the connector configuration and create it again, then select the correct sites and drives before you authenticate. |
For questions about Azure AD configuration, contact your Azure AD or SharePoint administrator. For issues with the NiCE configuration, contact your NiCE CXone Account Representative.